background image

- 3 -

INSTALLING THE HOUSING ASSEMBLY

FOR WALL MOUNT, RH7C

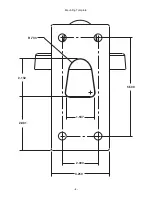
     A wall mount bracket comes standard with this unit, and a 

     template is included to use as a guide for mounting the bracket 

     to a wall.  Choose the desired location for installation and mark 

     the drill holes using the template.  Screw (2) bolts (not 

     provided) about 3/4 of the way into the (2) top holes.  Run 

     approximately 8" of wiring out of the wall.

NOTE:

Be sure the hardware and the mounting surface can sup-

                 port the weight of the wall mount bracket plus the weight

                 of the housing and drive unit. The load will be subjected 

                 to vibration from the camera motor and wind.

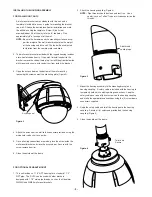
2.  The wall mount bracket provided with the rugged housing includes

     a location for conduit entry.  If you wish to install conduit to the 

     bracket remove the conduit hole plug.  Install fitting from below the 

     wall mount and secure with conduit nut from inside the bracket.

FOR OPTIONAL PENDANT MOUNT

1.  This unit includes a 1 1/2" NPT housing for a standard 1 1/2" 

     NPT pipe.  The RH7C can be used with other brackets

     designed with 1 1/2" male pipe threads, such as the Videolarm 

     WM20G and WM20 wall mount brackets.

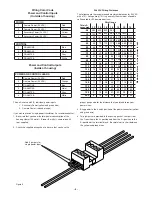
4.  Attach the wires from the wall to the connector provided, using the 

     wiring color code chart as a guide. 

5.  Once all wiring connections are made, place the wires inside the 

     wall mount bracket and close the access door.  Secure with the 

     screw removed earlier.

6.  Clean the outside of the dome. 

Figure 2

Access panel

3.  Open the access door on the bottom of the wall mount by 

     loosening the screw nearest the mounting plate (Figure 2).

Figure 3

Add thread 
sealing tape

Twist and 
Secure

1.  Mount the housing assembly to the mounting bracket and

     housing coupling.  A safety cable is included with the housing to

     temporarily hold it while making wiring connections.  Loop the 

     safety cable over one of the set screws on the housing coupling 

     and make the appropriate connections using the (2) screw-down 

     connectors supplied.

2.  Undo the safety cable and twist the housing onto the housing

     coupling.  Secure all (3) setscrews provided on the housing 

     coupling (Figure 4).

3.  Clean the outside of the dome.

2.  Attach the housing coupling (Figure 3).

NOTE:

  Pipe threads should be clean and rust free.   Use a 

                  sealer (such as Teflon™ tape or silicone sealer) on the 

                  threads.

Figure 4

Summary of Contents for RH7

Page 1: ... Series Installation and Operation Instructions for the following models Before attempting to connect or operate this product please read these instructions completely CERTIFIED 81 IN5300 02 02 2009 2009 Videolarm Inc All Rights Reserved ...

Page 2: ...ing screws with star washers f 2 1 4 x 20 x 3 8 HH Bolts g 2 1 4 Flat washers h 2 1 4 Split Lock washers i Instruction Manual TABLE OF CONTENTS Description 1 Electrical Specifications 1 Parts List 1 Installing Quick Release Bracket 1 Installing the Housing Assembly 1 Installing Optional Pendant Mount 2 Wiring Color Code Chart 2 Instructions for Quick Release Brackets 4 Exploded View 5 Exploded View...

Page 3: ...ned with 1 1 2 male pipe threads such as the Videolarm WM20G and WM20 wall mount brackets 4 Attach the wires from the wall to the connector provided using the wiring color code chart as a guide 5 Once all wiring connections are made place the wires inside the wall mount bracket and close the access door Secure with the screw removed earlier 6 Clean the outside of the dome Figure 2 Access panel 3 O...

Page 4: ... 1 Camera Power 24 VAC Red 2 Camera Power 24 VAC Orange 3 Accessory Power 24 VAC Yellow 4 Accessory Power 24 VAC Green CONTROL 1 RS 485RXB Blue 2 RS 485RXA Violet 3 RS 485TXA Gray 4 RS 485TXB White POWER AND CONTROL LEADS 1 Camera Power 24 VAC Red 2 Camera Power 24 VAC Orange 3 RS 485RXB Blue 4 RS 485RXA Violet 5 RS 485TXA Gray 6 RS 485TXB White The unit is setup with 2 individual power inputs 1 A...

Page 5: ...uires use of the adapter bracket supplied in the housing packet Attach 4 of the 1 2 standoffs to the main housing bracket Put the adapter bracket in place and secure it with 4 8 x 32 x 3 8 bolts and star washers Align the Ultra Dome quick release bracket as shown and secure in place with 2 10 x 32 x 3 8 bolts and star washers Wire as directed by the manufacturer A wiring color code is supplied on ...

Page 6: ... 19 1 4 Lock Washer 92 WSSL01 4 20 1 4 x 20 x 75 Hex Head Bolt 90 BTHH27 4 21 10 x 32 x 375 Bolt 90 BTRP20 4 22 WM10 Wall Mount Bracket 50 WM10G GRAY 1 22a WM10 1 Hole Plug 94 FSHP06 1 n s Housing Packet 40 PKRH7 1 28 27 26 25 24 23 22 21 20 19 18 17 EXPLODED VIEW OF HOUSING 1 22 21 20 19 18 17 16 15 14 13 12 11 10 8 7 6 5 2 17 1 4 x 20 FH SS Bolt 90 BTSR01 1 18 Housing Pendant Bracket 30 VL926 1 ...

Page 7: ... 7 1 9 2 3 5 4 6 8 7 10 14 16 15 7 12 11 SEE PACKET ASSEMBLY 13 RH7 RH7N Exploded Diagram for Replacement Parts ...

Page 8: ...odel RH7NHB Connection PCB Network Models 7 RPFD060 Camera Bracket 8 RPFD040 Upper Bracket Assembly 9 RPRH709 Housing Top Gray RPRH710 Housing Top White 10 WM10 WM10 Wall Mount 11 RPNET01 Network Camera Brackets 12 RPNET02 Network Housing Power Board 13 RPRH713 RH7 Fixed Bracket 14 SD0180 Pendant Housing Coupling 15 SD0170 Quick Release Pipe Coupling 16 SD0160 Pendant Mount Kit Items Not Shown RPR...

Page 9: ... 9 2 000 3 250 R 733 2 132 2 981 1 537 5 500 Mounting Template ...

Page 10: ...l of the following terms and conditions 1 NOTIFICATION OF CLAIMS WARRANTY SERVICE If Purchaser believes that the Product is defective in material or workmanship then written notice with an explanation of the claim shall be given promptly by Purchaser to Videolarm but all claims for warranty service must be made within the warranty period If after investigation Videolarm determines that the reporte...

Page 11: ...n Form at www videolarm com productregistration jsp or complete and mail in the bottom portion of this flyer Register your recent Videolarm purchases and benefit from the following Simple and Trouble Free RMA process Added into customer database to receive product updates news Eliminate the need to archive original purchase documents Receipts Purchase Orders etc Main Contact Info First Name Last Nam...

Reviews: