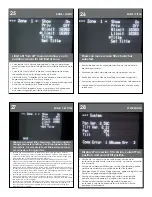
To set a manually controlled pattern by
joystick set Preset 80 (80,#, ).
• Para fijar un patrón manualmente controlado por el sistema
de la palanca de mando preestablezca 80 (80, #, ).
• Pour placer un modèle manuellement commandé par
l'ensemble de manche préréglez 80 (80, #, ).
• Um ein manuell gesteuertes Muster durch Steuerknüppelsatz
einzustellen stellen Sie 80 ein (80, #, ).
• Para ajustar um teste padrão manualmente controlado
pelo jogo do manche pré-ajuste 80 (80, #, ).
• Per determinare un modello manualmente controllato
dall'insieme della barra di comando prestabilisca 80 (80, #,
).
1
2
3
4
5
6
7
8
9
0
*
#
1, 2, 3...
F
Using the joystick move Pan/Tilt to desired
positions where you can record up to 128
seconds of movement.
• Con la palanca de mando mueva Pan/Tilt a las posiciones deseadas
donde usted puede registrar hasta 128 segundos de movimiento.
• En utilisant le manche déplacez Pan/Tilt aux positions désirées où vous
pouvez enregistrer jusqu'à 128 secondes de mouvement.
• Mit dem Steuerknüppel verschieben Sie Pan/Tilt auf gewünschte
Positionen, in denen Sie bis 128 Sekunden Bewegung notieren können.
• Usando o manche mova Pan/Tilt para as posições desejadas onde
você pode gravar até 128 segundos do movimento.
• Per mezzo della barra di comando sposti Pan/Tilt verso le posizioni
volute dove potete registrare fino a 128 secondi di movimento.
Press Preset 81 to stop recording (81,#, ).
Preset 80, to start pattern.
• Presione preestablecen 81 para parar el registrar (81, #, ).
Preestablezca 80, para comenzar el patrón.
• Serrez prérèglent 81 pour cesser d'enregistrer (81, #, ).
Préréglez 80, pour commencer le modèle.
• Betätigen Sie sich einstellen 81, um zu notieren zu stoppen
(81, #, ). Stellen Sie 80 ein, um Muster zu beginnen.
• Pressione pré-ajustam 81 para parar de gravar (81, #, ).
Pré-ajuste 80, para começar o teste padrão.
• Premi prestabiliscono 81 per smettere di registrare (81, #, ).
Prestabilisca 80, per iniziare il modello.
1
2
3
4
5
6
7
8
9
0
*
#
1, 2, 3...
F
Presets
OTHER FEATURES:
Home Preset
Preset 1 is the “home preset”. If this preset has been defined,
then the VLTP385 will always go to this preset when the unit is
powered up.
Remote Address
The Address of the unit can be set by a remote command. This
“soft” address will be saved even if the unit loses power and will
override the dip switch set address. The “soft” address can be
cleared by a remote command and the address will be
determined by the dip switch setting.
Program Download
There are two software programs in the standard unit. Each
program can be updated via the command communication
channel with a laptop or other computer system.
Error
Messages
The “COMM ERROR” message will be displayed at the top of the
screen whenever the MR7CS-9™ detects frame errors in the
receive data, such as when the RXA and RXB wires are reversed
when using RS485/422 or when the baud rate is incorrect.
The CAMERA ERROR” message will be displayed at the top of
the screen whenever there is an error in communication with the
camera.
33
34
36
35


