Page 88
Voyager User’s Manual - Appendices
Page 89
Voyager User’s Manual - Appendices
The last auxiliary component is the Low Frequency Oscillator, also known as the LFO. The LFO operates like
the main oscillators in almost all respects, but generally at a much lower frequency. LFO’s are typically used to
send modulation control signals to the main components. For example,
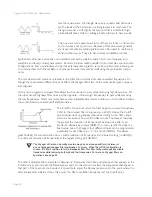
if you route a 6Hz LFO signal to an oscillator, it will produce vibrato by
varying the pitch of the oscillator. If you send that same LFO signal to
the amplifier, and you’ll get tremolo. LFO’s create cyclical variations in the
sound, making the sound more dynamic and interesting.
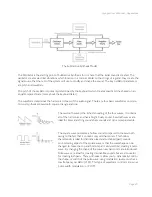
So there you have it - the six basic components that make up a synthesizer based on the subtractive
synthesis model. Keep in mind that most ‘subtractive’ synthesizers often include more than one of each
component. This is especially true of the oscillators and envelope generators, but may also be true of filters,
amplifiers and LFO’s. For example, the Moog Voyager has three oscillators, two filters, two amplifiers, an
LFO, two extensive modulation sections, and the Voyager’s third oscillator can act as an additional LFO. As
you would expect, synthesizers that offer more than one of each component provide a broader palette for
sound creation then those that don’t, and generally result in sounds with a greater complexity, variation, and
depth. Add some solid programming and playing technique, and incredibly expressive musical sounds can be
achieved.
So what is the best way to program synthesizers effectively? The answer to that question could fill a book’s
worth of explanations and examples. Fortunately, a number of excellent books have been written on the
subject in recent years. Two such recommendations, readily available, are:
“Power Tools for Synthesizer Programming” by Jim Aiken, available from Backbeat Books
“Analog Synthesis” by Reinhard Smitz, available from Wizoo Publications
You can also learn a lot from examining the factory presets in detail. The Voyager’s presets were crafted by
some of the best sound designers in music today, and you can learn their secrets simply by exploring the
individual parameters that makeup the sound. Just dial up a few presets and dig in!
As with all musical instruments, practice, exploration and experimentation are an important part of achiev-
ing great results. Spend a little time getting to know your new instrument - your efforts will be rewarded!
You can view the parameter values of any preset by setting the Parameter Display menu
(PANEL function 1.2) to “Yes” or “3sec”. With either of these settings selected, when you adjust
any knob or switch the stored and current values will be displayed. With this information you
could then reconstruct the preset by adjusting every knob and switch to the stored value. This is
a great way to learn how a sound works, and ‘see’ a preset.
For more information, see the “Parameter Display” menu description, page 44.

