43 |
Oscillator Tuning Procedure
Oscillator Tuning Procedure
From time to time the analog circuitry in your Minimoog Model D may require tuning to ensure
peak performance. This tuning procedure should only be performed by a qualified technician.
Please follow the procedure carefully and complete each step before advancing to the next step.
WARNING:
Before tuning your Minimoog Model D, you
MUST
first perform the Global Reset procedure.
To perform the Global Reset, which returns Minimoog Model D back to the factory settings, hold the lowest
four white keys —
F0
,
G0
,
A0
,
B0
—while turning on power.
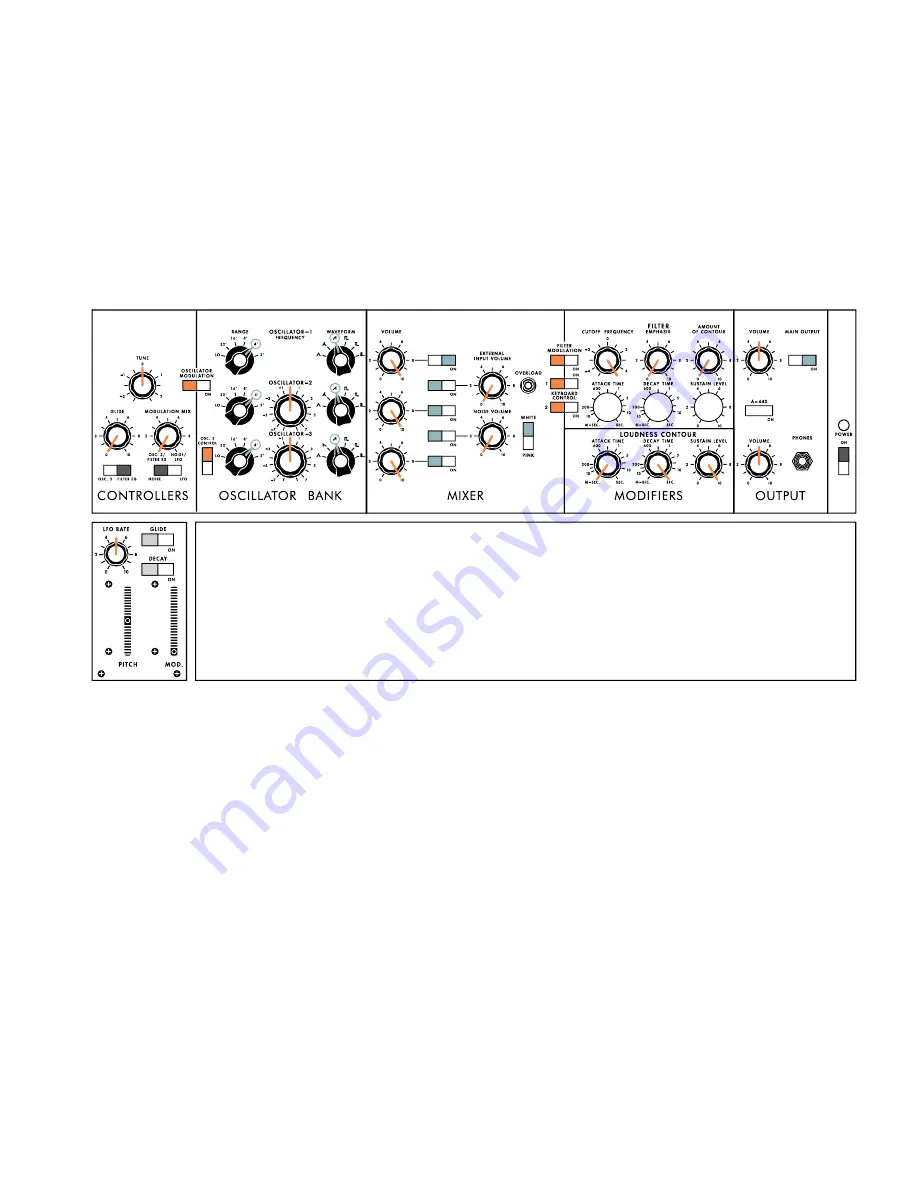
To begin the tuning procedure, match your instrument setting to those shown in the illustration.
Place the front panel controls in the
following positions:
TUNE:
Centered
GLIDE:
Fully CCW
MODULATION MIX:
Fully CCW
OSC 1 OCTAVE:
4’
OSC 1 WAVEFORM:
Sawtooth
OSC 2 OCTAVE:
4’
OSC 2 TUNE:
Centered
OSC 2 WAVEFORM
: Sawtooth
OSC 3 OCTAVE:
4’
OSC 3 TUNE:
Centered
OSC 3 WAVEFORM:
Sawtooth
OSC 1 VOLUME:
10
EXTERNAL SIGNAL VOLUME:
0
OSC 2 VOLUME:
10
NOISE VOLUME:
0
OSC 3 VOLUME:
10
Place the front panel switches in
the following positions:
OSC 3 CTRL:
ON (Up position)
OSC 1 VOLUME:
ON
EXTERNAL INPUT:
OFF
OSC 2 VOLUME:
OFF
NOISE VOLUME:
OFF
OSC 3 VOLUME:
OFF
Place the LHC controls in the
following positions:
PITCH WHEEL:
Centered
MODULATION WHEEL:
Down
GLIDE:
OFF
DECAY:
OFF
Notes:
Match these front panel settings before attempting the tuning procedure.
Summary of Contents for MINIMOOG MODEL D
Page 1: ......
Page 2: ......
Page 3: ......
Page 6: ...Minimoog Model D...
Page 8: ......
Page 9: ......
Page 14: ...Features Controls...
Page 22: ...22 Left Hand Keyboard Panel Left Hand Keyboard Panel...
Page 34: ...34 CHAPTER Top Patch Panel...
Page 38: ...38 CHAPTER Performance Tips Techniques...
Page 52: ...52 Signal Flow...
Page 53: ......
Page 54: ...54 CHAPTER Patch Sheets...
Page 74: ...74 Patch Sheets Notes Sound Level 3 Notes Sound The Haunting...
Page 78: ...78 Patch Sheets Notes Sound Notes Sound...


