background image

27

Rev. 1.0

4/29/2016

M2 Quick Setup Guide Manaul

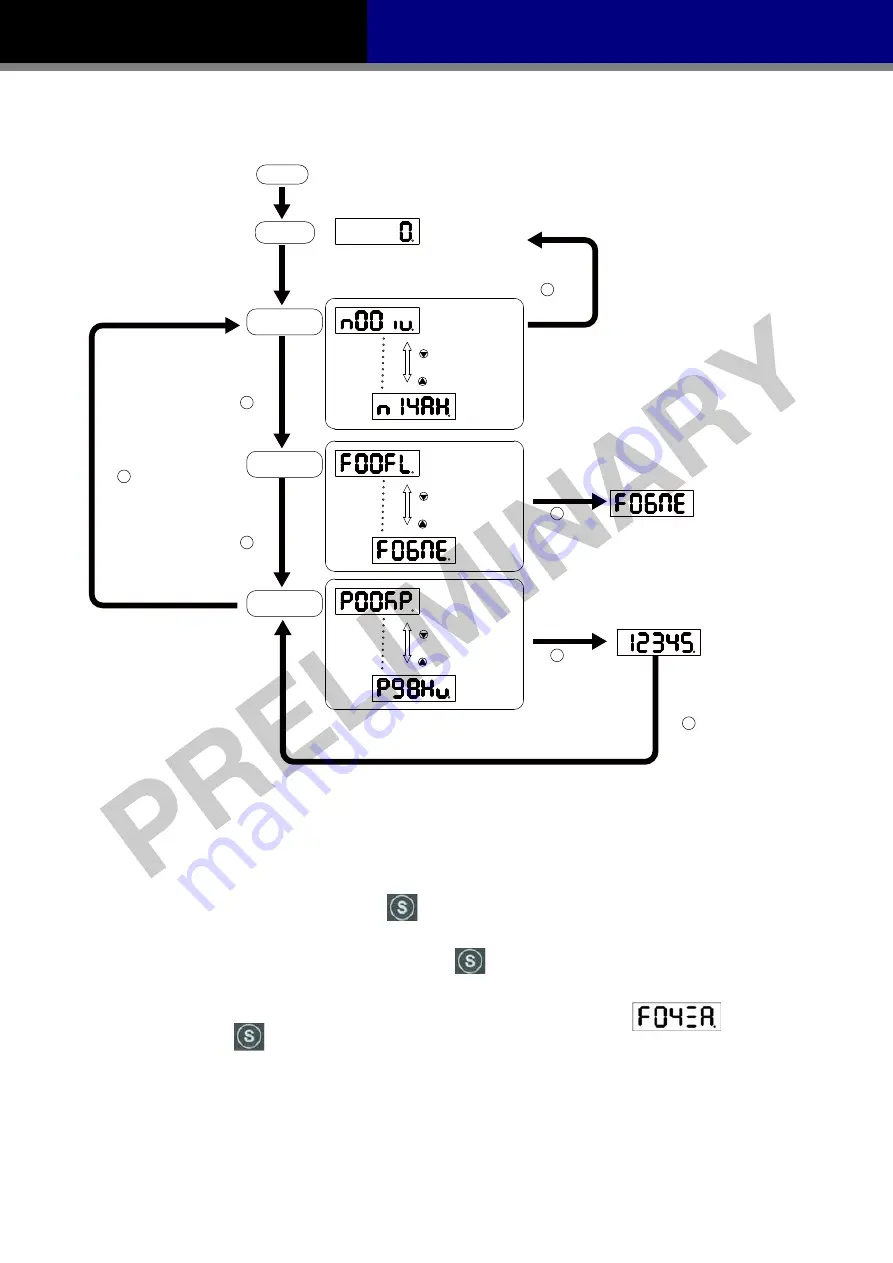
5.3 Key Operation Flowchart

Monitor Status

Power On

In factory default mode, it will display motor’s rotatory velocity.(*NOTE 1)

The last dot shows whether the drive is enable or disable.

Monitor Parameters

Press the UP and 

DOWN key to scroll 

through and change 

monitor status

S

Press SET key back

to Monitor Status

Press any key

Function Parameters

M

Press and hold the

MODE key for 1 second

Press the UP and 

DOWN key to scroll 

through and change

function selection

S

Press and hold SET key to 

confirm selection and execute it.

Drive Parameters 

Configuration

M

Press and hold the MODE

key for 1 second(*NOTE 4)

Press the UP and 

DOWN key to scroll 

through and change 

parameter selection.

S

Press SET key enter 

to value setting mode

Press and hold for 1 second  

the SET key to confirm setting value 

*Note(3)

S

M

Press and hold the 

MODE key for 1 second

Press SET key back to 

Drive Parameters Configuration 

mode without changing.

*NOTE(2)

*NOTE:

1) When power is applied, drive

s display will show customer de

ned monitoring mode. In factory 

default mode, it will display motor

s rotatory velocity. 

2) In parameter setting mode, press set 

 key will quit from parameter setting mode, and return 

back to parameter selection mode, and changes will not be saved. 
3) In parameter setting mode, press and hold set 

 button will con

rm and save current 

parameter setting. This will effect immediately, however, this change will not save to drive

s Flash. 

If parameter is required for permanent use, please go to function mode 

, and then 

press and hold set 

 button to save the parameter change. 

Summary of Contents for M2 Series

Page 1: ...Rev 1 0 9 21 2015 M2 Series AC Servo System Quick Setup Guide Manual SHANGHAI AMP MOONS AUTOMATION CO LTD ...
Page 2: ...mounting Don t switch the power supply repeatedly Don t touch the rotating shaft when the motor is running Don t strike the motor when mounting as the motor shaft or encoder may be damaged In order to prevent accidents the initial trial run for servo motor should be conducted under no load conditions separate the motor from its couplings and belts Starting the operation without matching the correc...

Page 3: ...necting to Peripheral Devices 9 3 1 1 System Configuration 9 3 1 2 Servo Drive Connectors and Terminals 10 3 1 3 Connections and Wiring Notes 10 3 2 Wiring Methods 11 3 2 1 Single Phase Power Supply Connection AC220V 11 3 2 2 Three Phase Power Supply Connection AC220V 11 3 2 3 Recommend Cable Specifications 12 3 3 Wiring to the Connector P2 12 3 3 1 Motor Power Cable Configuration 12 3 3 2 Motor P...

Page 4: ...f Encoder Connector CN3 21 3 8 4 Connect to Motor Encoder 21 3 8 5 Specifications of Encoder Connector 22 3 8 6 Wiring Diagram of Motor Encoder Extend Cable 22 4 Control Block Diagram 23 4 1 Position Mode 23 4 2 Speed Mode 24 4 3 Torque Mode 25 5 Display and Operation 26 5 1 Description of Operation Panel 26 5 2 Key Lock 26 5 3 Key Operation Flowchart 27 6 Preoperational mode 28 6 1 Inspection Bef...

Page 5: ...ption 7 6 PIN connector IEEE1394 Option 8 RJ 45 connectors For RS 485 or CANopen communication Port CN6 adn CN7 Option 9 5 PIN connectors For L1 L2 L3 L1C L2C 10 6 PIN connector For U V W B1 B2 B3 1 2 Servo Drive Model Introduction 1 2 1 Drive Name Plate Description Model No Input Output Voltage Phase Rated Current Frequency Rated Power 1 2 2 Drive Model Description M2DV 2 M2 Series AC Servo Drive...

Page 6: ...01AE4 KCD NNV09 SM0402AE4 KCD NNV09 SM0601AE4 KCD NNV09 SM0602AE4 KCD NNV09 SM0803AE4 KCD NNV09 With Brake SM0401AE4 KCD BNV09 SM0402AE4 KCD BNV09 SM0601AE4 KCD BNV09 SM0602AE4 KCD BNV09 SM0803AE4 KCD BNV09 Rated Speed RPM 3000 Maximum Speed RPM 6000 Rated Torque N m 0 19 0 32 0 64 1 27 2 4 Maximum Torque N m 0 48 0 93 1 9 3 8 6 9 Rated Current A 0 7 1 2 1 5 2 75 4 5 Maximum Current A 1 75 3 6 4 5...

Page 7: ...y should be under 45 The servo drive and motor will generate heat If they are installed in a control panel please ensure sufficient space around the units for heat dissipation Operation within a relative humidity rang of 5 to 85 and non condensing The vibration lower than 5 88m s2 10 60Hz Do not continuously use the drive for along time at resonance point Don t mount the servo drive and motor in a ...

Page 8: ...ace is given to the servo drive and a cooling fan is mounted in the control panel Please ensure grounding wires are securely connected Fan Fan 10mm 10mm 10mm 20mm 20mm 100mm 80mm 100mm 10mm 10mm 10mm 20mm 20mm 2 5 Motor Installation Don t strike the motor when mounting as the motor shaft or encoder may be damaged Don t use cables soaked in water or oil Avoid a stress application to the cable outle...

Page 9: ...lay The 5 digit 7 segment LED displays the diver status and faults Operation Panel Function keys are used to perform status display monitor and diagnostic function and parameter setting I O Interface Used to connect PLC motion card and other controllers Main Power Input Control Power Input Motor Power Cable Motor Feedback Cable Ground PE USB communication Port CN1 Regeneration Absorbing Resistor E...

Page 10: ...Nopen Communication 3 1 3 Connections and Wiring Notes Please ensure grounding wires are securely connected wires with more than 2 0mm2 on width is recommended Grounding method must be single point grounding Ensure L1 L2 L3 and L1C L2C are correctly wired and voltage supply are within the specification range Ensure U V W are following the order of RED YELLOW BULE Wrong connections will cause motor ...

Page 11: ...L2C P2 P1 CN3 Red Yellow Blue Yellow Green M2 Servo Drive Alarm Alm_R 24VDC Alm_R Encoder NF Encoder E_stop Ground B1 B2 B3 Use Internal regeneration resistor B1 B2 B3 Use external regeneration resistor 3 2 2 Three Phase Power Supply Connection AC220V MC L1 L2 R S E MCCB P_on P_off MC L1C L2C 24VDC Alm_R NF T L3 MC Alarm Alm_R E_stop M U V W P2 CN3 Encoder Encoder Ground M2 Servo Drive B1 B2 B3 Re...

Page 12: ...tions are as follows Matched Servo Drive and Motor Wire Diameter mm2 AWG L1 L2 L3 L1C L2C U V W B1 B3 M2DV 1D82 SM0401AE4 KCD NV 1 25 AWG16 1 25 AWG16 1 25 AWG16 2 0 AWG14 SM0402AE4 KCD NV 1 25 AWG16 1 25 AWG16 1 25 AWG16 2 0 AWG14 SM0601AE4 KCD NV 1 25 AWG16 1 25 AWG16 1 25 AWG16 2 0 AWG14 M2DV 3D02 SM0602AE4 KCD NV 2 0 AWG14 2 0 AWG14 2 0 AWG14 2 0 AWG14 M2DV 4D52 SM0803AE4 KCD NV 3 5 AWG12 3 5 ...

Page 13: ...n Housing Housing AMP 172167 1 AMP 172159 1 Crimp AMP 170360 1 AMP 170362 1 3 3 3 Wiring Diagram of Motor extend Cable Housing 172159 1 AMP Terminal 170362 1 AMP Drive Side P2 Signal Colour Motor Side Housing JST S06B F32SK GGXR AMP 172159 1 4 U Red 1 5 V Yellow 2 6 W Blue 3 Grounding Screw PE Yellow Green 4 NOTE Ensure U V W are following the order of RED YELLOW BULE Wrong connections will cause ...

Page 14: ...rake coil has no polarity During the brake release action there might be Ka Da sounds occurring this does not effect the use of brake Specification of brakes are as follows Motor Power Type 50W 100W 200W 400W 750W Holding Torque N m 0 35 2 4 5 Working Current A 0 25 0 38 0 61 Rated Voltage V 24V 10 Release Time 25ms Engage Time 25ms Release Voltage V Release Voltage18 5VDC 3 4 3 The timing charts o...

Page 15: ...3 6 Connect to Host Computer CN1 Port CN1 is used to connect drive with PC Use M servo suite software to set control mode change parameter values use auto tuning function and etc PIN Symbol Function 1 5V 5V Power Supply 2 D Data 3 D Data 4 Reserved 5 GND Ground 3 7 Input and Output Signal Interface Connector CN2 The CN2 port on M2 series AC servo drives is used from input output signals Details ar...

Page 16: ... Speed Pulse Input 44 PULSH1 45 PULSH2 46 SIGNH1 47 SIGNH2 37 Y1 36 Y1 11 Y2 10 Y2 40 Y5 41 Y5 14 Y6 13 Y6 42 Y3 43 Y4 OUT 16 15 18 17 DGND 10V User User_GND 20 25 FG 50 DGND ANA1 ANA2 STEP CW DIR CCW Enable Alarm Reset Limit Sensor Limit Sensor Gain Select Control mode Switch Dividing Switch SPD0 SPD1 SPD2 Position Command Analog Input Speed Command Torque Command Alarm Output Motor Brake Control...

Page 17: ... Signals M2 series AC servo drive have 12 programmable digital inputs as well as 2 analog inputs Each of the input can be specified with different function via parameter settings The functions are as follows Specified function signals i e Pulse DIR signal motor enable disable signals General purpose signal In velocity mode torque mode Q program mode or SCL mode ...

Page 18: ...ut is activated in position mode Speed Selecting Input 1 in change Speed mode General Input X11 X11 28 Speed Selecting Input 2 in change Speed mode General Input X12 X12 30 Speed Selecting Input 3 in change Speed mode General Input COM COM 7 X9 X12 COM point High speed pulse inputs PULSH1 44 High speed pulse inputs 5VDC line drive input The max input frequency is 2MHz Three different pulse command...

Page 19: ... signal when in position and the position error less than set value in position mode Tach out output Tach output produces pulses relative to the motor position with configurable resolution General Output Y6 13 Encoder pulse feedback Output AOUT 21 The encoder feedback phase A line drive output AOUT 22 BOUT 48 The encoder feedback phase B line drive output BOUT 49 ZOUT 23 The encoder feedback phase ...

Page 20: ...r signal Z please use high speed optocoupler circuitry for the host receiver CZ DGND 0VDC 24VDC Servo Drive 19 15 3 8 Encoder Connector CN3 3 8 1 Motor Encoder Feedback Cable Configuration 驱动器CN3端 P2 C N 3 编码器延长线连接头 编码器引出线编码器连接头 B1 B2 B3 U V W NOTE Please refer to section 3 8 4 Encoder Connector Specifications for details 3 8 2 The Layout of CN3 Connector 1 13 14 26 1 2 12 13 15 14 25 26 A B View ...

Page 21: ...Encoder 5V Encoder power supply 5V 13 Encoder 5V Encoder power supply 5V 14 A Encoder A 15 B Encoder B 16 Z Encoder Z 17 V Hall V 19 V Hall V 24 GND Encoder power supply ground 26 Shield Shield 3 8 4 Connect to Motor Encoder A Connect to 2500ppr Increment Encoder 9PIN AMP connector Motor Encoder CN3 Servo Drive CN3 A 1 A 4 B 2 B 5 Z 3 Z 6 5V 7 GND 8 Shield 9 1 14 2 15 3 16 11 24 26 A A B B Z Z 5V ...

Page 22: ...wer is applied and it will switch to A B Z signals after Specification of 9PIN AMP Connector Type Plug of the Motor Housing for the motor Housing AMP 172169 1 AMP 172161 1 Crimp AMP 770835 1 AMP 770834 1 3 8 6 Wiring Diagram of Motor Encoder Extend Cable A Diagram of 9PIN Encoder Cable Connect to drive Connect to Motor 1 3 7 9 A View A Drive Side Signal Colour Housing for the motor 3M 26PIN PIN脚 AM...

Page 23: ...DGND ANA1 ANA2 Enable Signal Input Alarm Reset Limit Sensor Limit Sensor Gain Select Control mode Switch Analog Input Speed Command Torque Command Open Collector Output High Speed Differential Input 44 PULSH1 45 PULSH2 46 SIGNH1 47 SIGNH2 Controller DGND FG Differential Pulse Signal VDC VDC Spec 5 24VDC Alarm Output Brake Control Output Servo Ready In Position 5 24VDC Drive A A B B Z Z DGND 5 24VD...

Page 24: ...5 24VDC Rotation Direction RUN STOP AOUT AOUT BOUT BOUT ZOUT ZOUT 21 22 48 49 23 24 CZ DGND 19 15 Drive A A B B Z Z DGND 5 24VDC DGND 15 10VDC 10VDC VDC 33 FG 50 High Speed Pulse Input Enable Signal Input Alarm Reset Limit Sensor Limit Sensor Gain Select Control mode Switch Analog Input Speed Command Torque Command Alarm Output Brake Control Output Encoder Phase A Output Encoder Phase B Output Enc...

Page 25: ...ervo Ready 5 24VDC RUN STOP AOUT AOUT BOUT BOUT ZOUT ZOUT 21 22 48 49 23 24 CZ DGND 19 15 A A B B Z Z DGND 5 24VDC DGND 15 10VDC 10VDC VDC 33 FG 50 Drive High Speed Pulse Input Rotation Direction Enable Signal Input Alarm Reset Limit Sensor Limit Sensor Gain Select Control mode Switch Analog Input Speed Command Torque Command Alarm Output Brake Control Output Encoder Phase A Output Encoder Phase B...

Page 26: ...ODE button can move the cursor to the left and then change parameters by using arrow keys UP DOWN Key UP and DOWN Key Pressing the UP and DOWN key can scroll through and change monitor codes parameter groups and various parameter settings SET Key Press to entering mode Press and hold to save parameters settings 5 2 Key Lock M2 series AC servo drive has Key Lock function to prevent unexpected opera...

Page 27: ...h and change parameter selection S Press SET key enter to value setting mode Press and hold for 1 second the SET key to confirm setting value Note 3 S M Press and hold the MODE key for 1 second Press SET key back to Drive Parameters Configuration mode without changing NOTE 2 NOTE 1 When power is applied drive s display will show customer defined monitoring mode In factory default mode it will displ...

Page 28: ...e installed on the machine 2 Ensure no load is installed on the servo motor 2 Please ensure the wiring between the drive and motor is correctly 1 Terminal U V W and FG must connect to Red Yellow Blue and Yellow Green cable separately U Red V Yellow U Blue FG Yellow Green If not connect to the specified cable and terminals then the drive cannot control motor 2 Ensure to connect encoder cable to CN2 ...

Page 29: ... the servo drive is restarted 6 4 Operations of JOG Mode Step Display Details 1 Press to switch the Monitor Status mode into the Drive Parameters Configuration mode 2 Scroll key to select parameter P61 SI 3 Press key into value setting mode 4 Scroll key to change values 5 Press and hold key for 1 second to confirm the setting value 6 Press key into the Function Operation mode 7 Scroll key to select ...

Page 30: ...Bad hall sensor Fault Servo off Encoder error Fault Servo off Position error Fault Servo off Low voltage Fault Servo off Velocity limited Warning No change to drive s staus CW limit or CCW limit activated Warning No change to drive s staus CW limit is activated Warning No change to drive s staus CCW limit is activated Warning No change to drive s staus Current limit Warning No change to drive s st...

Page 31: ... nosie 8 Machine has collided or the load has gotten heavy Machine has been distorted 9 Welding of contact of dynamic braking relay due to frequent servo ON OFF operations 1 Turn to Servo ON while disconnecting the motor If error occurs immediately replace with a new driver 2 Check that the motor wire U V and W is not shorted and check the branched out wire out of the connector Make a correct wiri...

Page 32: ...o save again 2 if problems is not solved please contact MOONS Phase loss of the main circuit STO is activated Safty torque off function is activated Either or both safety input 1 or 2 is ON Please confirm safety input 1 and 2 wiring configuration Please check Safety sensor setting Regeneration failed Regenerative energy has exceeded the capacity of regenerative resistor 1 Due to the regenerative e...

Page 33: ... Motor model selection and configuration 2 Operational mode selection 3 Define drive s input output mode 4 Apply auto tuning function on PID parameters for optimized motor performance Connect to Personal Computer MODE SET 安装M2 Servo Suit设置软件 请到本公司网站下载 www moons com cn Interface of M2 Servo Suit Configuration Steps Details Step 1 Motor Configuration Step 2 Select Control Mode Step 3 Further configuratio...

Page 34: ...E2 KCD NNV SM0601AE2 KCD NNV SM0602AE2 KCD NNV SM0801AE2 KCD NNV SM0802AE2 KCD NNV SM0803AE2 KCD NNV SM0401AE4 KCD NNV SM0402AE4 KCD NNV SM0601AE4 KCD NNV SM0602AE4 KCD NNV SM0801AE4 KCD NNV SM0802AE4 KCD NNV SM0803AE4 KCD NNV Appendix 2 LED Character Reference 1 2 3 4 5 6 7 8 9 10 A B C D E F G H I J K L M N O P Q R S T U V W X Y Z ...

Page 35: ...35 Rev 1 0 4 29 2016 M2 Quick Setup Guide Manaul 10 Contacting MOONS Service Center 86 400 820 9661 ...

Reviews: