Manual Part No: 931760-01 MV1 Gas Fryer
- 24 –
Manual Rev No: 1
Service and Maintenance (cont.)
ENSURE THAT THE GAS SUPPLY TO THE APPLIANCE HAS BEEN TURNED OFF BEFORE REMOVING OR
DISMANTLING ANY GAS CONTROLS.
1)
Removing the Thermostat
Drain the fryer of any oil.
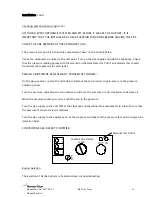
Open the compartment door and remove the thermostat knob.
Undo the thermostat phial gland nut from the tank and withdraw the phial/bulb.
Undo the two screws fastening the thermostat to the fixing bracket
Disconnect the two wires (noting their positions) and the thermostat can now be removed.
Replace the thermostat by reversing the above procedure.
ENSURE THAT THE THERMOSTAT PHIAL IS NOT KINKED - HAS NO SHARP BENDS AND IS
CORRECTLY LOCATED IN ITS HOLDER.
2)
Removing the Override Thermostat
Drain the fryer of any oil.
Open the compartment door and undo the phial gland nut from the tank and withdraw the
phial/bulb.
Lift off the control valve cover and remove the two screws securing the override thermostat to its
bracket and withdraw.
Disconnect the two wires (noting their positions)
Replace the thermostat by reversing the above procedure.
ENSURE THAT THE THERMOSTAT PHIAL IS NOT KINKED - HAS NO SHARP BENDS AND IS
CORRECTLY LOCATED IN ITS HOLDER.
3)
Removing the Burner/Pilot Assembly
Open compartment door and lift off the control valve cover.
Remove the burner heat shield, (secured by four screws) together with the override thermostat.
Undo the coupling to the burner manifold and remove the two fixing screws.
Disconnect the pilot feed pipe from the control valve.
Disconnect the two thermopile wires (noting their positions) at the control valve.
Undo the nut securing the thermocouple to the control valve.
Undo the nut (beneath the burner) securing the burner to the burner bracket. The burner can
now be withdrawn from the fryer together with the pilot assembly.
Replace by reversing the above procedure.


