background image

Audio System Upgrade Package

2011-UP Jeep Wrangler 2-Door
10” Subwoofer Kit

Installation Instructions

77KCK051

6-3-2011

Page 1 of 6

© 2011, Chrysler, LLC. Mopar is a registered trademark of Chrysler, LLC. All rights reserved.

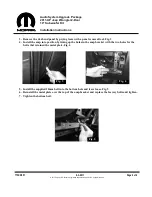
Fig. 1

CONTENTS

TOOLS REQUIRED:

Ratchet

13mm Socket
10mm Socket

Phillips Screwdriver

Pliers

Panel Removal Tool

Amp Installation

1. Gently pull out on the panel just below the steering column, rotate down and remove. Fig. 1
2. Remove the two 7mm screws securing the plastic panel below the steering column indicated by the

arrow in Fig. 2, and the one 7mm screw near the kick panel. Also, remove the two 10mm bolts
securing the metal plate and remove plate.

1EA.

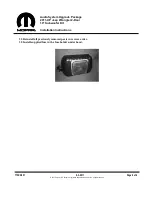
SUBWOOFER ASSEMBLY

P/N

RUWRANGLER

1EA.

200 WATT AMP/BRACKET ASSEMBLY

P/N

RM11JKBTL - Bracket

P/N

RE08BTL200R - Amp

1EA.

POWER HARNESS

P/N

RHWRANGLERPWR

1EA.

OVERLAY HARNESS

P/N

RHWRANGLER

2EA.

T-TAP

P/N

RFTTAPB

1EA.

10MM BOLT

P/N

RFM6

1EA.

FUSE 30 AMP

P/N

RFUSE30

6EA.

WIRE TIES

P/N

RFZIP6

1EA.

INSTRUCTIONS

P/N

RBI77KCK051

Fig. 2

Summary of Contents for 2011-UP

Page 1: ...eering column rotate down and remove Fig 1 2 Remove the two 7mm screws securing the plastic panel below the steering column indicated by the arrow in Fig 2 and the one 7mm screw near the kick panel Also remove the two 10mm bolts securing the metal plate and remove plate 1EA SUBWOOFER ASSEMBLY P N RUWRANGLER 1EA 200 WATT AMP BRACKET ASSEMBLY P N RM11JKBTL Bracket P N RE08BTL200R Amp 1EA POWER HARNE...

Page 2: ... Fig 5 3 Remove the dash end panel by prying loose with a panel removal tool Fig 3 4 Install the amp into position by lining up the holes in the amp bracket with the two holes for the bolts that retained the metal plate Fig 4 5 Install the supplied 10mm bolt into the bottom hole and leave loose Fig 5 6 Reinstall the metal plate over the top of the amp bracket and replace the factory bolts and tigh...

Page 3: ...p to the point where the plastic sheathing starts Fig 7 10 Run the wire through the grommet hole in the fire wall and reinstall the grommet 11 Run the wire along the top of the fire wall toward the battery and secure with wire ties 12 Remove the top of the fuse cover and using a 13mm socket and ratchet loosen and remove the nut on the positive battery accessory lug Fig 8 13 Connect the ring termin...

Page 4: ...to test the wire with an inexpensive test tone generator to verify you have the right wires 20 Connect the subwoofer harness input wires to the t tap connectors The green wire positive of the harness connects to the t tap connector on the gray wire with the yellow stripe in the vehicle The brown wire negative of the harness connects to the t tap connector on the gray wire with the purple stripe in...

Page 5: ...onnector 26 Using a 10mm socket and ratchet remove the bolt securing the support brace and connect the ground wire as shown in Fig 12 27 Run the wire harness along the floor under the rear seats to approximately the middle of the vehicle and pull the end of the harness under the seat to the cargo area Fig 13 28 Set the subwoofer in place and connect the wire harness 29 Align the mounting bracket w...

Page 6: ...woofer Kit Installation Instructions 77KCK051 6 3 2011 Page 6 of 6 2011 Chrysler LLC Mopar is a registered trademark of Chrysler LLC All rights reserved 31 Reinstall all previously removed parts in reverse order 32 Install supplied fuse in the fuse holder under hood ...

Reviews: