background image

GB

7

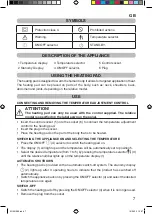
SYMBOLS

Protection class II.


Prohibited actions.

Warning.

Temperature selector.

ON/OFF selector.

STAND-BY.

DESCRIPTION OF THE APPLIANCE

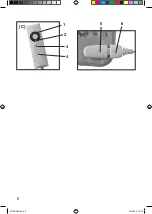
1 Temperature display.

3 temperature selector.

5 Control socket.

2 Stand-by Display.

4 ON/OFF selector.

6 Plug.

USING THE HEATING PAD

The heating pad is designed to warm the human body. It allows for targeted application of heat. 

The heating pad can be placed on parts of the body, such as: neck, shoulders, back, 

abdomen and joints, depending on the relative model.

USE

CONNECTING AND REMOVING THE TEMPERATURE ADJUSTMENT CONTROL 

ATTENTION!

The heating pad can only be used with the control supplied. The relative 

model is specified on the label sewn on the panel.

•  Insert the control socket (5) into the socket (6) to connect the temperature adjustment 

control to the heating pad.

•  Insert the plug in the socket.

•  Place the heating pad on the part of the body that is to be heated.
SWITCHING THE APPLIANCE ON AND SELECTING THE TEMPERATURE
•  Press the ON/OFF


(4) selector to switch the heating pad on.

•  The display (1) will light up and the temperature will be automatically set to position 5.
•  Select the desired temperature (from 1 to 5) by pressing the temperature selector 


 (3) 

until the relative number lights up on the temperature display (1).

AUTOMATIC SHUTDOWN

•  The heating pad is provided with an automatic switch-off system. The stand-by display  

 (2) lights up after 3 operating hours to indicate that the product has switched off 

automatically.

•  Switch the appliance back on by pressing the ON/OFF selector (4) and select the desired 

temperature once again.

SWITCH-OFF

•  Switch the heating pad off by pressing the ON/OFF selector (4) when it is no longer used.

•  Remove the plug from the socket.

MI001099.indd   7

15/04/13   12:07

Summary of Contents for Kyara E08Z1

Page 1: ...15 04 13 12 07 REF LT590 E08Z1 LT591 E08Z2 TERMOFORO GENIUS MANUALE D ISTRUZIONE GENIUS HEATING PAD INSTRUCTION MANUAL MA LT590 LT591 01 A 06 2013 REF...

Page 2: ...IT pagina 1 GB page 5 MI001099 indd 3 15 04 13 12 07...

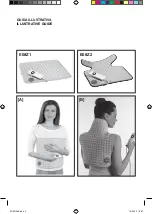
Page 3: ...GUIDA ILLUSTRATIVA A B E08Z1 E08Z2 MI001099 indd 4 15 04 13 12 07 ILLUSTRATIVE GUIDE...

Page 4: ...II C 1 2 3 4 5 6 D MI001099 indd 5 15 04 13 12 07...

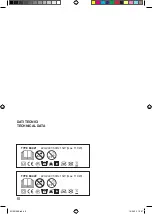
Page 5: ...III DATI TECNICI TECHNICAL DATA TYPE E08Z2 220 240 V 50Hz 15W max 110 W TYPE E08Z1 220 240 V 50Hz 15W max 110 W MI001099 indd 6 15 04 13 12 07...

Page 6: ...i difficile comprensione o se sorgessero dubbi prima di utilizzare il prodotto contattare l azienda all indirizzo indicato in ultima pagina INDICE AVVERTENZE SULLA SICUREZZA pag 1 LEGENDA SIMBOLI pag...

Page 7: ...AVVERTENZA NON adatto a bambini di et inferiore a 3 anni I bambini di et inferiore ai 3 anni non devono usare l apparecchio a causa della loro incapacit a reagire in caso di surriscaldamento NON azion...

Page 8: ...l comando di regolazione della temperatura al termoforo Inserire la spina elettrica nella presa di corrente Posizionare il termoforo sulla parte del corpo che si intende riscaldare ACCENSIONE E SCELTA...

Page 9: ...te il programma delicato per la centrifuga NON effettuare un ciclo di centrifuga supplementare ASCIUGATURA Asciugare in asciugatrice con impostazione a bassa termperatura Stendere senza applicare moll...

Page 10: ...he product at the address indicated on the last page CONTENTS SAFETY WARNINGS page 5 SYMBOLS page 7 DESCRIPTION OF THE APPLIANCE page 7 USING THE HEATING PAD page 7 USE page 7 SWITCHING THE APPLIANCE...

Page 11: ...ance as they are unable to react in the event of overheating DO NOT activate the temperature control with wet hands DO NOT pull the power cord or the appliance itself to remove the plug from the socke...

Page 12: ...adjustment control to the heating pad Insert the plug in the socket Place the heating pad on the part of the body that is to be heated SWITCHING THE APPLIANCE ON AND SELECTING THE TEMPERATURE Press t...

Page 13: ...DO NOT set an additional spin cycle DRYING Set the dryer at a low temperature Do not apply pegs on the electrical parts when hanging the heating pad to dry in order not to damage them DO NOT use the...

Page 14: ...15 04 13 12 07 MI001181 MI001181 indd 1...

Reviews: