

6
7
OPERATING INSTRUCTIONS
OPERATING INSTRUCTIONS
88:88
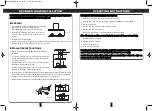
(K4)
Low
(K1)
Power
(K2)
Light
(K3)
Set/Timer
Digital Screen
(K5)
Medium
(K6)
High
CONTROL PANEL
Switch button from left to right in sequence
1. Insert the power plug into the power supply, a beep will sound when it is first switched on. The Digital
screen will display 12:00.
2.
K3: Time setting.
Only when the appliance is not in operating, to set the time of day. Press once (K3), the hours display is
flashing, and use (K4) “–“ or (K5) “+” to set the correct time (hour) of day “00 --- 23” when the correct
time of day is shown on the digital screen display. Press once (K3) again, the minus display is flashing,
and use (K4) “-“ or (K5) “+” to set the correct time (minus) “00---59”. Then press (K3) again to exit the
time setting.
3. While during operating, press once (K3) switch button for delay timer “3 minus”. (The delay timer can
be setting from 1 - 15 minus, after press (K3) switch button in 5 second. By using button K4 “–“ or
K5”+”.
4.
K1: Power switch button.
Press once to power ON. The digital screen will illuminate. Press once again to power OFF. (all others
switch button will function when power turn ON).
5.
K2: Light switch button.
Press once to turn ON the light. Press once again to turn OFF the light.
6.
K4: Low speed switch button.
Press once to turn on low speed. Press once again to turn off the low speed.
7.
K5: Medium speed switch button.
Press once to turn on medium speed. Press once again to turn off the medium speed.
8.
K6: High speed switch button.
Press once to turn on high speed. Press once again to turn off the high speed.
NOTE:
• This cooker hood is designed to remove smoke, cooking vapors and odors when cooking.
• For best results, operate the range hood for an extra 15 minutes more after the end of cooking or frying
to remove smells and cooking vapors in the kitchen.
• The lamp settings are independent from other settings (including delay-off) and must be manually
turned on or off.
• WARNING: LAMP IS EXTREMELY HOT! Do not touch the lamp unless they have been switched off and
cooled down for a while.
• Detach the power plug from the power supply if not using for a prolonged duration of time.
• Empty oil from the oil collecting cup when the oil reaches 2⁄3 of the capacity.
CLEANING & MAINTENANCE
It is recommended to clean and perform maintenance works regularly.
CLEANING INSTRUCTIONS
• Remove and clean the filter by soaking it in warm water and clean it using a soft brush and neutral
cleanser.
• Scrub away dirt and grime on the exterior using a wet cloth and neutral cleanser.
• CAUTION: Do not spray water directly onto the appliance and do not use abrasive/flammable detergents
such as thinners to avoid damaging the finishing.
• Periodically inspect the power cord and wiring for damage. Contact your service technician or similarly
qualified persons to repair/replace them.
MDH-916(IM)030718.qxp_Layout 1 7/5/18 9:55 AM Page 4


