background image

6

7

INSTALLATION

INSTALLATION

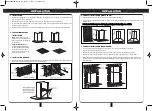
4.   PRODUCT INSTALLATION (SINGLE HOOD)

•    Align the appliance to the hanger holes and secure the appliance on the wall.

•    Connect the one end of exhaust pipe diameter 153mm to exhaust hole of appliance and the other end connect to the

     exhaust outlet.

     Note: Ensure that the range hood is hanging vertically and horizontally.  Do not tilt it.

5.   PRODUCT INSTALLATION (DOUBLE HOOD)

•    Loosen screws and align the appliance to the hanger holes and secure the appliance on the wall.

•    Align the upper hood to the proper position.  

•    Mark the position of the upper hood screw holes at upper side on the wall. Put the upper hood back.

•    Mark the position of the upper hanger side holes.  Mark the position of two middle holes of upper hanger.

•    Drill marking holes, insert plastic expansion bolts, fix upper hanger, install exhaust pipe on exhaust outlet, secure 

     appliance, connect the exhaust pipe to air outlet of the kitchen, pull the upper hood upwards and secure the side 
     holes with screws.

1.   INSTALLATION

•    DO NOT earth the appliance to any water pipes, lightning rod or telephone lines or come into contact with steel and

     wires to avoid the risk of electric shock.

•    This appliance must be properly earthed to avoid electric shocks in the event of electricity leakage.

•    Ensure that the power supply system in your home (current, voltage, connecting wires) meets the requirements of the

     appliance’s power supply load.

•    DO NOT use high capacity fuse in electrical circuit. Always select the correct ones as specified on the rating label.

2.   PRECAUTIONS BEFORE 

     INSTALLATION

•    

WALL:

Ensure the wall that the 

     appliance is to be mounted must be
     hard enough to bear the weight of
     the appliance.

•    

HEIGHT OF MOUNTING: 

The 

     recommended mounting height 
     should preferably be 650-750mm 
     above the cooking stove but is 
     subject to the construction of the 
     user’s kitchen dimensions. 

3.   INSTALLATION HANGER

•    Measure the installation height by marking the position of the hanger on the wall.  Drill holes for fixing hanger and

     insert plastic expansion bolts into the holes to enhance the hanger.

MDH-922OC(IM)291216.qxp_Layout 1  1/19/17  3:14 PM  Page 4

Summary of Contents for MDH-922OC

Page 1: ...UAL Designer Hood MDH 922OC E mail electrical appliance dksh com www morgan my Market Expansion Services by www dksh com my facebook com morganappliances MDH 922OC IM 291216 qxp_Layout 1 1 19 17 3 14 PM Page 1 ...

Page 2: ...E N T S 4 5 6 8 9 9 10 PARTS IDENTIFICATION AND SPECIFICATION SAFETY PRECAUTIONS INSTALLATION OPERATING INSTRUCTIONS CLEANING AND MAINTENENCE TROUBLESHOOTING MDH 922OC IM 291216 qxp_Layout 1 1 19 17 3 14 PM Page 2 ...

Page 3: ...Always turn off the power supply when replacing lamps New lamps must be the same specification as the current ones 11 It is dangerous to alter the specifications or to modify this appliance in any way Do not tamper with it or attempt to alter it in the attempt to customize it further 12 This appliance is not intended for use by persons including children with reduced physical sensory or mental cap...

Page 4: ...cure the side holes with screws 1 INSTALLATION DO NOT earth the appliance to any water pipes lightning rod or telephone lines or come into contact with steel and wires to avoid the risk of electric shock This appliance must be properly earthed to avoid electric shocks in the event of electricity leakage Ensure that the power supply system in your home current voltage connecting wires meets the req...

Page 5: ...ce every three days Clean and empty the oil inside the filter regularly It is recommended to carry out a full maintenance service once every half yearly by qualified personnel 2 IMPORTANT STEPS TO REMEMBER FOR INTERNAL MAINTENANCE Turn off power supply Remove filter and clean using a soft brush and reassemble after drying for next maintenance Remove the smoke cover by pulling it upwards Unscrew th...

Page 6: ...d and control board Contact service center Excessive vibration noise Ensure appliance is securely mounted Check and ensure appliance is properly increases mounted The connecting pieces of the fixed screws Tighten screws are loose Volute standing fixed screws are loose Tighten screws Motor fixed screws are loose Tighten screws Impeller installation is not in place Install in place Impeller is damag...

Reviews: