background image

9

8

INSTALLATION

OPERATING INSTRUCTIONS

FUNCTION ILLUSTRATION

1.   TO SET THE CLOCK:

•    When the appliance is connected to the power supply, the display will show 12:00.

•    Touch the “SET” button and hold for 3 seconds.

•    The “12” on the hour side will start flashing.  Touch “+” or “–“ button to set hour.

•    Then touch the “SET” button again and “00” on the minute side will start flashing.

•    Touch “+” or “–“ to set the minute.

•    Touch the “SET” button to finalize timer setting.

NOTE: The timer setting will need to be reset again in the event of a power interruption. 

2.   OPERATING THE APPLIANCE:

•    Touch the “ON/OFF” button. The appliance will enter standby mode.

•    The blower has three speeds - “SLOW”, “MEDIUM” and “HIGH”.  These three speeds can be toggled in-between 

     each other.

•    Touch the “+” button to start operating at slow speed.

•    Touch the “-“ button to switch to medium speed.

•    Touch the “SET” button to switch to high speed.

NOTE:

–    You can toggle between the speeds by touching the respective buttons.

–    To switch off the appliance, touch the “ON/OFF” button, the blower will power off immediately.  Touch the “DELAY”

     button, the fan will continue to operate for 5 minutes and the appliance will then switch off.

3.   OPERATING THE LIGHTS:

•    The lights operate separately from the “ON/OFF” button.

•    When the appliance is connected to the power supply, the lights can be switched ON / OFF by touching the “ON/OFF”

     button.

•    When the lights are turned on during the motor operation, touch the “DELAY” button. The fan and lights will 

     continue to operate for 5 minutes before switching off. 
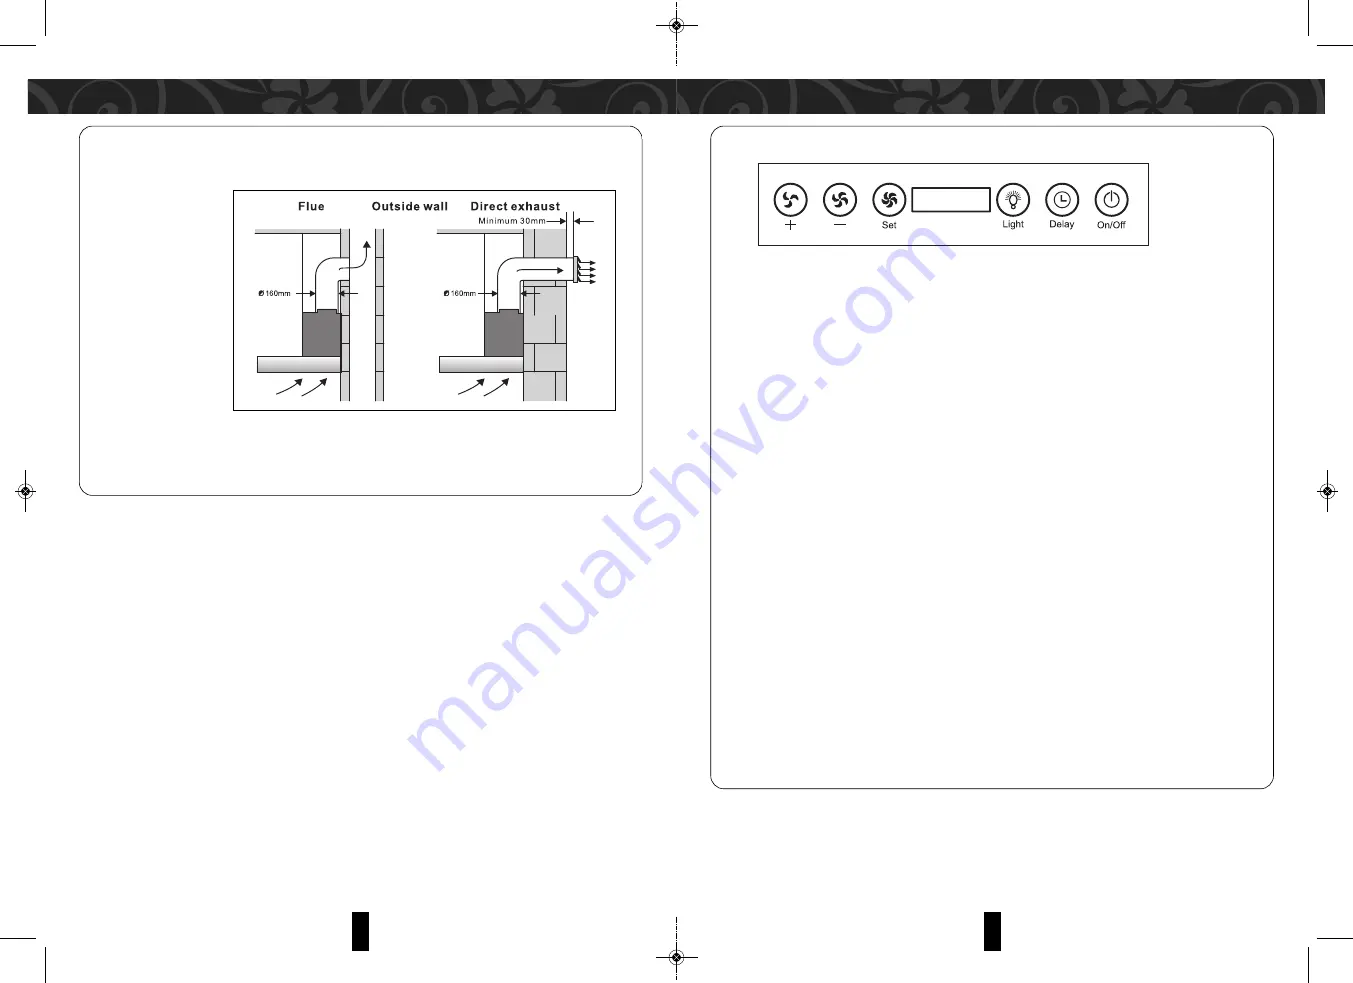
CONTROL PANEL

6.   EXHAUST PIPE CONNECTING TO THE WALL OUTSIDE

•    The other head of exhaust pipe should be connected to the hole of wall outside (Diameter of the hole should 

     be 85mm)

7.   CHECKING AND TESTING

•    After installation, connect appliance to the power supply and turn on the appliance.  Check if all functions of the 

     appliance are working normally, i.e.no vibration and no exhaust resistance.

MDH-923STOC(IM)281216.qxp_Layout 1  12/29/16  5:14 PM  Page 5

Summary of Contents for MDH-923STOC

Page 1: ...L Designer Hood MDH 923STOC E mail electrical appliance dksh com www morgan my Market Expansion Services by www dksh com my facebook com morganappliances MDH 923STOC IM 281216 qxp_Layout 1 12 29 16 5 14 PM Page 1 ...

Page 2: ...N T S 4 5 6 8 9 10 11 PARTS IDENTIFICATION AND SPECIFICATION SAFETY PRECAUTIONS INSTALLATION OPERATING INSTRUCTIONS CLEANING AND MAINTENENCE TROUBLESHOOTING MDH 923STOC IM 281216 qxp_Layout 1 12 29 16 5 14 PM Page 2 ...

Page 3: ...ays turn off the power supply when replacing lamps New lamps must be the same specification as the current ones 11 It is dangerous to alter the specifications or to modify this appliance in any way Do not tamper with it or attempt to alter it in the attempt to customize it further 12 This appliance is not intended for use by persons including children with reduced physical sensory or mental capabi...

Page 4: ...re the side holes with screws 1 INSTALLATION DO NOT earth the appliance to any water pipes lightning rod or telephone lines or come into contact with steel and wires to avoid the risk of electric shock This appliance must be properly earthed to avoid electric shocks in the event of electricity leakage Ensure that the power supply system in your home current voltage connecting wires meets the requi...

Page 5: ...can toggle between the speeds by touching the respective buttons To switch off the appliance touch the ON OFF button the blower will power off immediately Touch the DELAY button the fan will continue to operate for 5 minutes and the appliance will then switch off 3 OPERATING THE LIGHTS The lights operate separately from the ON OFF button When the appliance is connected to the power supply the ligh...

Page 6: ...lter The air convection in the kitchen is too big Reduce air convection and open doors and or space sealing is too tight windows moderately Higher installation height Adjust to appropriate height Exhaust pipe is too long or has too many Install according to the manual turns Outdoor wind is too strong Non technical faults TROUBLESHOOTING 1 FOR BEST PERFORMANCE Clean the exterior of the appliance on...

Reviews: