


6
7
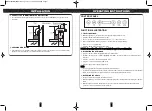
INSTALLATION
INSTALLATION
4. PRODUCT INSTALLATION (SINGLE HOOD)
• Align the appliance to the hanger holes and secure the appliance on the wall.
• Connect the one end of exhaust pipe diameter 153mm to exhaust hole of appliance and the other end connect to the
exhaust outlet.
Note: Ensure that the range hood is hanging vertically and horizontally. Do not tilt it.
5. PRODUCT INSTALLATION (DOUBLE HOOD)
• Loosen screws and align the appliance to the hanger holes and secure the appliance on the wall.
• Align the upper hood to the proper position.
• Mark the position of the upper hood screw holes at upper side on the wall. Put the upper hood back.
• Mark the position of the upper hanger side holes. Mark the position of two middle holes of upper hanger.
• Drill marking holes, insert plastic expansion bolts, fix upper hanger, install exhaust pipe on exhaust outlet, secure
appliance, connect the exhaust pipe to air outlet of the kitchen, pull the upper hood upwards and secure the side
holes with screws.
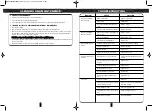
1. INSTALLATION
• DO NOT earth the appliance to any water pipes, lightning rod or telephone lines or come into contact with steel and
wires to avoid the risk of electric shock.
• This appliance must be properly earthed to avoid electric shocks in the event of electricity leakage.
• Ensure that the power supply system in your home (current, voltage, connecting wires) meets the requirements of the
appliance’s power supply load.
• DO NOT use high capacity fuse in electrical circuit. Always select the correct ones as specified on the rating label.
2. PRECAUTIONS BEFORE
INSTALLATION
•
WALL:
Ensure the wall that the
appliance is to be mounted must be
hard enough to bear the weight of
the appliance.
•
HEIGHT OF MOUNTING:
The
recommended mounting height
should preferably be 650-750mm
above the cooking stove but is
subject to the construction of the
user’s kitchen dimensions.
3. INSTALLATION HANGER
• Measure the installation height by marking the position of the hanger on the wall. Drill holes for fixing hanger and
insert plastic expansion bolts into the holes to enhance the hanger.
MDH-930STOC(IM)281216.qxp_Layout 1 12/29/16 5:10 PM Page 4


