


4
5
CARE & CLEANING
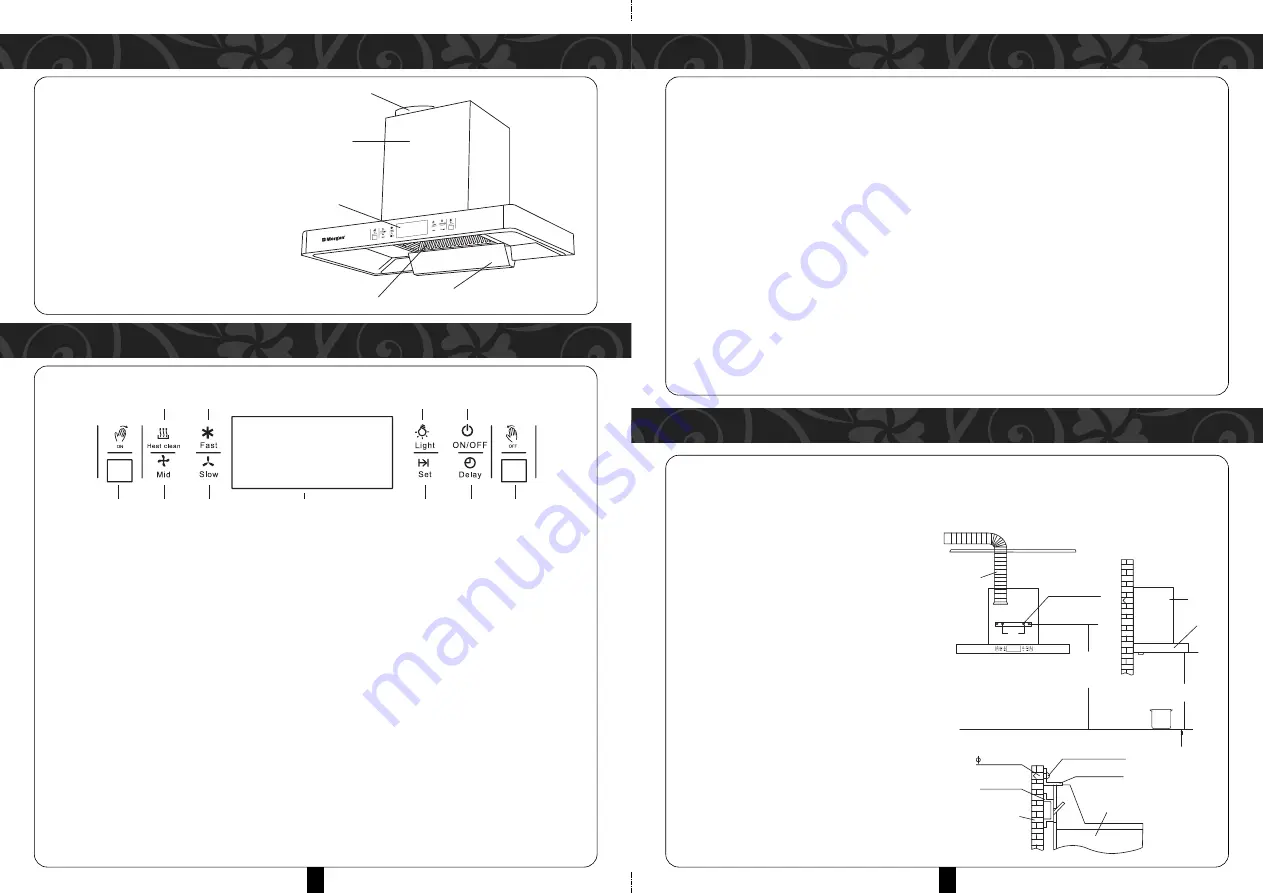
PARTS IDENTIFICATION
1
2
3
4
5
1. Chimney
2. Control Panel
3. Filter Assembly
4. Oil Collector
5. Air duct assembly
INSTALLATION KIT INCLUDES:
• Install screws package
• User instructions
• Main unit Back hanger
A
B
C
D
E
F
G
H
I
J
K
TOUCH CONTROL AND MOTION CONTROL
INSTALLATION
ALWAYS SWITCH OFF AND DISCONNECT FROM POWER SUPPLY!
SURFACES
• Wash with warm soapy water and a soft sponge.
• Never use abrasive detergent, scouring pads, steel wool or solvents on any part of this appliance as this
will damage the finishing.
ALUMNIUM GREASE FILTERS
• Wash with soapy warm water or soak in a degreasing agent for an hour, then rinse off and dry before
re-installing.
CHARCOAL FILTERS
(for recirculating model only):
• The charcoal cannot be reused and must be replaced once a year or depending on the frequency of
operation.
• Regular maintenance is mandatory for this appliance to function effectively as clogged filters may restrict
airflow and may cause the motor to overheat.
OPERATING INSTRUCTIONS
6 Screw pipe
Wall
Main unit Hanger
Screw ST4.2X25-C
Buckle fixing plate
Main unit
Main unit
Chimney
Fixing Screws
75
0
12
80
-1
38
0
180
Extension Pipe
1. Use suitable bolts to mount the appliance on a secure surface.
2. The minimum distance between the supporting surface for cookware on the hob and the lowest part of
the range hood with the cooker hood located above a gas appliance should be at least 65 cm. If the
instructions for installation for the gas hob
specify a greater distance, this has to be taken
into account;
3. Ensure the location of the installation has
permanent openings for ventilation.
4. Regulations concerning the discharge of
air have to be fulfilled.
5. It is strongly recommended that the cooker
hood be installed right over the exhaust air
from cooking.
6. It is not recommended to install the pipe outlet
in the wind direction, which can prevent the
exhaust air from flowing backwards.
7. Fasten the exhaust outlet components securely
with screws. To ensure good ejection of
exhaust air, do not bend the pipe excessively.
1.
( A )
Is the switch to POWER ON and SPEED motion control. The high-speed fan will operate when a
hand gesture swipes the first time to the right about 10cm from
( A )
and the second time is mid fan
speed and the third time is the low fan speed. Lights and
( D )
LED screen will power on simultaneously.
2.
( B )
is to select the Mid fan speed.
3.
( C )
is to select the Slow fan speed.
4.
( D )
The LED screen will display Time, Fan speed or Time for auto-heat cleaning.
5.
( E )
is to set the clock. Touch the “Set” button, both the “Fast” and “Slow” buttons will be illuminated,
and the clock will appear on the LED and start flashing. Touch “Fast” and “Slow” button to set time.
6.
( F )
is to select delay time to switch off the appliance. Touch the “Delay” button when the fan is on
(any speed), a run down clock will display on the LED and the hood fan will automatically turn off after
60 seconds. Lights will be turned off simultaneously.
7.
( G )
is Power OFF switch for Motion Control. The unit will power off when a hand gesture swipes to
the left about 10cm from the
( G )
.
Note:
This function will not be activated when the unit is on auto-heat cleaning.
8.
( H )
is Heat auto-cleaning function. Press
( H )
key for 2 seconds to start Heat auto-cleaning function
when the heat auto cleaning is in operation. The unit will divert the oil into the inner housing in 10
minutes. Press
( H )
again to cancel the function.
9. There are 3 fans speed levels.
( I )
high speed,
( B )
medium speed and
( C )
is low speed.
10.
( J )
is the ON/OFF light switch.
11.
( K )
is the Power ON/OFF switch for Touch control. Press it to power on the unit. Press it again to power off.


