


6
7
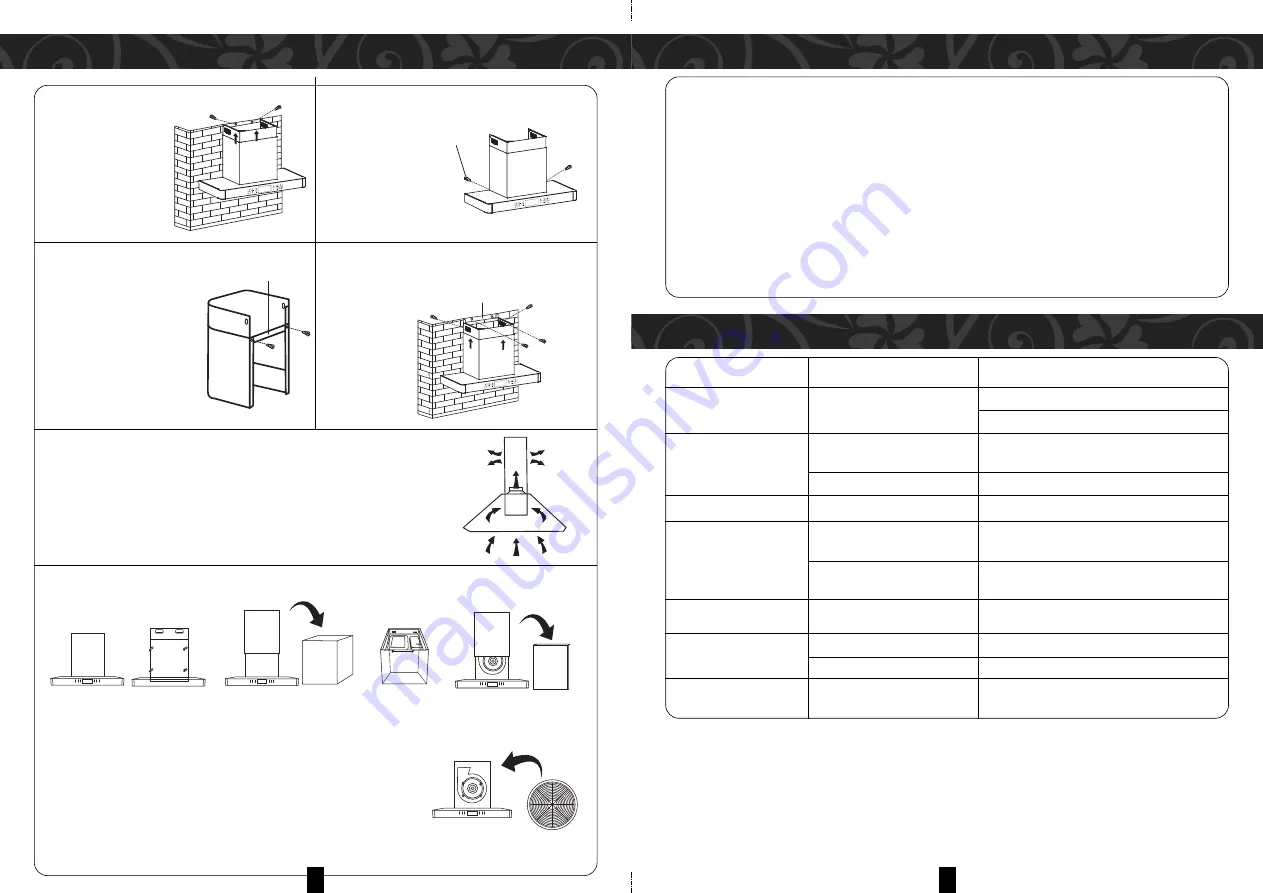
INSTALLATION
NOTES FOR THE INSTALLER
INSTALLATION (VENT INSIDE)
• Insert the inner chimney into the upper
chimney and pull upwards.
Adjust to reach
the height
required.
• Secure the lower chimney with 2 pcs of
4x8mm screws.
Screw
• An exhaust pipe is not required if there is no external exhaust outlet. See
similar installation method as in “Installation (Vent outside)”.
1
3
4
5
2
• Slide the chimney to adjust
the chimney height. When
the desired height is
achieved, secure it with
2 pcs of 4x8mm screws onto
the holes as illustrated in
Plate I below.
Plate I
• Drill 2 x 8mm holes to accommodate Plate II.
Secure and tighten Plate II onto the wall with
the 2 screws
provided.
• Assemble the
chimney onto
the unit and
secure it with
2 screws.
Plate II
4x8mm
4x30mm
SAFETY INFORMATION
• Power connections must be made only in accordance to the local standards and laws.
• Ensure that the power supply complies with the setting on this appliance, otherwise, do not connect.
• The power connection of this appliance must be earthed. If unsure, check with a qualified electrician. The
colour codes are:
Green & Yellow = EARTH
Blue = NEUTRAL
Brown = LIVE
• Ensure that the power cord is not exposed to heat sources or sharp objects.
• LED lamp must not exceed 1.5W.
TROUBLESHOOTING
PROBLEM
CAUSE
SOLUTION
No operation
No electrical supply
Ensure that power switch is turned on
Ensure power plug is connected to the power supply
Poor airflow
Aluminium grease filters are
Clean the filters and replace when dry
clogged.
Charcoal grease filters are clogged Replace charcoal filters
Motor running but no airflow
Butterfly valve jammed
Contact technician
Motor cuts after a few
High temperature safety device
The kitchen is not sufficiently ventilated
minutes
activated
The hood is installed too near the
Ensure the hood is installed at least 65cm from the
cooking stove
stove
Strong cooking smell
Charcoal filters are not installed
Charcoal filters must be installed in re- circulating
mode
Oil dripping onto stove
Oil cup missing or not installed
Remove aluminium filter and replace oil cup
Aluminium grease filter saturated
Wash the aluminium grease filters
Whirring sound
Foreign object in contact with fan
Contact technician
blade
HOW TO INSTALL CHARCOAL FILTER
(For Recirculation System model only)
1. Unscrew the four (4) screws on the back of the chimney hood.
2. Remove the chimney from the designer hood.
3. Unscrew the two (2) screws on top of the cover.
4. Slowly pull up the cover and put a side.
5. Screw the charcoal filter on the motor.
6. Install back the cover and chimney hood.


