


5
4
SAFETY PRECAUTIONS
OPERATING INSTRUCTIONS
When using this stand mixer, basic precautions should always be followed, including the
following:
1. All safety and operating instructions should be read before operation and user manual should be
retained for future reference.
2. This appliance is for household use only.
3. Never immerse the appliance into water or any other liquids.
4. Do not operate the appliance with wet hands. If the appliance is humid or wet, detach the power plug
from the power supply immediately.
5. To disconnect from power supply, turn the control to OFF, then detach the power plug. Always hold
the power plug, but never yank on the power cord.
6. Always disconnect the appliance from the power supply if it is left unattended and before assembly,
disassembly or cleaning.
7. This appliance is not intended to be used by persons (including children) with reduced physical,
sensory or mental capabilities, or lack of experience and knowledge, unless they have been given
supervision or instruction concerning use of the appliance by a person responsible for their safety. If
the supply cord is damaged, it must be replaced by the manufacture of its service agent or a similar
qualified person in order to avoid a hazard.
8. Keep fingers away from moving parts and fitted tools. Never insert fingers into any part of the
appliance during operation to avoid personal and bodily injuries.
9. The manufacturer recommends the use of original accessories and spare parts only.
10.For children’s safety, keep all packaging materials (plastic bags, boxes, polystyrene etc.) out of their
reach.
11.Do not attempt to modify/repair the appliance. Unauthorized repair of the appliance may cause
electric shocks and/or damage the product, thus voiding your warranty.
12.Do not insert any object(s) into the rotating hooks while the machine is operating to prevent damage
to the appliance and possible personal injuries.
13.Do not allow power cord to hang over edge of table or counter or touch hot surfaces.
14.Place the machine on a smooth, flat and stable working surface.
15.Exercise caution when raising the arm of this appliance to avoid accidents.
16.Do not operate appliances with damaged power cord or power plug or after the appliance
malfunctions or has been damaged in any manner. Return it to the nearest Authorized Service
Centre for examination, repair, or adjustment.
17.The use of accessory attachments not recommended by the manufacturer may cause hazard or
injury.
BEFORE USING
• Before connecting to the power supply, ensure that the voltage of the appliance corresponds to the
voltage indicated on the power supply rating label at the bottom of the appliance.
• Remove and discard all plastic wrappings and plastic bags.
• Clean the parts and accessories before using.
1. Press down the Locking Bar to raise the arm.
2. Place the mixing bowl into the housing and turn the bowl until it locks securely into place.
3. Insert the Bowl Lid and then Kneading hook/Stirrer beater/Whisk into the Accessories Outlet. Ensure
that the accessories are securely locked in position.
4. Pour ingredients through the Bowl Lid .
5. Press the Locking Bar down again and simultaneously press down the arm to lock into the body unit
6. Turn the Speed Selector to set desired speed and to begin operating the appliance.
7. After operation, turn the Speed Selector to “0” position to cease operation and detach the power plug
from the power supply.
8. Press the Locking Bar down again to disassemble Kneading hook /Stirrer beater/Whisk, Bowl Lid,
and detach the mixing bowl.
9. Use a spatula to stir or remove the mixture.
10.Clean the parts as described under “Cleaning”
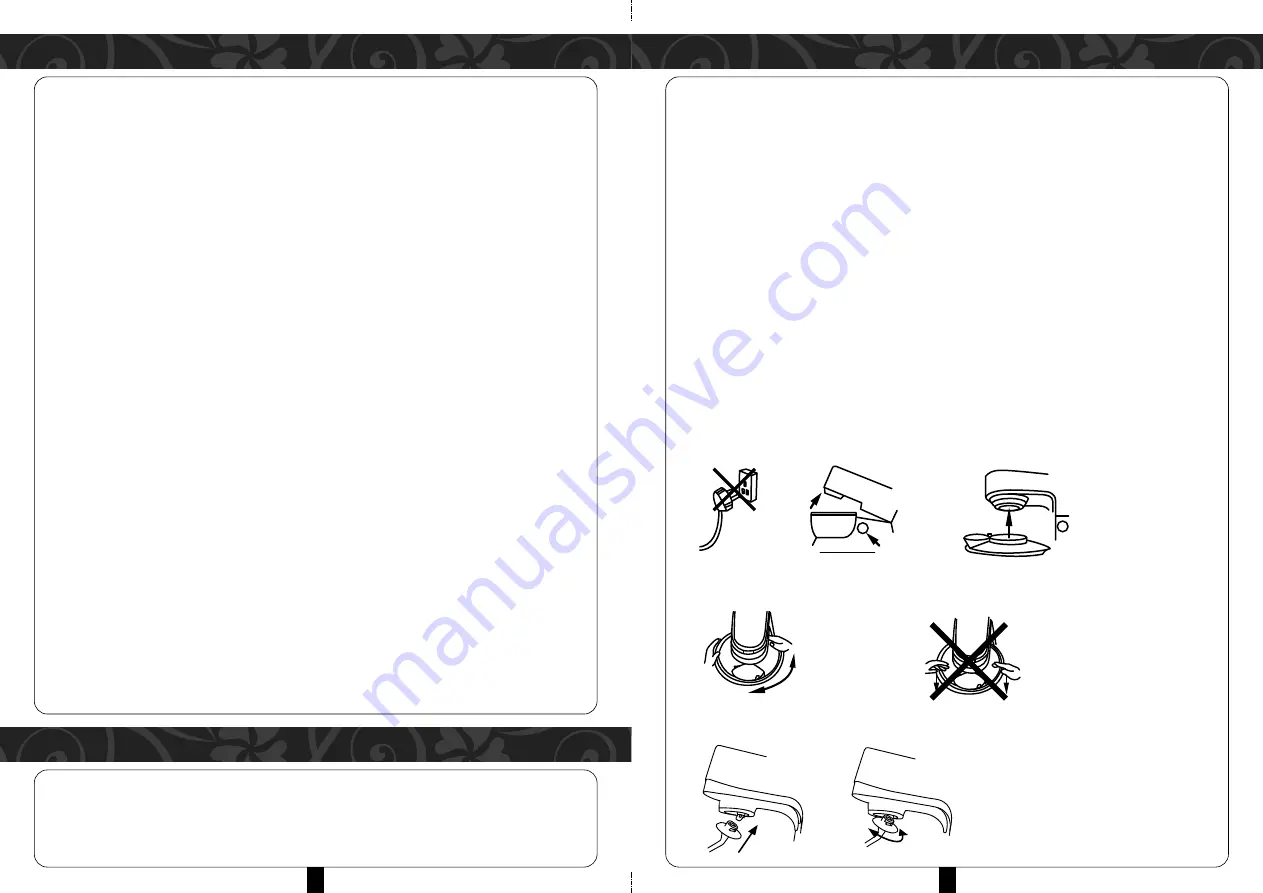
ASSEMBLE / DISASSEMBLE ACCESSORIES
A) BOWL LID
1. Detach power plug from power supply before bowl lid assembly/disassembly.
2. Press the button and raise the arm
3. Assembly - insert the lid into the accessories outlet & turn right
4. To disassemble – Turn left and detach the lid (figure 1).
5. Do not disassemble the lid as in figure 2.
B) KNEADING HOOK / STIRRER BEATER / WHISK ASSEMBLY/DISASSEMBLY
Lock and Unlock
Lock
Unlock
Insert
Insert
L
(figure 1)
(figure 2)


