background image

9

Blending

Your Easy Blend & Juice is ideal for blending a
wide range of foods, including fruit and dairy.
However it is 

NOT

suitable for the following uses:  

Grinding or mashing heavy foods (e.g. potatoes or
meat). 

• 

Stirring thick mixtures (eg dough).

Juicing

A wide range of fruits can be juiced, however it
should be prepared correctly before juicing. Your
Easy Blend Juice is unable to separate citrus peel
or pith from fruit so it should be removed and
flesh cut into segments prior to juicing.  

DO NOT

juice hard vegetables (turnip, carrot,

potatoes, uncooked beetroot etc). 

Cut all fruit and vegetables into segments or thin
sticks before juicing. 

Your Easy Blend comes with a 750ml Beaker and
a Jug for juicing 

750ml Beaker (9)

There is a single beaker supplied with a capacity
of 750ml. Do not overfill. The Beaker comes with a
‘Sports Lid’

(8) 

so you can enjoy drinks on the go.   

Jug (5)

The Jug supplied is for use with the Juicing
process, as depicted on page 7-8. It has a 
maximum capacity of 750ml. You can also use the
Jug to blend smoothies and milkshakes by 
following the steps detailed to the right. 

1.

Follow steps 1-3 of ‘Using your Easy Blend Juicer.’ 

2.

Add your ingredients to the Jug

(5)

, Do not over

fill. The Jug has a maximum capacity of 750ml. 
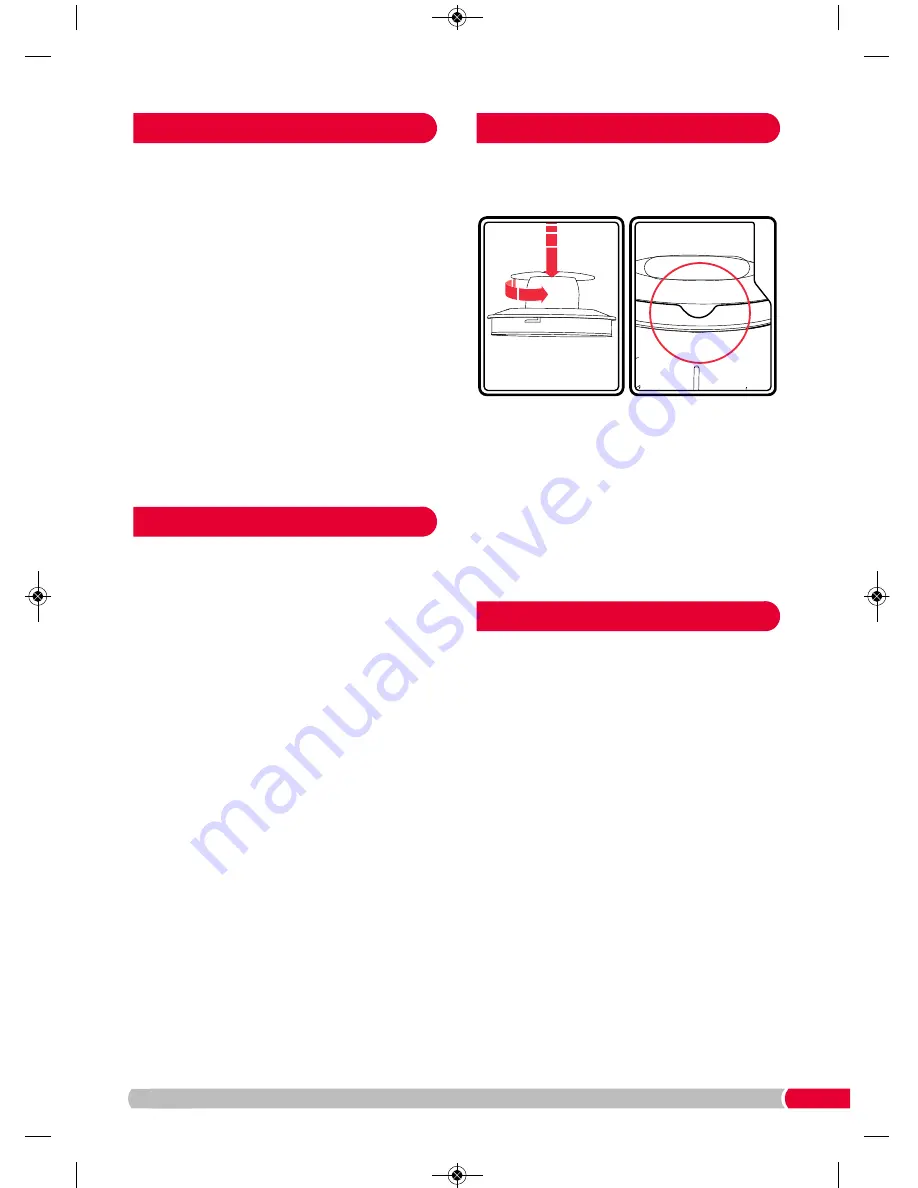
3.

Insert the Measuring Cap

(12)

into the Juicer Lid

(2) 

twist to lock into place. Attach the Lid to the

Jug ensuring the 

blank side

of the Lid is aligned

with the spout (not the grate). See above. 

Ensure the Measuring Cap and Lid are fixed 
in place securely. 

4.

Blend as normal (Steps 5-6 of ‘Using your Easy
Blend Beaker,’ on page 5). 

5.

Before pouring your drink from the Jug, detach
from the Main Unit 

(6)

.

Prepare all the ingredients first and have them
conveniently placed near the appliance, this will
ensure you keep the juicing time short.  Do not
exceed 550g of prepared fruit for juicing.

If you should need to juice for more than 1 minute,
switch off, allow to rest for 30 seconds, continue
for a further 30 seconds if required. Do not exceed
this 1 minute run time as permanent damage
could be caused to the motor and blade bearing.

The juice recipe cards supplied should give you 1
glass (approximately 200ml) of fresh juice
depending on the condition of the fruit used.

When removing the Jug from the Main Unit 

(6)

ensure you do not unscrew the Jug 

(5)

from the

Blade Lid 

(10)

. Support the Blade Lid if you see it

turning, leakage will occur if you allow this to
happen.

When pouring juice out, keep the Pusher 

(1) 

in

place to retain the pulp.

After pouring the juice out into a glass allow the
pulp to stand in the jug for 2 minutes, this will
allow more juice to flow through the Filter mesh

(3)

.

Suitable Foods 

Beaker And Jug

Blending In The Jug

Hints And Tips For Juicing  

14

403020.qxp_Layout 1  28/10/2014  09:24  Page 9

Summary of Contents for easy blend & juice

Page 1: ... For competitions product hints and tips and more join us at Register online for your 2 year guarantee See the back of this instruction book for details UK and Ireland customers only Please read and keep these instructions for future use GUARANTEE 2 YEAR 403020 qxp_Layout 1 28 10 2014 09 24 Page 1 ...

Page 2: ...g parts that move in use Do not use hot liquids in the blender as it can be ejected out of the appliance due to sudden steaming Electrical requirements Check that the voltage on the rating plate of your appliance corresponds with your house electricity supply which must be A C Alternating Current Should the fuse in the mains plug require changing a 3 amp BS1362 fuse must be fitted The use of any e...

Page 3: ...nts And Tips 10 Care And Cleaning 10 Contact Us 10 Notes 11 Guarantee 12 Contents Thank you for purchasing your new Morphy Richards Easy Blend Juice Your Easy Blend Juice will allow you to create an extensive selection of juices smoothies and alcohol free cocktails Please read the instructions thoroughly before use Remember to visit www morphyrichards co uk to register your products two year guara...

Page 4: ... 4 5 10 9 12 0 11 Product Overview 1 Pusher 2 Juicer Lid 3 Filter 4 Spout 5 Jug 6 Main Unit 7 Speed Control 8 Sports Lid 9 750ml Beaker 10 Blade Lid 11 Safety Seal 12 30ml Measuring Cap 403020 qxp_Layout 1 28 10 2014 09 24 Page 4 ...

Page 5: ... Control to the Off O position and unplug from the mains Using Your Easy Blend Beaker Ensure the Safety Seal 11 is fitted correctly in the Blade Lid 10 Attach the Blade Lid to the Beaker Screw to fix into place securely Before First Use WARNING Sharp blades handle with care Before using for the first time or if un used for a long period wash your Easy Blend Juice thoroughly before use 1 Remove the...

Page 6: ...to the appliance The Safety Seal only needs to be removed for cleaning After cleaning ensure the seal is reinserted as directed before using the Easy Blend After 40 seconds of continuous use you will need to switch off your Easy Blend and leave to cool for 5 minutes to prevent overheating For Juicing after 60 seconds of continuous use switch off and leave to cool for 30 seconds If using ice in a r...

Page 7: ... into place securely 1 WARNING Ensure your Easy Blend is unplugged from the mains before use 5 Attach the Juicer Lid 2 Twist clockwise to lock aligning the grate with the spout of the Jug The Juicer Lid will not fit the Jug correctly if the Filter is not properly inserted 6 Plug into the mains Turn the Speed Control 7 to High II Using Your Easy Blend Juicer Attach the Blade Lid to the Main Unit 6 ...

Page 8: ... full switch off and unscrew from the Main Unit see step 13 and decant before continuing Mix the juices together before drinking for a better flavour 12 When finished turn the Speed Control to the Off O position and unplug from the mains Do not run for more than 60 seconds switch off your Easy Blend and wait 30 seconds before continuing 14 Pour the juice from the Jug and dismantle for cleaning Cle...

Page 9: ...nto the Juicer Lid 2 twist to lock into place Attach the Lid to the Jug ensuring the blank side of the Lid is aligned with the spout not the grate See above Ensure the Measuring Cap and Lid are fixed in place securely 4 Blend as normal Steps 5 6 of Using your Easy Blend Beaker on page 5 5 Before pouring your drink from the Jug detach from the Main Unit 6 Prepare all the ingredients first and have ...

Page 10: ... outlet 2 Remove the Safety Seal 11 from the Blade Lid 10 WARNING Extreme care must be taken when washing the metal blades as they are sharp 3 Wash all parts except the Main Unit 6 in hot soapy water dry thoroughly Do not allow the Blade Lid to stand in water A small brush can be used to remove food from under the blade on the Blade Lid and the Filter 3 4 Replace the Safety Seal into the Blade Lid...

Page 11: ...11 Notes 403020 qxp_Layout 1 28 10 2014 09 24 Page 11 ...

Page 12: ...king days of receipt If for any reason this item is replaced or repaired during the 1 year guarantee period the guarantee on the new item will be calculated from original purchase date Therefore it is vital to retain your original till receipt or invoice to indicate the date of initial purchase To qualify for the 1 year guarantee the appliance must have been used according to the instructions supp...

Reviews: