background image

10

www.morphyrichards.com

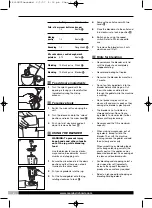
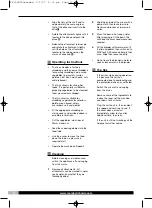
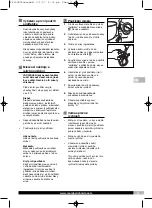
Align the flats of the shaft end to
approximately the same angle as
that of the drive and insert into the
drive 

P

.

Rotate the attachment slightly until it
locates to the drive and push into
place 

Q

.

Release the attachment retainer pin
and rotate the attachment slightly
until the hole on the attachment
locates to the retainer pin on the
main unit drive hub 

R

.

Operating Instructions

The fine shredder is for finely
shredding and the coarse shredder is
for coarsely shredding hard or crisp
vegetables (e.g. carrots, turnips,
potatoes, but also hard cheese, nuts
and dry bread).

The thick slicer is for slicing firm
foods. It is particularly suitable for
preparing vegetables to be steamed,
fried, creamed or scalloped.

The thin slicer is suitable for
shredding vegetables for coleslaw,
potato crisps, bread, celery,
cucumbers, nuts and pickles.

Fit the appropriate shredding or
slicing cones as described above in
assembly instructions.

Cut the vegetables into cubes of
25mm maximum.

Feed the cubed vegetables into the
feed tube.

Use the pusher to move the food
down the tube, no pressure is
required at all.

Operate the machine on Speed 4.

Cleaning

Before cleaning and maintenance,
switch the appliance off and unplug
from the mains.

1

Remove all attachments. All
attachments can be washed in warm
soapy water. Ensure that they are
thoroughly dried.

2

Wipe the outside of the mixer with a
damp cloth, then leave to air dry.
Never use abrasives or immerse in
water.

3

Wash the bowl in hot soapy water.
After cleaning re-fit the bowl. This
will keep the mixer head mechanism
covered.

4

Fill the blender with warm water, fit
the lid and goblet, then switch on to
MAX for 20-30 seconds. Empty then
rinse. Wipe then leave to air dry.

Do not leave the blender in water to
soak or leave water in the blender.

Top tips

If the mixer stops during operation,
it is because the unit has
overheated due to overloading and
the protection device has activated. 

Switch the mixer off and unplug
from the mains.

Remove some of the ingredients to
reduce the load. Let the machine
cool down for 3 minutes. 

Plug the unit back in, then reselect
the speed and continue to use. If
the mixer does not restart
immediately, allow to stand for
additional time, then retry.

If the unit is still not working call the
helpline for further advice.

48955MCZamended  9/1/07  4:32 pm  Page 10

Summary of Contents for KITCHEN MACHINE 48955

Page 1: ...en machine with attachments Please read and keep these instructions Kuchy sk robot s n stavci P e t te si tyto pokyny a uschovejte je g 48955MCZ www morphyrichards com 48955MCZamended 9 1 07 4 32 pm P...

Page 2: ...t a safety cut out will come into operation Switch off and allow to cool down for 3 minutes Never run the blender for more than 1 minute Allow to cool down for 3 minutes It is advisable to use the spl...

Page 3: ...upervised by a responsible person to ensure that they can use the appliance safely Other safety considerations Disconnect the appliance from the mains supply when not in use before taking off attachme...

Page 4: ...d Features Outlet cover for blender Base unit Speed pulse selector Plug cord storage fi Release lever fl Bowl locator Mixer head For attachments optional extra certain countries only Meat Mincer Veget...

Page 5: ...ents The opening can be used to add ingredients during mixing When you are putting the splash guard on slide it across the bowl and around the mixer head and slot into place Using the mixer 1 Turn the...

Page 6: ...tion G 6 Switch on by using the speed switch Refer to Which speed to use 7 To remove the blender turn it anti clockwise and lift off Hints for blending Never remove the blender or its lid until the bl...

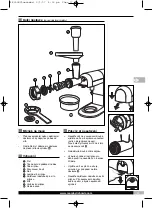
Page 7: ...screen Collector dish Assembly instructions Fit the cutting blade to the food advancing screw ensuring that the blade is in the correct orientation sharp edges facing outwards The screw has a square p...

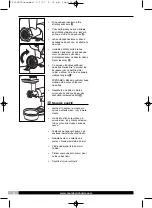
Page 8: ...ith one hand and the spanner in the other hand and turn clockwise L NOTE it may be necessary to tighten this collar again during use Fit the food tray into the food throat and locate the tray undernea...

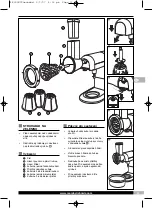
Page 9: ...slicing cone Coarse slicing cone Assembly instructions Choose the appropriate cone for the application Affix the shaft to the cone by aligning the fixing tabs on the shaft to the holes in the base of...

Page 10: ...down the tube no pressure is required at all Operate the machine on Speed 4 Cleaning Before cleaning and maintenance switch the appliance off and unplug from the mains 1 Remove all attachments All at...

Page 11: ...guarantee on the new item will be calculated from original purchase date Therefore it is vital to retain your original till receipt or invoice to indicate the date of initial purchase To qualify for...

Page 12: ...bezpe nostn vyp na Vypn te ho a nechte ho t i minuty chladnout Nikdy nenechte b et m cha d le ne jednu minutu Nechte ho t i minuty chladnout P i leh n se doporu uje zakr t m su krytem proti post k n D...

Page 13: ...houc mi osobami bez n le it ho dozoru zodpov dn osoby kter zaru e mohou bezpe n pou vat spot ebi Dal bezpe nostn pokyny Kdy spot ebi nepou v te p ed odeb r n m n stavc a p ed i t n m ho v dy odpojte o...

Page 14: ...lu fi Uvol ovac p ka fl Polohovac zna ka na m se Hlava mix ru Pro n stavce dopl kov p slu enstv pouze n kter zem ml nek na maso a struhadlo na zeleninu Kryt proti post k n Otvor v krytu proti post k n...

Page 15: ...c Otvor lze pou vat k p id v n p sad b hem m ch n Kdy nasazujete kryt proti post k n nasu te ho na m stu a kolem hlavy mix ru a zasu te ho dr ku na m sto Pou v n mix ru 1 Oto te uvol ovac knofl k do p...

Page 16: ...a v stup a zajist te ho oto en m doprava G 6 P ep na em rychlost zapn te spot ebi Viz Volba spr vn rychlosti 7 Chcete li odstranit m cha oto te ho doleva a zvedn te ho Rady pro m ch n Nikdy neodstra u...

Page 17: ...u ek pro s to ml nku Kl Hrub s to ml nku Sb rn m sa Pokyny pro sestaven Nasa te n na posunovac roub a ujist te se e m spr vnou orientaci ostr okraje obr cen ven roub m ty hrann profil na kter se nasaz...

Page 18: ...rubici a kl em v druh ruce budete utahovat doprava L POZN MKA B hem pou v n bude mo n nutn znovu p it hnout n kru ek Nasa te t c na j dlo do hrdla a vyrovnejte ho pod v stupem aby zachyt val zpracovan...

Page 19: ...hrub ez n strouh n Ku el na jemn kr jen pl tk Ku el na hrub kr jen pl tk Pokyny pro sestaven Vyberte vhodn ku el pro dan pou it P ipevn te h del ke ku elu tak e vyrovn te up nac v stupky s otvory v z...

Page 20: ...te stroj na rychlost 4 i t n P ed i t n m a dr bou vypn te spot ebi a odpojte ho od s t 1 Odstra te v echny n stavce V echny n stavce lze m t v tepl sapon tov vod Zajist te aby byly d kladn vysu en 2...

Page 21: ...n lh ty vym n n z ruka na nov v robek se bude po tat od data p vodn koup Proto je velmi d le it abyste uschovali p vodn stvrzenku nebo fakturu s vyzna en m datem p vodn koup Platnost z ruky na spot eb...

Page 22: ...22 www morphyrichards com 48955MCZamended 9 1 07 4 32 pm Page 22...

Page 23: ...23 www morphyrichards com 48955MCZamended 9 1 07 4 32 pm Page 23...

Page 24: ...ce o recyklaci ve va zemi si zjist te od m stn ch ad nebo prodejce g Morphy Richards products are intended for household use only Morphy Richards has a policy of continuous improvement in product qual...

Reviews: