background image

4

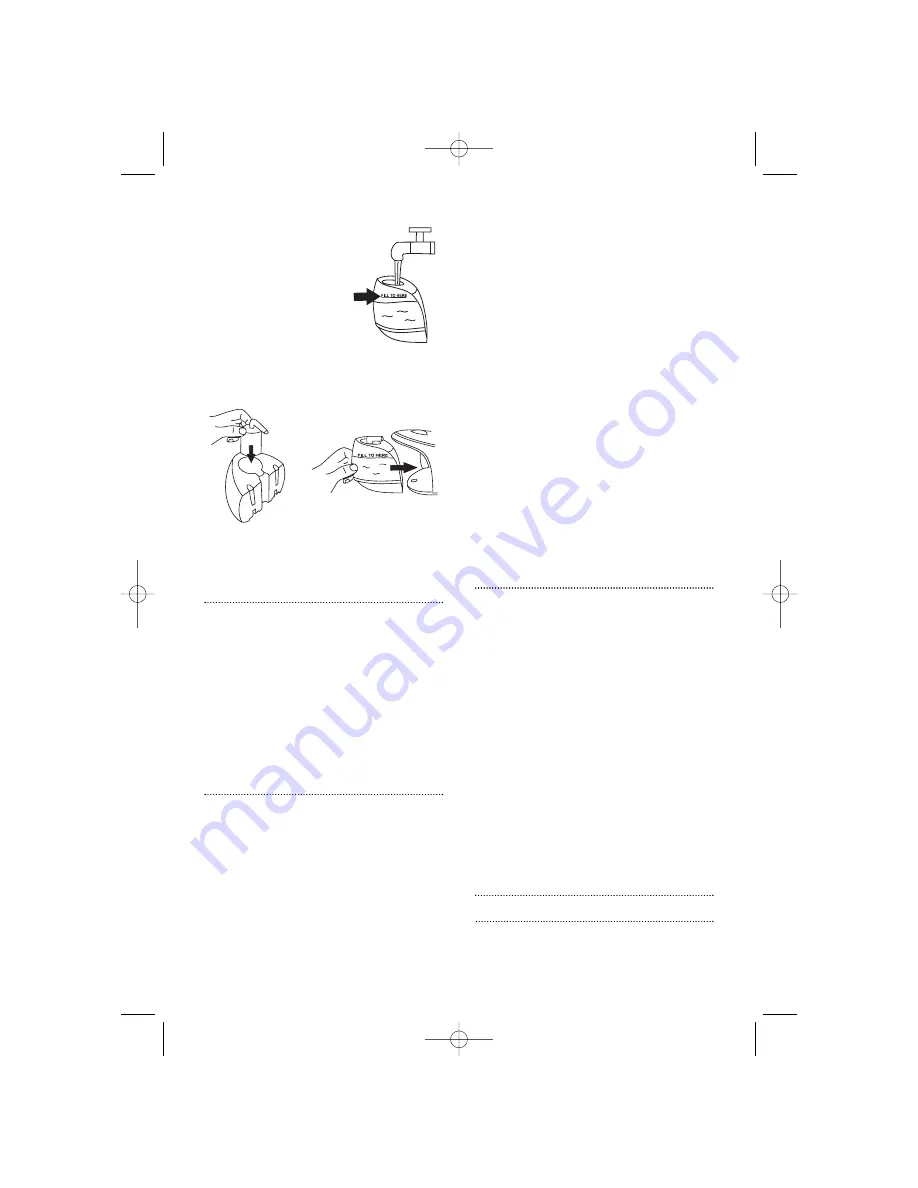
Fill the tank up to the

‘fill to here’ line with
clean tap water 

C

.

Never use battery

topping up fluid or

water containing any

substances like

starch or sugar, or

defrosted water from

a refrigerator.

5

Re-install the anti-scale cartridge and

replace the water tank on the base 
unit 

D

.

6

Always pour out remaining water after

use.

Re-filling

1

When the water level reaches a low level,

the pump begins to emit a loud noise.

This is due to air being pumped instead

of water and is quite normal. Refilling

can be done whilst the appliance is in

operation. It is not necessary to wait for

the appliance to cool down.

2

Slide out the water tank and fill (see

‘Filling’ instructions).

Steam ironing

1

Unwind and straighten the power cord

·

and supply cord 

fi

.

2

Slide out the water tank and fill (see

‘Filling’ instructions).

3

Connect the appliance to a suitable
mains outlet. Turn the power switch 

on the base unit to ‘

I

’ (on) and the

indicator will glow.

4

The boiler ready indicator light 

situated above the ‘power switch’ 

‚ 

will

also illuminate, indicating the boiler is on

it’s heating cycle and will extinguish

when the required temperature is

reached. 

5

Turn the temperature dial on the iron in a

clockwise direction, select dot-1, dot-2

or dot-3 according to the

recommendation of the garment label.

6

The iron’s temperature indicator light 

goes off when the required temperature

is reached.

7

Depress the steam button 

for one

minute to clean the steam generating

system (for first time use). It will be

accompanied by a clicking noise which

is quite normal.

8

Begin first time ironing with an old towel.

It takes one minute to reach the required

temperature.

9

Press the steam button for steam

ironing.

10

To switch the unit off, turn the power

switch on the base unit to ‘

O

’ (OFF).

Dry ironing

1

Connect the appliance to a suitable

mains outlet.

2

Turn the temperature dial on the iron in a

clockwise direction, select dot-1, dot-2

or dot-3 according to the

recommendation of the garment label.

3

The temperature indicator light glows on

the iron, indicating that it is switched on.

4

When the required temperature is

reached, the temperature indicator light

on the iron goes off. The iron is then

ready to use.

It is always a good idea to begin with

’cool’ fabrics and work up to higher

settings.

An iron heats up quicker than it cools

down, so you’ll save time and electricity.

Steam ironing

5

D

The spray unit (certain models only)

The spray unit can be used at any time and

does not affect any product settings. 

C

42271 rev4  30/7/08  15:56  Page 5

Summary of Contents for Steam Generator

Page 1: ...website getting the best from your new steam generator Safety first Caution must be used when handling this appliance as it does get very hot Always switch off the unit and allow to cool before cleaning or storing Water tank and spray certain models only The water tank can be removed and re filled at any time during ironing Performance To extend the performance and life of your jet stream generato...

Page 2: ...d to over hang the work surface The socket should always be off before plugging or unplugging from the socket Never yank the cord to disconnect from the socket instead grasp the plug and pull to disconnect This appliance is not intended for use by persons including children with reduced physical sensory or mental capabilities or lack of experience or knowledge unless they have been given supervisi...

Page 3: ...ur house electricity supply which must be A C Alternating current For appliances with fitted plug If the socket outlets in your home are not suitable for the plug supplied with this appliance the plug should be removed and the appropriate one fitted WARNING The plug removed from the mains lead if severed must be destroyed as a plug with a bared flexible cord is hazardous if engaged into a live soc...

Page 4: ...ator is on a firm surface when ironing Before use Remove any protective sticker from the soleplate and the cabinet if any Textiles and clothes are supposed to carry ironing instructions If they don t you should follow the fabric guide on page 3 but be sure to test the temperature by ironing the hem of the garment or similar area first If you turn the control dial down from a hot setting to a coole...

Page 5: ...dial on the iron in a clockwise direction select dot 1 dot 2 or dot 3 according to the recommendation of the garment label 6 The iron s temperature indicator light goes off when the required temperature is reached 7 Depress the steam button for one minute to clean the steam generating system for first time use It will be accompanied by a clicking noise which is quite normal 8 Begin first time iron...

Page 6: ... per week ironing then we suggest you refill your anti scale cartridge as shown below If you iron more or less frequently then you should alter the interval between refills accordingly Replacement anti scale refills To obtain replacement anti scale refills telephone our spares number on 0844 873 0719 1 If a new cartridge is not available you may continue operating the appliance but scale will buil...

Page 7: ... boiler can now be stored together Maintenance To clean a stainless steel soleplate To keep the soleplate of your iron clean and free of limescale we recommend that you use one of the gentle chrome silver or stainless steel cleaners that are generally available Always follow the manufacturer s instructions To clean off melted man made fibres set the iron at 3 dot position and pass it over a clean ...

Page 8: ...aused or is attributable to accidental use misuse negligent use or used contrary to the manufacturer s recommendations or where the fault has been caused by power surges or damage caused in transit 2 The appliance has been used on a voltage supply other than that stamped on the products 3 Repairs have been attempted by persons other than our service staff or authorised dealer 4 The appliance has b...

Reviews: