background image


2.1


Location 

When selecting a position for your unit you should make sure the floor is flat and firm, and the 
room is well ventilated. Avoid locating your unit near a heat source, e.g. cooker, boiler or radiator. 
Also  avoid  direct  sunlight  as  it  may  increase  the  electrical  consumption.  Extreme  cold  ambient 
temperatures may also cause the unit not to perform properly. This unit is not designed for use in 
a garage or outdoor installation. Do not drape the unit with any covering.


When installing the unit, ensure that 20 cm of free space is left at both sides, 15 cm at the rear 
and 20 cm at the top of the unit. This will allow cold air to circulate around the wine cooler and 
improve  the  efficiency  of  the  cooling  process.  The  door  can  be  opened  to  the  right  or  the  left, 
depending on what better suits the location. Please ensure there is adequate space for the door 
to fully open. 

2.2


Reversing the Door Swing 

Tools Required:


Phillips style screwdriver / Flat blated screwdriver / Hexagonal spanner 


  If  you  want  to  have  the  door  swing  reversed,  we  recommend  that  you  contact  a 

qualified technician. You should only try to reverse the door yourself if you believe that 
you are qualified to do so. 


  Ensure the unit is unplugged and empty. 


  Adjust the two levelling feet to their highest position. 


  To take the door of it is necessary to tilt the unit backwards. You should rest the unit on 

something solid so that it will not slip during the door reversing process. 


  All parts removed must be saved to do the reinstallation of the door. 


  Do not lay the unit fat as this may damage the coolant system. 

  We recommend that 2 people handle the unit during assembly.   

 
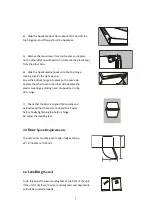
1)


Remove the plastic covering from the top door hinge. 


2)


Unscrew the three screws from the bottom bracket. 

Remove the foot from opposite side. 


3)


Place to one side. 


Summary of Contents for KSTRC44CB

Page 1: ...MODEL User manual COMPACT REFRIGERATOR SINGLEDOOR KSTRC44CW KSTRC44CB...

Page 2: ...or Accessories 4 3 PRODUCT OVERVIEW 4 4 OPERATION 5 4 1 Switching On Your Unit 5 4 2 Noise Inside the Unit 5 4 3 Tips for Keeping Food in the Unit 5 5 CLEANING 6 5 1 Defrosting 6 5 2 Cleaning the Inte...

Page 3: ...supervision 7 If the supply cord is damaged it must be replaced by the manufacturer its service agent or similarly qualified persons in order to avoid a hazard 8 Please abandon the refrigerator accor...

Page 4: ...the location Please ensure there is adequate space for the door to fully open 2 2 Reversing the Door Swing Tools Required Phillips style screwdriver Flat blated screwdriver Hexagonal spanner If you wa...

Page 5: ...Replace theother foot on the other side Replace the plastic covering by clicking back into position on the door hinge 7 Check that the door is aligned horizontally and vertically and that the seals a...

Page 6: ...le with the plug supplied with the unit Before Turning On Do not turn on until two hours after moving the unit The coolant fluid needs time to settle 2 7 Interior Accessories Various glass or plastic...

Page 7: ...er at the normal choose the number 3 The number represent the location of the temperature does not mean that a specific temperature 4 2 Noise Inside the Unit You may notice that your unit makes some u...

Page 8: ...move the salad bin first remove the lower door shelf Wipe the inside of the unit with a weak solution of bicarbonate soda and then rinse with warm water using a wrung out sponge or cloth Wipe complete...

Page 9: ...too much food in the freezer at one time Do not put foods until they are cooled Frequent opening of refrigerator door Illuminating light does not shine Whether the refrigerator is connected to power w...

Reviews: