background image

    B 

Set open-window detection (ONLY by remote control): 

 Press“ 

the product enters into working status. Heating for a moment until stable. 

 Press

”    ” by remote control, light “ 

“ will on; The temperature displays ”23”by default. Press ” 

“      to set desired temperature. During open-window detection mode, once the ambient temperature drops 5-10


within  10  minutes,  then  the  product  will  stop  working  within  30  minutes  and  enters  into  stand  by  mode.  Then 

pr

ess “ 

” to turn on the product. 

Press    ” 

“‘’  again  to  turn  off  the  open-window  detection,  the  light  “ 

”will  go  off  and  the  product  will 

resume to previous working mode. 

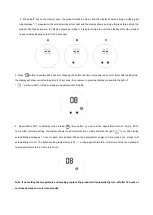
Below is an example to set 23

 during open-window detection. See below image F: 

4)

      G 

Maintenance and cleaning 

Warning:

 Never use detergent, chemical


damage plastic parts. 

Warning:

 Let the appliance cool down completely before handling or cleaning: 

To prevent risk of fire or electrocution inside the appliance.

Clean the outside wall of the appliance by rubbing it gently with soft, damp cloth, either with or without

soap.

Regularly clean the air inlet and outlet vents of the fan.

The open-window function is based on the working time that weekly timer is setted. If weekly timer is not working at 

a specific period, then open-window function also will not work. Product will stop working when temperature drops 

sharply (open-window function works) even if it does not reach the setting temperature. For example, you set 26 


in  weekly  timer.  When  the  product  is  at  20 

,  the  open-window  function  works  and  then  the  product  will  stop 

working. 

See below image G:

Note:  you have to set the working time in weekly timer, otherwise it shows '00' which means product will not work.

1)

2) 

3)

Summary of Contents for MBH-16314

Page 1: ...INSTRUCTIONS MANUAL Bathroom heater Model MBH 16314 THANK YOU FOR PURCHASING OUR BATHROOM HEATER BEFORE FIRST USE PLEASE READ THE INSTRUCTIONS CAREFULLY AND KEEP THEM FOR FURTHER REFERENCE...

Page 2: ...enter any ventilation or exhaust opening as this may cause an electric shock fire or damage to the appliance Do not immerse in liquid or allow liquid to run into the interior of the appliance as this...

Page 3: ...ey do not play with the appliance The appliance must not be located immediately below a socket outlet Do not use this appliance with a programmer timer or any other device that switches the heater on...

Page 4: ...your needs Before use make sure the product is well fixed on the wall 1 Plug in the power and turn on the main power switch on the back of the product The product enters the standby state The display...

Page 5: ...econds then resume to previous display meanwhile the light of will be turned on Below image is an example of setting 8h 4 Appointment ON In standby mode press timer button you can set the appointment...

Page 6: ...e same time below image C A B C 3 The timer of remote control operates as same as the timer button on unit body 4 Set current TIME DAY can set both under standby mode working status 1 Press button for...

Page 7: ...00am Memo the setting time 00 24 for choice See below image D 6 Press the display shows the pervious step turn on time by default Press continuously to set the turn off time Such as set the shutdown t...

Page 8: ...chemical damage plastic parts Warning Let the appliance cool down completely before handling or cleaning To prevent risk of fire or electrocution inside the appliance Clean the outside wall of the ap...

Page 9: ...ure control select one At minimum heat output elmin 0 0 kW single stage heat output and no room temperature control no In standby mode elSB 0 0 kW Two or more manual stages no room temperature control...

Page 10: ...arate collection systems for used electrical and electronic products Please help us to conserve the environment we live in DECLARATION OF CONFORMITY Herewith KALLIOPI KARYDA CO LP states that this pro...

Reviews: