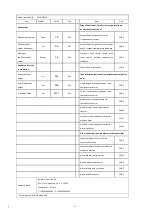
background image


3


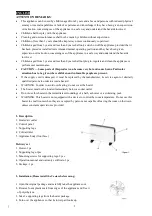
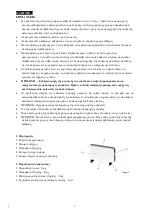
5. Attach the supporting legs to the lower part of the appliance on the   
left and right sides so that mounting holes are aligned with holes on the appliance body (Fig.2). 
6. Drive the  mounting screws to the available holes applying a sufficient force (Fig.2). Check security  of 
attachment. 
7. Turn the appliance to the right position and place it onto the even horizontal surface strictly vertically. 
The appliance is ready for operation! 
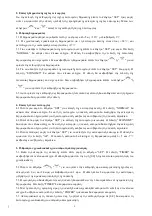


3. Heater control 

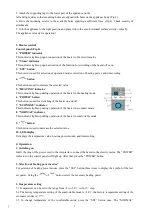
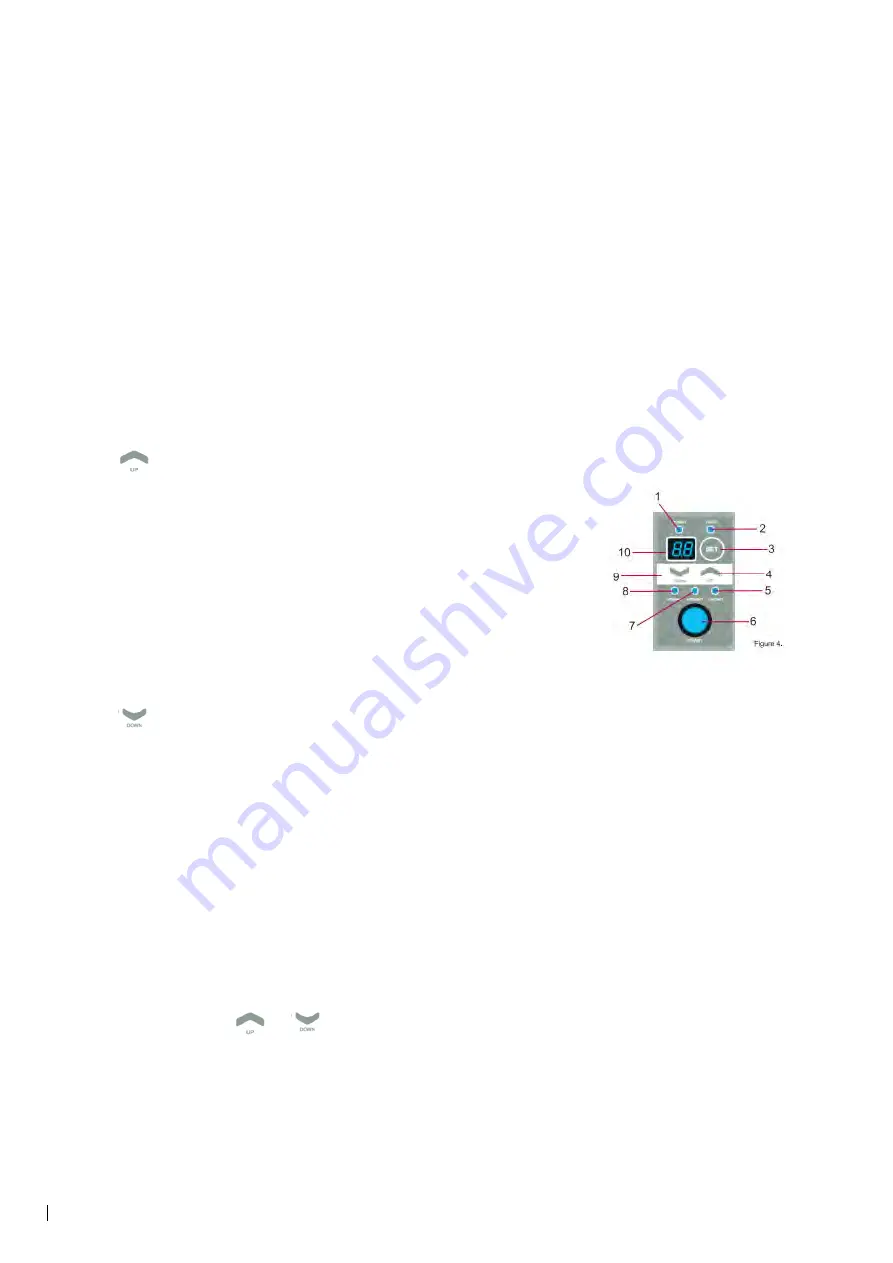
Control panel (Fig.4) 
1. “POWER” indicator 

This indicator lights up upon connection of the heater to the electric mains. 

2. “Timer” indicator 

This indicator lights up upon activation of the function for switching of the heater off or on. 

3. “SET” button 

This button is used for selection of operation modes, selection of heating power, and timer setting. 

4. “

” button 

This button is used to increase the selected value. 

5. “HEATING” indicator 

This indicator lights up during operation of the heater in the heating mode. 

6. “POWER” button 

This button is used for switching of the heater on and off. 

7. “ECONOMY” indicator 

This indicator lights up during operation of the heater in economic mode. 

8. “NORMAL” indicator 

This indicator lights up during operation of the heater in comfortable mode. 

9. “

”button 

This button is used to decrease the selected value. 

10. LED-display 

It displays the temperature value, heating power modes, and timer setting. 
 

4. Operation   

1. Switching on 

Insert the plug of the power cord to the receptacle to connect the heater to the electric mains. The “POWER” 
indicator on the control panel will light up. After that, press the “POWER” button. 
 

2. Selection of heating power modes* 

For selection of heating power modes, press the “SET” button three times to display the symbol of the last 

set power. Using the “

”or“

”button, select the necessary heating power.   

 
3. Temperature setting 

3.1 Temperature can be set in the range from +5 to +30

  with 1

  step. 

3.2 The factory temperature setting of the comfortable mode is +24

; the factory temperature setting of the 

economic modes is +17

3.3  To  change  temperature  of  the  comfortable  mode,  press  the  “SET”  button  once.  The  “NORMAL” 

Summary of Contents for MCH20018

Page 1: ...odel Μοντέλο MCH20018 Keep these instructions in a safe place for future reference Φυλάξτε τις οδηγίες χρήσης για ενδεχόμενη μελλοντική χρήση This product is only suitable for well insulated spaces or occasional use Αυτό το προϊόν είναι κατάλληλο μόνο για καλά μονωμένους χώρους ή για περιστασιακή χρήση ...

Page 2: ...tention has to be given where children and vulnerable people are present If the supply cord is damaged it must be replaced by the manufacturer its service agent or similarly qualified persons in order to avoid a hazard WARNING In order to avoid overheating do not cover the heater The heater must not be located immediately below a socket outlet Do not use this heater in the immediate surroundings o...

Page 3: ...ing mode 6 POWER button This button is used for switching of the heater on and off 7 ECONOMY indicator This indicator lights up during operation of the heater in economic mode 8 NORMAL indicator This indicator lights up during operation of the heater in comfortable mode 9 button This button is used to decrease the selected value 10 LED display It displays the temperature value heating power modes ...

Page 4: ... Setting of timer function for switching off 5 1 During operation of the heater press the SET button 5 times The TIMER indicator on the control panel will flash The display will show the flashing value 0 0 or last set value of the timer 5 2 Press the or button to set the heater switching off time from 0 to 24 hours with 1 hour step The display will show the countdown of time remaining till the mom...

Page 5: ...f To switching the heater off press the POWER button on the control panel and disconnect the appliance from the electric mains 5 Maintenance The appliance should be regularly washed to remove dust and contaminations from its outer surfaces since it affects the effectiveness of its operation and temperature parameters of space heating Prior to the preventive maintenance activities switch the applia...

Page 6: ...lect one At minimum heat output elmin N A kW single stage heat output and no room temperature control no In standby mode elSB N A kW Two or more manual stages no room temperature control no with mechanic thermostat room temperature control no with electronic room temperature control yes electronic room temperature control plus day timer no electronic room temperature control plus week timer no Oth...

Page 7: ...ή ρεύματος να αλλάζουν ρυθμίσεις να καθαρίζουν τη συσκευή ή να εκτελούν εργασίες συντήρησης σε αυτήν ΠΡΟΣΟΧΗ Ενδέχεται μέρη της συσκευής να αναπτύξουν υψηλές θερμοκρασίες και να υπάρχει κίνδυνος πρόκλησης εγκαυμάτων Πρέπει να δοθεί ιδιαίτερη προσοχή όταν υπάρχει η κοντινή παρουσία παιδιών ή ευπαθών ατόμων Σε περίπτωση φθοράς του καλωδίου παροχής ρεύματος θα πρέπει άμεσα να ελεγχθεί και να αντικατα...

Page 8: ...OWER Αυτή η ένδειξη ανάβει με το που συνδέεται η συσκευή στην παροχή ρεύματος 2 Ένδειξη Timer Αυτή η ένδειξη ανάβει με την ενεργοποίηση της λειτουργίας ενεργοποίησης ή απενεργοποίησης της συσκευής 3 Πλήκτρο SET Το πλήκτρο αυτό είναι για την επιλογή μεταξύ λειτουργιών επιλογή ισχύος θέρμανσης και ρύθμιση του χρονοδιακόπτη 4 Πλήκτρο Το πλήκτρο αυτό χρησιμεύει στην αύξηση της επιλεγμένης τιμής 5 Ένδε...

Page 9: ...έγχου Σε αυτή τη λειτουργία η συσκευή αυτόματα θα διατηρήσει την επιλεγμένη θερμοκρασία που έχει οριστεί για τη λειτουργία αυτή ανάβοντας και σβήνοντας τη συσκευή περιοδικά 4 2 Πιέστε δύο φορές το πλήκτρο SET για επιλογή της λειτουργίας οικονομίας Η ένδειξη ECONOMY θα ανάψει στον πίνακα ελέγχου Σε αυτή τη λειτουργία η συσκευή αυτόματα θα διατηρήσει την επιλεγμένη θερμοκρασία που έχει οριστεί για τ...

Page 10: ...ν κλειδώσει και κατά την πίεση τους θα εμφανίζεται στην οθόνη το σύμβολο 8 2 Για να ξεκλειδώσετε τη συσκευή πιέστε και κρατήστε πατημένα τα πλήκτρα και για 3 δευτερόλεπτα ή απενεργοποιήστε τη συσκευή 9 Λειτουργία RESTART επανεκκίνηση Σε περίπτωση μικρής διακοπής στην παροχή ρεύματος η συσκευή αυτόματα θα επανενεργοποιηθεί μόλις επανέλθει η παροχή ρεύματος και θα συνεχίσει τη λειτουργία της με βάση...

Page 11: ... να επιλεχθεί μια δυνατότητα στην ελάχιστη θερμική ισχύ elmin N A kW μονοβάθμια θερμική ισχύς και χωρίς ρυθμιστή θερμοκρασίας δωματίου όχι σε κατάσταση αναμονής elSB N A kW δύο ή περισσότερες χειροκίνητες βαθμίδες χωρίς ρυθμιστή θερμοκρασίας δωματίου όχι με μηχανικό θερμοστατικό ρυθμιστή θερμοκρασίας δωματίου όχι με ηλεκτρονικό ρυθμιστή θερμοκρασίας δωματίου ναι με ηλεκτρονικό ρυθμιστή θερμοκρασία...

Page 12: ...συσκευών προς ανακύκλωση Στις χώρες της Ευρωπαϊκής Ένωσης υπάρχουν σημεία συγκέντρωσης χρησιμοποιημένων ηλεκτρικών και ηλεκτρονικών συσκευών Παρακαλούμε βοηθήστε μας να προστατέψουμε το περιβάλλον που ζούμε ΔΗΛΩΣΗ ΣΥΜΜΟΡΦΩΣΗΣ Με την παρούσα η Αμοιρίδης Σαββίδης Α Ε δηλώνει ότι η παρούσα συσκευή συμμορφώνεται προς τις ουσιώδεις απαιτήσεις και τις λοιπές διατάξεις των παρακάτω οδηγιών EMC Directive ...

Reviews: