16
4 Installation
4.1 Selecting the best possible installation
location
Due to the large number of possible vehicle dimensions
and designs, observation of the general notes on the
optimal positioning is highly recommended.
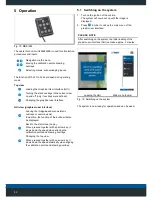
Fig. 9: Camera positions and blind spots
• Keep in mind that convex panels or added
structures may restrict the view.
• In this case, the area immediately next to the
vehicle will not be captured completely, see red
zones Fig. 9.
• Within the context of legal and technical options, it
is possible to use brackets in order to mount the
cameras in order to enlarge the viewing field.
Also observe the following instructions for selecting the
mounting position:
• Position the cameras as high as possible and in the
centre of the relevant side of the vehicle after the
calibration.
• In the case of vehicles which are subject to
authorisation for the transport on public roads,
when the camera protrudes beyond the outer
contour of the vehicle: Mount the cameras at a
minimum height of 2 meters
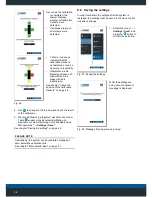
• When installing the cameras, ensure the type plate
points downwards of the vehicle.
Fig. 10: Type plate position
• Cameras that project the vehicle's contour must be
protected with suitable safety bar or cover.
• Align the cameras in order to ensure that the image
of the vehicle boundaries is captured. The area
around the vehicle must be recorded properly and
the field of view must overlap at least 3 metres.
• Avoid installation positions where add-on
components restrict the view of the road.
• Avoid installation positions subject to excessive
vibrations.
• Never install the cameras on movable attachments.
• Avoid installation positions subject to an increased
risk of contamination.

