background image


Selecting CH1/CH2/CH3   

(5)  ON/OFF: 

This keypad is used to turn the output power on or off. 

(6)  Number Key: 

Input  number  by  number  key.  To  set  the  voltage  or  current,  press  the 
“V” or “A” key after the number input. 

(7) 

►(STORE): 

This  keypad  has  two  (2)  functions.  When  the  output  is  on,  this  key  is 

used  to move  the  cursor  to  select  the  digit  to  be  adjusted.  Users  then 

adjust  the  digit  by  turning  the  rotary.  When  in  memory  function,  this 

keypad  is  used  to  store  the  current  configuration  into  the  memory 

simply by pressing it. 

(8) 

◄(RECALL): 

This  keypad  has  two  (2)  functions  also.  When  the  output  is  on,  press 

this  key  to  move  the  cursor  to  the  selected  digit  and  then  turning  the 

rotary  to  adjust  the  value  of  the  digit.  When  in  memory  function,  by 

pressing this key to recall a stored configuration from the memory. 

(9)  DISP: 

Press  this  key  to  select  the  display  to  show  the  voltage/current  or 

power/resistance readout. 

(10)  V(Voltage): 

Press this key to set voltage after number input.   

(11)  A(Current): 

Press this key to set current after number input. 

(12)  Config: 

Press  this  key  to  enter  the  configuration  setting.  There 16  items  to  be 

set in this mode. 


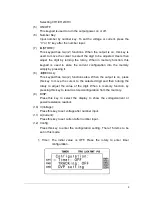
1.  Timer:  The  initial  value  is  OFF.  Press  the  rotary  to  enter  timer 

configuration.   


Summary of Contents for LPS 505N

Page 1: ...LPS 505N Programmable DC Power Supply User s Manual...

Page 2: ......

Page 3: ...e held liable for errors contained herein or direct indirect special incidental or consequential damages in connection with the furnishing performance or use of this material MOTECH INDUSTRIES INC 6F...

Page 4: ...cost MOTECH assumes no responsibility for its product being used in a hazardous or dangerous manner either alone or in conjunction with other equipment High voltage used in some instruments may be da...

Page 5: ...e device is precision equipment please use qualified transportation as possible And please avoid heavy hitting to damage the device Maintenance There is no maintenance operation for the general user e...

Page 6: ......

Page 7: ...05N Panel Description 8 4 1 1 Front Panel Description 8 4 1 2 Rear Panel Description 16 5 Operation Setting 18 5 1 Voltage Setting 18 5 2 Current Setting 18 5 3 OVP 18 5 4 OCP 18 5 5 Rotary Controller...

Page 8: ......

Page 9: ...ded to meet general applications The LPS 505N has a rotary and numeric keypads for user to manipulate this electronic instrument easily The LPS 505N provides a memory space enough to store 100 configu...

Page 10: ...ment equipment budget and space 4 Memory and timer function LPS 505N provides a memory space to store 100 settings that can be easily recalled This feature makes the restoration of the previous settin...

Page 11: ...3 Users only needs to setup CH1 output voltage and current LPS 505N will output the same voltage current at CH2 This is convenient to test two samples at the same time...

Page 12: ...pp 1mVrms 20mVpp Normal Mode Current 1mA 5mA Resolution Programming 10mV 1mA 10mV 2mA Readback 10mV 1mA 3mV 2mA Programming Accuracy of output offset Voltage 0 05 20mV 0 05 6mV Current 0 05 3mA 0 05 4...

Page 13: ...on Mode Voltage 240Vdc Dimensions W H D mm 216 135 432 Weight 6 5 kg LPS 505N Features LCD display triple independent output and display on LCD CH3 auto ranging output Low Ripple Low Noise Number and...

Page 14: ...hat the ambient temperature is in 0 40 C and the relative humidity is in 20 80 If the temperature is over 40 C please don t use temporary until the temperature is back to normal to avoid the unit dama...

Page 15: ...fuse can t sure with the eyes the testing value under 15 is normal 3 When replacing the fuse the cap jut out the rear panel on fuse stand using flat type screwdriver or pressing softly by hand Mark Ce...

Page 16: ...is a 20x4 yellow green backlight LCD 2 Rotary ENTER Rotary can adjust voltage and current Users can press it as ENTER function 3 M Press M key to enter the memory function Users can then select one 1...

Page 17: ...ressing it 8 RECALL This keypad has two 2 functions also When the output is on press this key to move the cursor to the selected digit and then turning the rotary to adjust the value of the digit When...

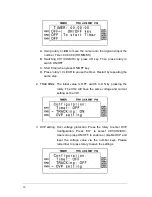
Page 18: ...e timer Restart by repeating the same step 2 TRACKING The initial value is OFF switch to ON by pressing the rotary The CH2 will have the same voltage and current setting as the CH1 3 OVP setting Over...

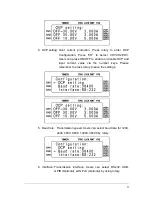
Page 19: ...to enable or disable OCP and input current value via the number keys Please remember to press rotary to save the settings 5 Baud rate Transmission speed Users can select baud rate for 1200 2400 4800 9...

Page 20: ...DHCP ON mode a dynamic IP address can be obtained from the server 8 IP When the DHCP is off it needs to set an IP address for the LPS 505N if LAN is selected Users may use the keypads to locate the cu...

Page 21: ...OFF Press rotary to turn on parallel output The total output current is 6A because the CH1 and CH2 are connected parallelized 12 Serial out Serial output The initial value is OFF Press rotary to turn...

Page 22: ...ings before the instrument shutdown The initial value is OFF Press rotary to turn on the function When the function is enable all setting will be saved before the instrument shutdown and recalled afte...

Page 23: ...se as a decimal point Or users can press the key to reset to LOCAL mode when in REMOTE connection 14 CLEAR ESC Clear the number input Or back to the previous display 15 Power Switch POWER ON OFF Power...

Page 24: ...lug connected to the AC source It uses for 115V 220V 19 Fuse The fuse used for power source When the switch set to 115V using 5A slow fuse set to 220V using 2 5A slow fuse 20 Remote Sense Local Sense...

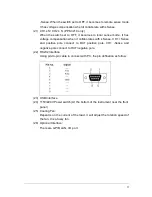
Page 25: ...Sense CH1 Sense and positive pole connect to DUT positive pole CH1 Sense and negative pole connect to DUT negative pole 22 RS232 Interface Using pin to pin cable to connect with PC the pin defination...

Page 26: ...the LCD Use the number key to input the current And press A to finish the setting The current will be set immediately 5 3 OVP Press Config to enter Configuration display adjust rotary or to move the c...

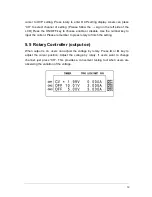
Page 27: ...r disable Use the number key to input the current Please remember to press rotary to finish the setting 5 5 Rotary Controller output on When output is on users can adjust the voltage by rotary Press o...

Page 28: ...tive integer numeric values are valid data NRf The data format NRf is defined in IEEE 488 2 for flexible Numeric Representation Zero positive and negative floating point numeric values are some exampl...

Page 29: ...allowed 005 Command Header Error 010 Numeric data error 011 Invalid character in number 013 Too many digits 014 Numeric data not allowed 016 Invalid suffix 020 Invalid character data 030 Invalid expr...

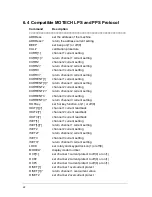
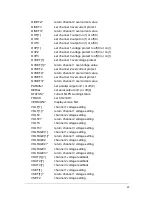
Page 30: ...channel 3 current setting CURRENT3 return channel 3 current setting HOTKey set hot key function on 1 or off 0 IOUT 1 channel 1 current readback IOUT2 channel 2 current readback IOUT3 channel 3 curren...

Page 31: ...l 3 overcurrent value PARAllel set parallel output on 1 or off 0 SERial set seial output on 1 or off 0 STATUS current NLPS working status TRACK set CH2 CH1 VERSION display version NO VOLT 1 channel 1...

Page 32: ...et channel 1 voltage to 35V is fail because out of range Q4 How to read the voltage setting value VSET return channel 1 voltage setting VSET2 return channel 2 voltage setting Q5 How to set current ISE...

Page 33: ...off Q10 How to set the parallel output mode PARA 1 parallel on PARALLEL ON parallel on PARA 0 parallel off PARALLEL OFF parallel off Q11 How to set the serial output mode SER 1 serial on SERIAL ON se...

Page 34: ...are type version RCL Recalls settings from memory Memory numbers from 0 to 99 are valid RST Resets the power supply to its power on state SAV 1 Saves defined parameters 2 Saves current settings to mem...

Page 35: ...al mode NORMal resume normal mode STATus status subsystem read back machine status ERRor read back machine error code CCP read back Iset DAC value CVP read back Vset DAC value MONV read back Vout DAC...

Page 36: ...PAUSE stop running the timer MEMory memory subsystem n select n page memory number n range from 0 99 read back memory page n parameters VSET n volt setting for channel n 1 3 level voltage level 0 32V...

Page 37: ...the string must be less than 15 characters LOCAL ON disable remote mode and back to local mode GPIO this command is valid when optional card exists level read or set up level of GPIO pins level 0 255...

Page 38: ...n volts for channel n 1 3 level voltage level 0 32V for ch1 and ch2 0 15V for ch3 PROTection over voltage protection OVP level return or set the over voltage in volts TRIGger trigger voltage protectio...

Page 39: ...tri channel output is OFF Q31 How to set up timer TIMER 00 10 00 set up the timer to run for 10 minutes TIM 99 59 59 set up timer to run 99 hours 59 minutes 59 seconds and then stop Q32 How to start t...

Page 40: ...ted in the above command Q38 How to stop program PROG OFF Q39 How to read program parameter PROGRAM Return program parameter PROGRAM TIMER Return timer parameter Q40 How to set memory step 1 MEM 1 sel...

Page 41: ...fy machine ID address CONTROL ADDR 23 modify id to 23 CONT ADDRESS 09 modify id to 9 Q46 How to check password CONT PASSWORD 12345 enter password to verify Q47 How to enter or leave the monitor mode G...

Page 42: ...or ch1 MEAS POWER3 read back power for ch3 MEAS POW3 read back power for ch3 Q54 How to measure resistance MEASURE RES1 read back resistance for ch1t MEAS RESISTANCE3 read back resistance for ch3 MEAS...

Page 43: ...annel 1 OISET2 1 9 set over current to 1 9A for channel 2 Q59 How to read back over voltage parameter SOUR VOLTAGE3 PROT return over voltage for channel 3 SOURCE VOLT1 PROT return over voltage for cha...

Page 44: ...TRIG OFF disable OCP for channel 1 OCP2 ON enable OCP for channel 2 OCP3 OFF disable OCP for channel 3 Q63 How to set up a program example PROG 10 define program 10 PROG ISET1 1 set max output current...

Page 45: ...put 7V PROG FAST 1000 output the setting of program 13 for 1 second PROG NEXT JUMP 12 jump to program 12 Q64 How to enable or disable DHCP CONT DHCP ON enable DHCP CONTROL DHCP 1 enable DHCP CONT DHCP...

Page 46: ...5 remote flag bit 4 keypad between push and pop status bit 3 machine running at time mode bit 2 machine running at sub menu mode bit 1 machine running at configuration sub menu mode bit 0 machine run...

Page 47: ...ect flag bit 3 machine running at DAC read back mode bit 2 timer pasue flag bit 1 machine running at calibration mode bit 0 reserved byte 6 bit 7 display lock message flag bit 6 continue to send V I s...

Page 48: ...sories Model LPS 505N Serial number Accessories Date No Description P N Q ty Selection 1 Power cord ZPO 640MI 1 Yes No 2 Black Red Test Lead ZTP LPSMI 1 3 Yes No 3 User s manual ZOM 505ME 1 1 Yes No V...

Page 49: ...ZOMG 505ME 1B...
Reviews: