background image

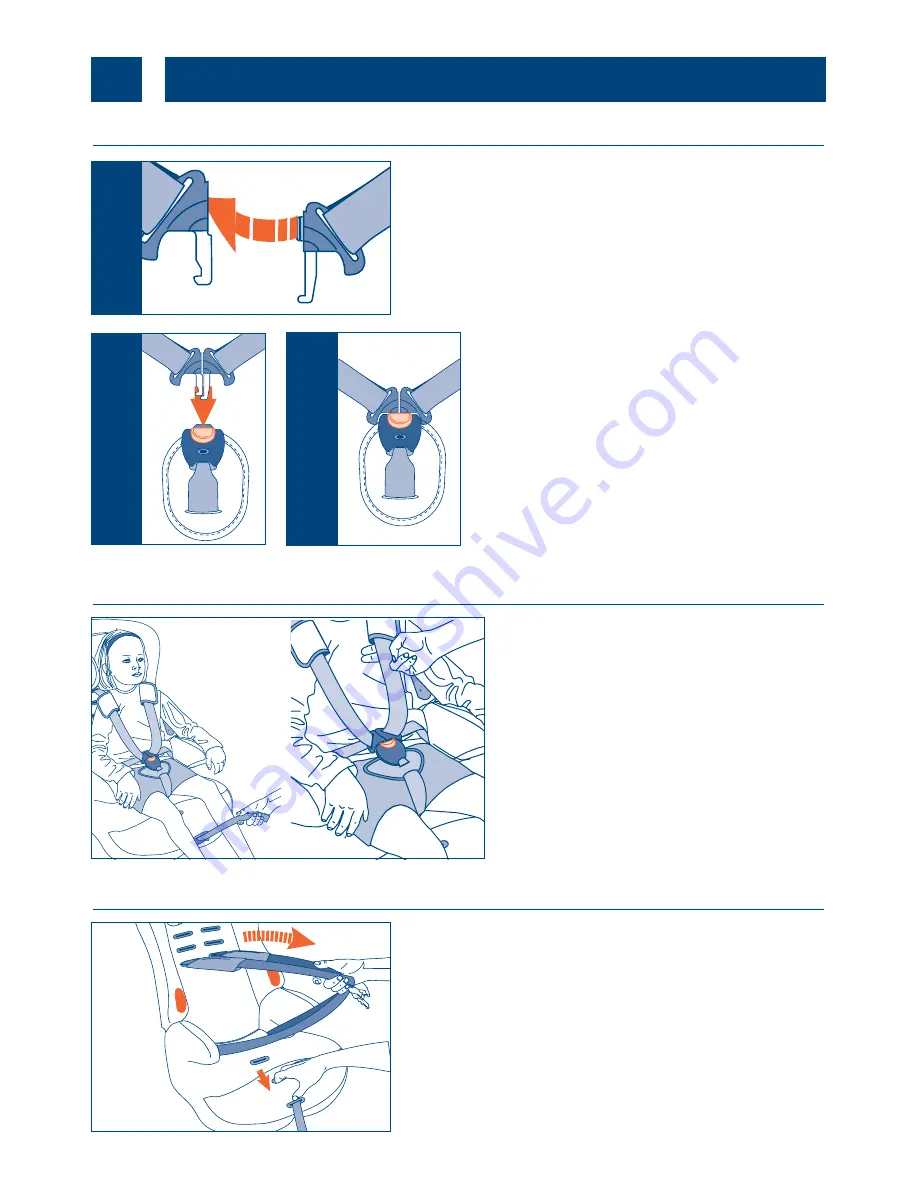
Place the left hand harness connector behind
the right hand one. They should slot together
neatly.

securing the harness

1

2

3

the harness 

6

loosening the harness

If the harness is too tight, loosen it by first
pressing the tab at the front of the seat, and
then pulling both straps, as shown.

Do not

pull

on the shoulder pads, as these are fixed in
length.

tightening the harness

Pull gently on the harness adjuster
to take up any slack.

A loose harness is 

dangerous

, so  it

should be checked 

every

time the

seat is used.

It is recommended that there is just
enough room to insert two fingers
between the shoulder straps and
the childs’ chest.

5

Push the harness ends into the hole in
the buckle at the top of the crotch
strap.You will hear and feel a ‘CLICK’
when it is secure. Check by attempting
to remove the connectors by pulling
the webbing above and below the
buckle. Periodically check that your
child has not released the buckle.
(To release the harness, press the red
button down.)

Summary of Contents for advance SP

Page 1: ...restraint for this age group 3 This child restraint has been classified as Universal under more stringent conditions than those which applied to earlier designs which do not carry this notice 4 If in...

Page 2: ...e Important Please retain this user guide for future reference Conforms to ECE R44 03 Universal EXTREME HAZARD Parents should not under any circumstances use this child restraint on a passenger seat e...

Page 3: ...ve your child unattended in the seat at any time It is recommended that this car seat should be changed when it has been subjected to violent stresses in an accident or has become badly worn Periodica...

Page 4: ...3 for children weighing from 22kg to 36kg 4 11 years approx HEAD SUPPORT BUCKLE AND RELEASE BUTTON DIAGONAL BELT CLIP for use in group 3 only see above Store in a FRONT OF SEAT SET UP FOR USE BY 9 18...

Page 5: ...must have 3 Your mothercare child seat can only be installed forward facing using a lap and diagonal seat belt DO NOT USE THIS CHILD SEAT IN PASSENGER SEATS EQUIPPED WITH AIRBAGS important notes In an...

Page 6: ...on the harness adjuster to take up any slack A loose harness is dangerous so it should be checked every time the seat is used It is recommended that there is just enough room to insert two fingers bet...

Page 7: ...he metal retaining yoke located at the back of the seat Leave the other one in place for reference Pull the shoulder strap through the harness slot in the shell and cover then pull through the shoulde...

Page 8: ...position Then re tighten the red locking device making sure that there is no movement in the head support The head support can be removed to wash the cover Please see care maintenance section 1 2 fit...

Page 9: ...e seat and fasten in the normal way making sure that the lap section is below the arm rest and the diagonal section goes through the red guide Make sure that there are no kinks or twists in the car se...

Page 10: ...back of the seat base The end of the harness adjuster which is left can be fed back into the slot in the cover for storage for future use To set up for use from 15kg to 25kg 1 2 2 a 3 9 Your child wil...

Page 11: ...oint seat belt Make sure it is facing towards the front of the vehicle Pull the lap and diagonal sections of the car seat belt across and secure it in the normal way Make sure that there are no kinks...

Page 12: ...d under both the arm rests of the child seat and the diagonal belt routed over the armrest as shown Attach the diagonal belt clip by threading the loose strap through the slot at the side of the seat...

Page 13: ...child seat is however well built it is your childs safety depends on you Read this final checklist once you have fitted your child seat in your car 1 Check that you have adjusted the harness to suit y...

Page 14: ...h the harness slots at the correct height for your child The shoulder pads are an important safety feature and must be fitted with the friction side against your child s shoulders 3 Feed the metal kee...

Page 15: ...fer to diagrams 1 to 5 on pages 9 and 10 Then release the elasticated edges of the cover from the seat Remove the head support by turning the red locking device whilst applying downward pressure as sh...

Page 16: ...listed below are available for your product In the event that you require any of these parts please contact your local mothercare store or contact Customer Care on 08453 30 40 30 BACK COVER SHOULDER P...

Reviews: