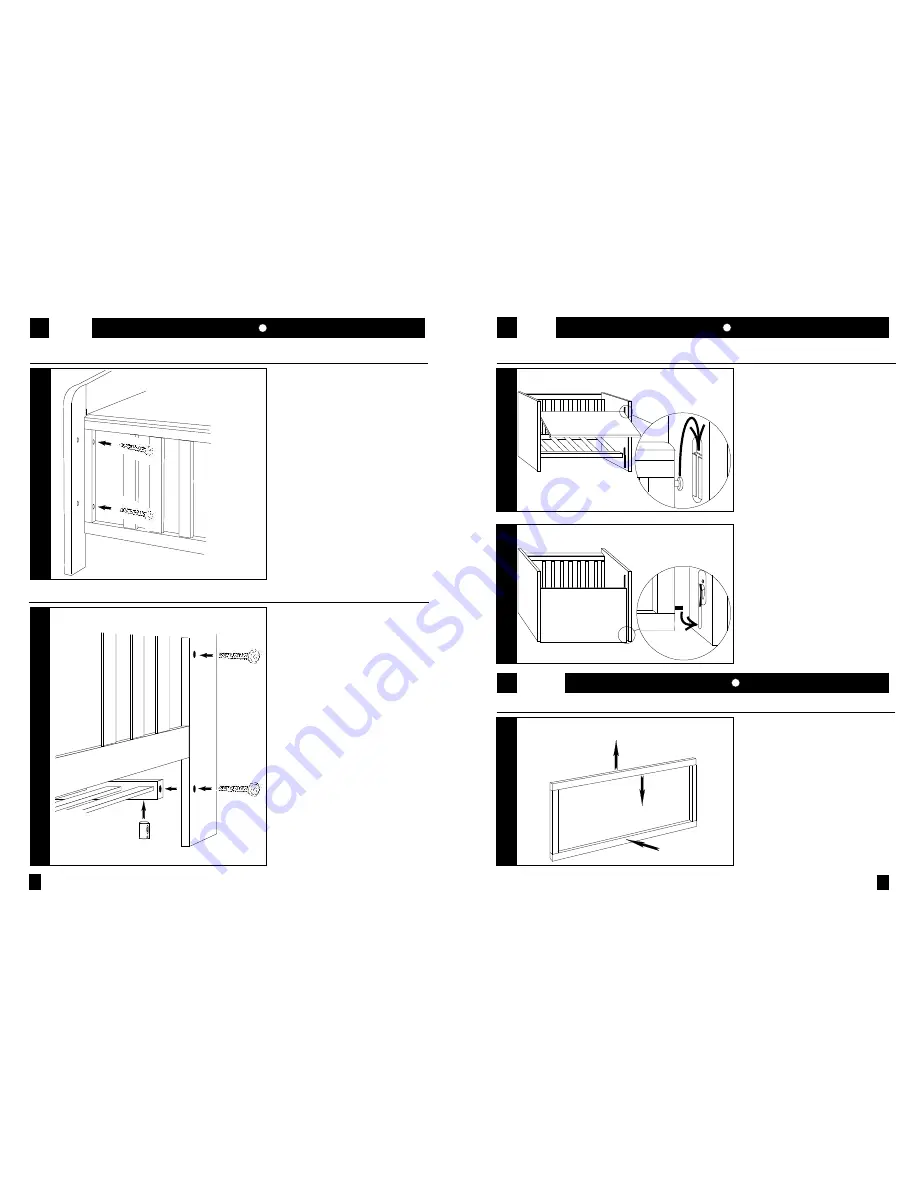
Engage the upper sliders on each
side of the dropside, in the upper leg
track. Slide downwards.
Engrane los pasadoros superiores,
en cada extremo del lado móvil, con
las ranuras superiores de cada pata.
Deslice hacia abajo.
Push the cot ends slightly apart and
engage the lower pins in the groove
near the bottom of each leg. Tighten
the mattress base bolts.
Separe ligeramente los extremos de
la cuna y engrane los pasadoros
inferiores con la ranura cerca del
fondo de cada pata. Apriete los
pernos en la base del colchón.
1
5
3
Attach the mattress base in the
higher (1) or lower (2) position, using
the long bolts and barrel nuts, as
shown. Do not fully tighten at this
stage.
Please note that the lowest position
is the safest (please see Section 6,
Safety Notes)
Asegure la base del colchón en la
posición más alta (1) o más baja (2),
utilisando los pernos largos y los
manguitos roscados, tal como se
indica. En esta etapa, no los apriete
completamente.
Nótese por favor que la posición
mas baja es la más segura (Véase el
Artículo 6, Medidas de Seguridad).
To Lower:
1. Lift.
2. Push the bottom rail with your leg.
3. Lower.
To Raise: Lift until it clicks.
Para Bajar
1. Levante.
2. Empuje al fondo con la pierna.
3. Baje.
Para Levantar: Levante hasta que
hace 'Clic'.
The Fixed Side
El Lateral Fijo
The Mattress Base
La Base del Colchón
The Drop Side
El Lateral Abatible
In Use
En Uso
Operating the Drop Side
Funcionamiento del Lateral Abatible
Attach the fixed side to the ends,
using the short bolts, as shown.
.
Asegure el lado fijo a los extremos,
utilisando los pernos cortos, tal
como se indica.
4
3
1
2
4
2
1
2
Assembly
Montaje
Assembly
3
Montaje
3
4


