background image

16

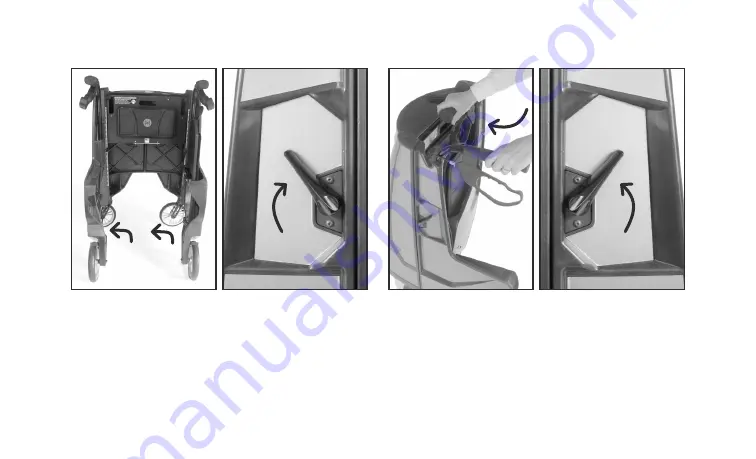
2. Fold in the RIGHT side. 

To close 

securely, always fold the RIGHT 

side in FIRST. 

Next, release the 

LEFT side by pulling up on the 
LEFT side latch lever to unlock.

1. Before folding, turn the Tour 

slightly to rotate the front wheels 
to one side. Then, release the 
RIGHT side by pulling up on the 
RIGHT side latch lever to unlock. 


Folding Your Tour

UNLOCK

UNLOCK

UNLOCK

Summary of Contents for Tour

Page 1: ...Tour Owner s Manual ...

Page 2: ......

Page 3: ...e chosen the Tour and invite you to connect with us and other Tour users at www facebook com motivolife The following owner s manual provides details on how to safely and effectively use your Motivo Tour and all its integrated features If you have any questions more information can be found at www motivolife com You can also reach customer support via email at support motivolife com as well as by ...

Page 4: ...e professional to determine if the Tour is appropriate for you to use and the proper adjustment and usage of your Tour DO NOT use the Tour as a wheelchair or transport device The Tour is NOT intended for propelling while seated Serious injury can occur ALWAYS observe the Tour s 300 lb 136 kg weight limit The weight limit is the combined weight of the user and items placed in the storage area on th...

Page 5: ...p inclines slippery surfaces moving walkways or in the shower ALWAYS check to ensure handles are secure handle grips do not twist there is nothing hindering the movement of the wheels casters and the brakes are operating properly before use All four wheels MUST remain in contact with the ground at all times during use DO NOT hang anything other than a cane or Motivo certified accessories from your...

Page 6: ...Right Side Brake Levers Stow Away Seat Backrest Cane Hook Right Handle Right Side Latch Handle Height Adjustment Knobs Storage Door Seat Platform Brake Shoe Flip Out Tray Cup Holders Seat Cushion RIGHT SIDE VIEW INSIDE VIEW ...

Page 7: ...5 Carry Handle Left Side Left Handle Left Side Latch Brake Shoe Cane Hook Seat Support Bar LEFT SIDE VIEW FOLDED VIEW ...

Page 8: ...Press down on the LEFT side latch lever until it locks Unfolding Your Tour 1 Pull the black strap to release the Velcro style closure WARNING Pinch points exist between the front and side panels Make sure hands and body are clear of all pinch points LOCK ...

Page 9: ...ndle FULLY unfold the RIGHT side Press down on the RIGHT side latch lever until it locks 4 Squeeze handles towards each other to make certain latches are FULLY engaged before use If either side folds in repeat steps 2 4 LOCK ...

Page 10: ... until both click to engage the parking brakes Verify rear wheels do not rotate before sitting To release squeeze both brake levers How to Operate the Brakes 1 Squeeze both hand brake levers to slow the Tour down or stop the Tour temporarily ...

Page 11: ...to move the brake shoe away from the rear wheel turn the knurled cap counterclockwise 3 When the tension is set tighten the locking nut against the brake lever body to secure turning it counterclockwise DO NOT use if brakes are not properly adjusted When properly adjusted the brakes will prevent the rear wheels from rotating and when the brakes are released the rear wheels will rotate freely KNURL...

Page 12: ...set parking brakes p 8 and complete steps 2 3 for each handle Adjusting the Handle Height 2 Start by unscrewing the knob at the base of the handle turning it counterclockwise Refer to Handle Height Guide p 1 1 to determine height setting ...

Page 13: ...ten knob turning clockwise Above measurements are from the ground to the top of the grip ALWAYS consult your healthcare professional to determine proper adjustment and usage of the Tour Handle Height Guide 38 96 5 cm BOTTOM Hole 33 83 8 cm 37 94 0 cm 35 88 9 cm 31 78 7 cm TOP Hole 36 91 4 cm 34 86 4 cm 32 81 3 cm ...

Page 14: ...s snap onto the seat support bar Rotate seat down 1 Activate both parking brakes FULLY before using the seat p 8 Make sure tray is folded and storage door is closed pp 14 15 Using Storing the Seat WARNING Be careful of pinch points when unfolding and folding the seat ...

Page 15: ...til both upper clips snap onto the seat support bar and the bottom edge rests on the rubber catch 3 Align and place seat end securely on the LEFT side seat platform ONLY use seat when secured on the LEFT side seat platform and sits parallel to the ground SECURED CLIPS CATCH ...

Page 16: ...agnetic closure 1 To unfold pull up on the top half of the tray and rotate open The tray weight limit is 8 lb 3 6 kg Unfolding Folding the Tray WARNING Be careful of pinch points when folding and unfolding the tray Use caution when transporting hot beverages ...

Page 17: ...he storage door until it latches Opening Closing the Storage Compartment 1 Using hand opening pull to open Compartment weight limit is 10 lb 4 5 kg DO NOT put more than 5 lb 2 3 kg on the storage door when open or use as a seat ...

Page 18: ...T Next release the LEFT side by pulling up on the LEFT side latch lever to unlock 1 Before folding turn the Tour slightly to rotate the front wheels to one side Then release the RIGHT side by pulling up on the RIGHT side latch lever to unlock Folding Your Tour UNLOCK UNLOCK UNLOCK ...

Page 19: ... closure WARNING Pinch points exist between the front and side panels Make sure hands and body are clear of all pinch points 1 To transport fold your Tour p 16 and with the folded sides facing you pick up using the carrying handle inside the RIGHT hinge Transporting Your Tour ...

Page 20: ...n of parts including hardware brackets and plastics for deformation corrosion breakage wear or compression is recommended Regular cleaning of the Tour is recommended Wipe all surfaces including cushions with a damp cloth and wipe surfaces dry before use DO NOT use harsh chemicals or solvents DO NOT clean cushions in a washing machine ONLY use certified Motivo replacement parts and accessories Gene...

Page 21: ...in such warranty period the Tour shall be proven to be defective it shall be repaired or replaced at Motivo s option with refurbished or new parts This warranty does not include any labor or shipping charges incurred in replacement part installation or repair of the Tour Repairs shall not extend this warranty Coverage for repaired products shall end when this limited warranty terminates Motivo s s...

Page 22: ...arts or accessories not originally intended or compatible with the Motivo Tour The warranty does not apply to damage or failure due to accident abuse corrosion discoloration of plastic or neglect Motivo Inc shall not be responsible for incidental or consequential damages Any warranty replacement parts shall be warranted for the remainder of the original warranty term Motivo Inc expressly disclaims...

Page 23: ......

Page 24: ... motivolife Facebook com motivolife Made in the USA Copyright 2018 Motivo All rights reserved Motivo Inc 16227 W Ryerson Rd New Berlin WI 53151 414 235 9409 www motivolife com ...

Reviews: