background image

Page 18

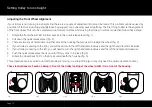
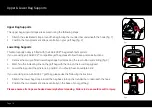
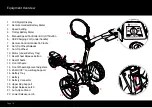
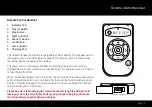
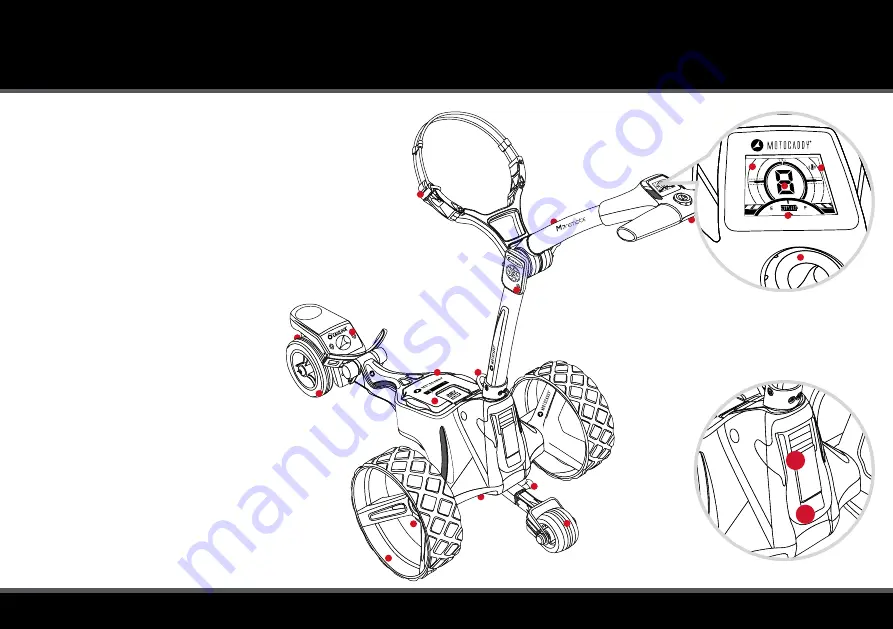
1.  LCD Digital Display
2.  Remote Handset Battery Meter
3.  Speed Setting
4.  Trolley Battery Meter
5.  Manual Speed Controller & On/Off Button
6.  USB Charging Port (under handle)
7.  Remote Control Handset & Cradle
8.  Anti-Tip Wheel Release
9.  Anti-Tip Wheel
10.  Motor (under Battery Tray)
11.  Rear Wheel Release Button
12.  Rear Wheels
13.  Front Wheels
14.  Front Wheel Alignment Adjusters
15.  EASILOCK™ Lower Bag Support
16.  Battery Tray
17.  Battery
18.  Battery Connector
19.  Upper Bag Support
20.  Upper Release Latch
21.  Auto-Open Stand
22.  Lower Release Latch

Equipment Overview

7

13

8

10

11

14

9

12

21

22

18

16

17

15

19

20

1

5

2

3

4

6

Summary of Contents for M7 REMOTE

Page 1: ...instructions for other Motocaddy instructions including translations M7 REMOTE Electric Trolley Instruction Manual Before using the M7 REMOTE for the first time please take a few minutes to read thro...

Page 2: ...ttery Care 9 Attaching the Wheels Inverting the Wheels 10 Attaching the Anti Tip Wheel 11 Setting trolley to run straight 12 13 Unfolding Folding your Trolley 14 15 Upper Lower Bag Supports 16 Adjusti...

Page 3: ...of the packaging in case you need to return your trolley for any reason A proof of purchase must also be kept in case your trolley requires servicing during its warranty period Please keep a record of...

Page 4: ...ays be used when operating the M7 REMOTE Never aim the M7 REMOTE at other people or golf trolleys Do not attempt to transport any other equipment The trolley is not designed for the transportation of...

Page 5: ...120 seconds the trolley will stop Whilst moving if the trolley travels out of range of the remote control the trolley will also cut power to the motors Whilst operating the trolley in manual mode if n...

Page 6: ...ter from the trolley prior to storage Never use a pressure washer to clean your trolley To prevent water damage wipe down with a damp cloth Avoid using high pressure air hoses near moving components T...

Page 7: ...sed to charge any other battery and is designed for use with Motocaddy Lithium batteries only The charger should only be connected to an earthed socket outlet the battery charger should only be opened...

Page 8: ...s depending on the depth of discharge please be aware that this may take longer for the first few charges 6 Once charging is complete please disconnect the charger from the mains power supply 7 Finall...

Page 9: ...otect the battery from excessive abuse high currents deep discharge and overcharge When the battery is delivered there may be no output as the BMS is designed to maximize safety whilst shipping Please...

Page 10: ...dible click will confirm the wheel is in the correct position The outer groove can be used as a free wheel option if you run out of battery power To check you have attached the wheels correctly onto t...

Page 11: ...WAYS fitted when navigating using the remote control handset To attach the wheel simply pull the grey button on the right hand side out and slide the wheel attachment into the housing There will be a...

Page 12: ...here are two small metal dials on either side of the housing that are used to realign the wheel fig 3 4 If your trolley is veering to the right you will need to turn the left hand dial clockwise and t...

Page 13: ...ning the dial either clockwise or anti clockwise will then change the display to show 1 9 turning the dial anti clockwise will trim the trolley left and turning the dial clockwise will trim the trolle...

Page 14: ...se the upper latch fig 1 2 Unfold the handle and re secure the latch fig 2 3 Release the lower latch fig 3 4 Lift the trolley handle up into position fig 4 The front wheel will automatically unfold 5...

Page 15: ...l the trolley is fully folded fig 3 4 Re secure both latches If you wish to stand the trolley upright leave auto open stand out Remember to ensure the auto open stand is pushed down if not being used...

Page 16: ...ase follow these simple instructions 1 Remove the two pre fitted lower bag straps by depressing the rear button and sliding fig 3 2 Match up the indicating line on the golf bag with the line on the lo...

Page 17: ...ould be adjusted to be reasonably tight around the golf bag 1 Unclip the elasticated straps from the housing by pulling outwards in the direction shown fig 1 2 Move the bar as required to tighten or l...

Page 18: ...8 Anti Tip Wheel Release 9 Anti Tip Wheel 10 Motor under Battery Tray 11 Rear Wheel Release Button 12 Rear Wheels 13 Front Wheels 14 Front Wheel Alignment Adjusters 15 EASILOCK Lower Bag Support 16 B...

Page 19: ...lly charged the green LED will be on and not flashing This will take around 4 5 hours to fully charge from flat When the handset battery starts to get low the LED will flash red when pressing a button...

Page 20: ...set can be locked by pressing the Lock button fig 2a when this is pressed the LED will either flash Green or Red fig 2b Green indicates that the handset is unlocked and Red indicates that it is locked...

Page 21: ...quickly by pressing the stop button or gradually by decreasing the speed until it stops the lowest speed setting in remote mode is 2 once you slow to speed 2 decreasing the speed once more will stop t...

Page 22: ...and humidity conditions can result in localised misting within the display screen This will not affect the trolley functionality nor cause any damage and will return to normal when adverse conditions...

Page 23: ...ormity Wednesday January 01 2020 Model S1 S1 DHC S3 PRO S3 PRO DHC S5 CONNECT S5 CONNECT DHC S7 REMOTE M1 M1 DHC M3 PRO M3 PRO DHC M5 CONNECT M5 CONNECT DHC M5 GPS M5 GPS DHC M TECH C TECH M7 REMOTE J...

Page 24: ...om We are dedicated to protecting the environment and encourage the recycling of Motocaddy products through a free collection and disposal service To find out more or to locate your nearest Motocaddy...

Reviews:

Related manuals for M7 REMOTE