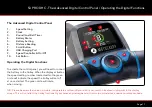
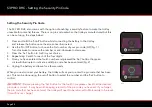
background image

Page 18

Setting the Time

1.  Press and hold the ‘Set’ button for three seconds until the ‘minutes’ start flashing 
2.  Set the minutes by pressing the ‘Scroll’ button, each press will increase the time by one minute
3.  To toggle to the hour press the ‘Set’ button again 
4.  Repeat steps 1-3 to set the hour
5.  Once the time is correct, press and hold the ‘Set’ button for three seconds to confirm 
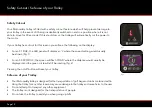
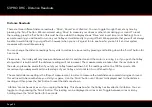
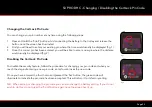
Battery Meter

The battery meter on the digital display is set to measure capacity of a Lead-acid battery by default. To enable accurate 
measurement of Lithium battery capacity, please follow the procedure below: 

1.  Hold down the ‘Scroll’ button while plugging in the battery and release the button once the screen illuminates
2.  If you have already set a pin code, you will need to enter this now in the top left hand side of the screen (where the time is 

usually displayed). If no pin code has been set then proceed to step 3

3.  Press the ‘Scroll’ button to toggle between ‘S’ (Lead-acid battery) and ‘L’ (Lithium battery)
4.  Unplug the battery and leave for five seconds before reconnecting ready for use

NB : Please note that during this process the pin code may also be set. If you do not wish to set a pin code please only use  
the Scroll button (‘Set’ button is used to set the pin code).


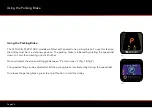
The trolley is designed to protect your battery from being fully discharged. If the battery capacity drops too low, the trolley will 
cut power to the motor and the battery meter will start flashing.

S3 PRO DHC - Setting the Time / Battery Meter

Summary of Contents for S1 DHC

Page 1: ...S1 DHC S3 PRO DHC Electric Trolley Instruction Manual REGISTERONLINE www motocaddy com warranty...

Page 2: ...your Serial Number The serial number for your Motocaddy trolley is located on the underside of the battery tray This number is required when registering your warranty online and should be kept handy f...

Page 3: ...re determined when stood behind the trolley at the handle To attach the wheels follow these simple steps 1 Push the quick release in towards the centre of the wheel 2 Slide the wheel on to the axle as...

Page 4: ...el nut fig 1 2 There are two small metal dials on either side of the housing that are used to realign the wheel fig 2 3 If your trolley is veering to the right you will need to turn the left hand dial...

Page 5: ...y other battery and is designed for use with Motocaddy Lithium batteries only The charger should only be connected to an earthed socket outlet and the battery charger should only be opened and maintai...

Page 6: ...GREEN Battery fully charged and ready to be disconnected 5 The charging process will take between 3 to 5 hours depending on the depth of discharge please be aware that this may take longer for the fi...

Page 7: ...management system BMS to protect the battery from excessive abuse high currents deep discharge and overcharge When the battery is delivered there may be no output as the BMS is designed to maximize s...

Page 8: ...d the upper QUIKFOLD release button fig 1 2 Lift the handle and release the button 3 Unfold the upper frame section fully fig 2 4 Lift the main frame from the central hinge using the section marked Ho...

Page 9: ...to avoid damage to the frame whilst folding 3 Press and hold the lower QUIKFOLD release button fig 1 4 Lower the main frame and release the button fig 2 5 Fold the handle towards the front wheel until...

Page 10: ...ing fig 1 2 Match up the indicating line on your cart bag with the line on the lower bag support 3 Lower bag until the pins lock in position If you are using a non EASILOCK bag please use the followin...

Page 11: ...left Adjusting the Bag Supports The bag support straps are manufactured from elasticated material to allow your golf bag to be held tightly in place The strap should be adjusted to fit reasonably tigh...

Page 12: ...ed setting would usually be shown fig 1 For an S3 PRO DHC the screen will flash LOAD where the distance would usually be displayed and the green circle will still be rotating fig 2 Pressing the on off...

Page 13: ...to minimise exposure to rain as much as possible with an umbrella during heavy rainfall Wipe excess water from the trolley prior to storage Never use a pressure washer to clean your trolley To preven...

Page 14: ...rt 3 QUIKFOLD Upper Release Button 4 QUIKFOLD Lower Release Button 5 Rear Wheels 6 Rear Wheel Release Button 7 EASILOCKTM Lower Bag Support 8 Battery 9 Battery Tray 10 Motor located under Battery Tray...

Page 15: ...button The trolley will smoothly accelerate until it reaches the selected speed To stop the trolley simply press the button again there is no need to reduce the speed setting Power and Battery Level T...

Page 16: ...QUIKFOLD Lower Release Button 5 Rear Wheels 6 Rear Wheel Release Button 7 EASILOCK Lower Bag Support 8 Battery 9 Battery Tray 10 Motor located under Battery Tray 11 Front Wheel 12 Front Wheel Alignmen...

Page 17: ...display activates the speed setting number located within the green circle will indicate the speed the trolley will set off at once started The green circle will rotate when moving NB Please be aware...

Page 18: ...attery and release the button once the screen illuminates 2 If you have already set a pin code you will need to enter this now in the top left hand side of the screen where the time is usually display...

Page 19: ...the central on off button for a couple of seconds 3 The Distance Display will change to indicate 05 5 yards or metres and the letters ADC will appear 4 Rotate the button clockwise to increase the dis...

Page 20: ...lley will only measure distance whilst it is switched on and the motor is running i e if you push the trolley along when it is switched off the distance readings will not increase The measurements are...

Page 21: ...in You can test that the lost ball timer is working by doing the following Press and hold the Set button whilst plugging in the battery the alarm should beep twice if operating correctly After the sec...

Page 22: ...k competition rules before using your trolley with distance readings enabled To enable the competition mode the trolley must be stationary Hold down the Scroll and Set buttons together for three secon...

Page 23: ...e duration of time that the cable is attached and the battery is connected It is important to note that the speed of charge will be lower than that of a mains AC charger and similar to plugging the de...

Page 24: ...step 2 and 3 for each of the four digits 5 Once you have entered the fourth number and pressed the Set button the green circle will illuminate to indicate a valid pin code has been entered fig 2 6 Unp...

Page 25: ...ly be displayed fig 2 Disabling the CartLock Pin Code To disable the security feature follow the procedure for changing your pin code and when you reach the stage of entering a new pin code enter four...

Page 26: ...king brake is initiated by rotating the speed dial down to 1 and then rotating one click further Once activated the screen will toggle between P and number 1 fig 1 fig 2 The speed setting can be adjus...

Page 27: ...cs lights are located on the underside of trolley on the left hand side near the back of the under tray The lights are numbered as described within the troubleshooting diagram 1 In the event that your...

Page 28: ...is loose Unzip the battery bag to check the connections No Is the battery meter displayed on the screen S3 PRO DHC S1 DHC Is the right LED on the handle lit Is the speed indicator circle rotating S3...

Page 29: ...ce Agents To find your nearest authorised Service Agent please go to www motocaddy com service agent locator or call our UK Technical team on 44 0 1279 712370 For international customers please contac...

Page 30: ...irrecoverable long term damage Deeply discharging your battery will not increase its capacity or lifespan Is it best to leave my battery on charge There is no need to leave it plugged in for extended...

Page 31: ...Page 31 Declaration of Conformity...

Page 32: ...79 712 370 e info motocaddy com w www motocaddy com We are dedicated to protecting the environment and encourage the recycling of Motocaddy products through a free collection and disposal service To f...

Reviews: