background image

26 


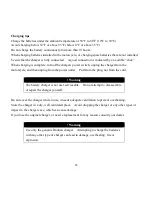
Charging tips 

Charge the batteries under the ambient temperature of 50°F to 86°F (10°C to 30°C). 
Avoid charging below 32°F or above 95°F (below 0°C or above 35°C). 
Do not charge the battery continuously for more than 10 hours. 
When charging batteries installed in the motorcycle, or charging spare batteries that are not installed, 
be sure that the charger is fully connected.    A good connection is indicated by an audible “click”. 
When charging is complete, turn of the chargers power switch, unplug the charger from the 
motorcycle, and then unplug from the power outlet.    Pull from the plug, not from the cord. 


! Warning 

The battery charger is not user serviceable.    Do not attempt to disassemble 
or repair the charger yourself.     


Do not cover the charger while in use, it needs adequate ventilation to prevent overheating. 
Store the charger in a dry, well ventilated place.    Avoid dropping the charger or any other types of 
impact to the charger case, which can cause damage.   
If you lose the original charger, or need a replacement for any reason, consult your dealer.


! Warning 

Use only the genuine Doohan charger.    Attempting to charge the batteries 
with any other type of charger can lead to damage, overheating, fire or 
explosion.     


Summary of Contents for Doohan iTank DH01

Page 1: ...1 Motorino Doohan iTank DH01 USER S MANUAL...

Page 2: ...ler for servicing If the original dealer is not nearby or convenient for you we recommend locating another authorized dealer to ensure that the correct parts and proper repair methods are used If you...

Page 3: ...ated in section IX Do not allow inexperienced operators to ride your iTank DH01 New riders should attend training to learn safe operation techniques and obtain the proper licensing where required Road...

Page 4: ...follow instructions WARNING You can be killed or seriously injured if you don t follow instructions CAUTION You can be hurt if you don t follow instructions NOTICE You may cause damage to your motorcy...

Page 5: ...s I Safe Driving II Component locations III Daily inspection and adjustment IV Operation guidance V Maintenance and repair VI Diagnostics VII Vehicle Storage VIII Vehicle Identification IX Main Techni...

Page 6: ...ns in parking lots and rail crossings Observe speed limits and reduce your speed in the rain or other hazardous conditions Take a rider education course and practice your riding skills in an open area...

Page 7: ...re changing lanes NOTICE Only small and lightweight objects should be placed in the seat compartment Do not exceed the load limit Maximum Weight Seat Compartment 10kg 22lbs When determining the motorc...

Page 8: ...8 II Component Locations Mirror Head Lamp Turn Signal Seat compartment Front battery cover Side stand Side battery cover License plate lamp Seat lock Instrument Tail light...

Page 9: ...9 Charging port Rear brake handle Handrail Handlebar Front brake handle Reflector...

Page 10: ...nstrument board illustration Speedometer Reverse Sidelight Low battery Best energy state Battery indicator Fault Battery Speed Mode Odometer Real time current Left turn signal Right turn signal High b...

Page 11: ...ged Reverse gear Best energy state The motorcycle is operating efficiently Speed mode Full speed mode or limited speed mode Speedometer Indicates the current speed in mph or km h Battery Charge Percen...

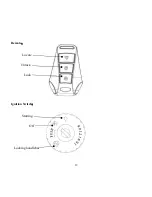
Page 12: ...12 Remote Ignition Switch Locking handlebar Off Starting state Locate Unlock Lock...

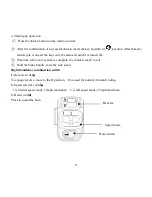
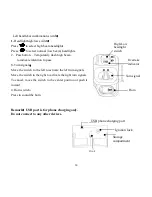
Page 13: ...is turned off When the self test of system is complete the iTank is ready to ride Hold the brake handle raise the side stand Right handlebar combination switch 1 Reverse switch To engage reverse move...

Page 14: ...ove the switch to the left to activate the left turn signals Move the switch to the right to activate the right turn signals To cancel move the switch to the center position or push it inward 4 Horn s...

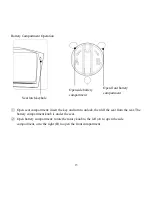
Page 15: ...lift the seat from the rear The battery compartment knob is under the seat Open battery compartment rotate the rotary knob to the left A to open the side compartment or to the right B to open the fron...

Page 16: ...d level It should be between the upper and lower limit 2 If the brake fluid level is near the lower limit it can be an indication that the brake pads are worn Have the condition of the brake pads chec...

Page 17: ...help determine when the tires must be replaced Inspect the tire sidewalls road contact surface and tread base If inspection reveals cuts punctures cracks or other wear or damage replace the tire befor...

Page 18: ...hem replaced before riding Horn The horn operation should be confirmed before riding If the horn does not operate properly have it repaired before riding Throttle control Rotate the throttle control g...

Page 19: ...fic laws Parking Rotate the key to the off position and remove the key Lower the side stand and lean the motorcycle left so it is supported by the side stand Park on level ground when possible If you...

Page 20: ...to stop quickly release the throttle and apply the front and rear brake levers evenly and gradually Warning When the road surface is wet or there is loose sand or gravel it will take longer to stop P...

Page 21: ...ries service life avoid fully discharging the battery and do not charge or store the battery in temperatures higher than 104 F 40 C The battery will perform the best and last the longest when the stat...

Page 22: ...aintenance should be performed after about one month or 250miles of operation Subsequent maintenance is recommended every 6 months or 1 800 miles of operation If the motorcycle is used in extreme cond...

Page 23: ...bristle brush which can scratch the surface Do not use pressurized water to wash the motorcycle Pressure washers can force water into the electrical components causing damage To remove bug remnants or...

Page 24: ...rcycle may lunge forward causing an unsafe condition The motorcycle is design to withstand the weather but it is still a good idea to avoid prolonged exposure to sunlight rain snow and other elements...

Page 25: ...ow tools or other metal objects to touch the battery terminals which may cause sparks fire or explosion Warning Lithium batteries are not serviceable Do not attempt to disassemble or repair the batter...

Page 26: ...r from the motorcycle and then unplug from the power outlet Pull from the plug not from the cord Warning The battery charger is not user serviceable Do not attempt to disassemble or repair the charger...

Page 27: ...e key and reconnect the battery plug 2 Charge the battery 3 Replace the fuse 4 See your dealer 5 Replace the battery Turn power on and turn the throttle but motorcycle does not move 1 Low battery volt...

Page 28: ...y low 1 Fully charge the battery 2 Replace the battery 3 Adjust tire pressure 4 Ride more conservatively 5 Reduced battery performance is normal under very low temperature conditions Battery will not...

Page 29: ...ion Charge the battery completely before riding after storage Perform the Pre Ride Inspections in section III Long term storage In addition to the short term storage steps listed above Disconnect the...

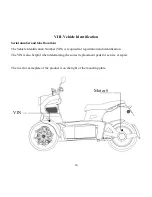
Page 30: ...The Vehicle Identification Number VIN is required for registration and identification The VIN is also helpful when determining the correct replacement parts for service or repair The rivet for namepla...

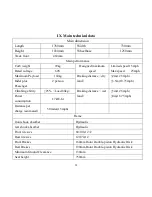
Page 31: ...12 5mph 3 5m 18 75mph Rider plus Passenger 2 person Climbing ability 25 Load 80kg Braking distance wet land 3m 12 5mph 4m 18 75mph Power consumption 1 7kW hr Distance per charge estimated 50miles 15mp...

Page 32: ...one full charge estimate 50miles 15 mph 28miles 25mph Power Capacity of Single Battery 2600mAh 3200mAh optional Battery Weight 9kg Charge and discharge of battery 600 times Ambient temp range of batt...

Page 33: ...wave controller Maximum rotation rate idling power 522rpm 10W Rated power rotation rate 1490W 509rpm Maximum torque rotation rate 128N m 19rpm Maximum current of controller 35A Motor energy utilizati...

Reviews: