5A
5B
4A
4B
EN
EN
05. CONFIGURATION
05. CONFIGURATION
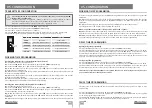
TRANSMITTERS CONFIGURATION
WORKING TIME PROGRAMMING
PAUSE TIME PROGRAMMING
WORKING TIME PROGRAMMING
01 •
Press the
SEL
button once and the LED
CODE
will flash slowly.
02 •
Press the
SEL
button again and the LED
CODE
will flash quickly.
03 •
Press the ↑ button of transmitter to configure.
04 •
The LED
CODE
will stop flashing and stay on, which means the success of the configuration.
The transmitter is this programmed with one button opening and one button closing.
Working time without soft stop (starting with closed shutters):
01 •
Put shutters in the closed position.
02 •
Press the
SEL
button the necessary times until the LED
T. MOT
start flashing.
03 •
Press the
SET
button once, and leaf nº1 will begin to open.
04 •
When the leaf nº1 get to the open position, press
SET
once to save that position. The leaf nº2
will start to open immediately.
05 •
When the leaf nº2 get to the open position, press
SET
once to save that position. This same leaf
will start closing immediately.
06 •
When the leaf nº2 get to the closed position, press
SET
once to save that position. The leaf nº1
will start closing immediately.
07 •
When the leaf nº1 get to the closed position, press
SET
once to save that position.
The configuration of the time work was finished successfully.
Working time with soft stop (starting with closed shutters):
01 •
Put shutters in the closed position.
02 •
Press the
SEL
button the necessary times until the LED T.
MOT
start flashing.
03 •
Press the
SET
button once, and the leaf nº1 will begin to open. Press the
SET
button again when
you want that the leaf nº1 start slowdown.
04 •
When the leaf nº1 get to the open position, press
SET
once to save that position. The leaf nº2
will start to open immediately. Press again the
SET
button when you want the leaf nº1 to start the
slowdown.
05 •
When the leaf nº2 get to the open position, press
SET
once to save that position. This same leaf
•The settings should be made with the control board connected to a 20V transformer (IN:
230 OUT: 20V), supplied in kit.
•
Whenever you end a configuration - T.MOT / T. PAUSE / etc, you must wait 10 seconds or
press the SEL button the necessary times until all LEDs remain fixed (on or off).
While some flashing LED, the control board is in programming mode.
LED
LED OFF
LED ON
•
CODE
No code
Insert code
•
T.MOT
The time of motor 30 sec.
Programmed time
•
T. PAUSA
Without automatic closure
With automatic closure
•
T. R.AP
Without delay in opening
Programmed time
•
T. R. CH
Without delay in closing
Programmed time
will start closing immediately. Press the
SET
button again when you want the leaf nº2 to start the
slowdown.
06 •
When the leaf nº2 get to the closed position, press
SET
once to save that position. The leaf nº1
will start closing again immediately. Press the
SET
button when you want the leaf nº1 to start the
slowdown.
07 •
When the leaf nº1 get to the closed position, press
SET
once to save that position.
The configuration of the time work was finished successfully.
NOTE •
To put the shutters in the closed position, you have two options:
Option 1 •
Disconnect the cables from the motors and the motors connect directly to a battery of 12 /24V
until the doors are in closed position. Turn on again the wires to the motor, the same way they were.
Option 2 •
Programming a false work time, to cause the motors to return to the closed position. At the
end of this false programming, you can start over and make the correct programming.
DELAY TIME PROGRAMMING
Opening delay time programming:
01 •
Press the
SEL
button the necessary times until the LED
T.R.AP
start flashing.
02 •
Press the
SET
button once, wait the desired time for delay and press the
SET
button once to finish.
The time that waited between the two times that you pressed the
SET
button, is the time the control
board will wait from the start of the opening of the leaf 1 until the start of opening of the leaf 2.
This function is especially useful when it is required that leaf 1 to start opening before the leaf 2 (see
page 01.A to know how to identify leaves 1 and 2).
Closing delay time programming:
01 •
Press the
SEL
button the necessary times until the LED
T.R.AP
start flashing.
02 •
Press the
SET
button once, wait the desired time for delay and press the
SET
button once to finish.
The time that waited between the two times when you pressed the
SET
button, is the time the control
board will wait from the start of the closing of the leaf 1 until the start of closing of the leaf 2.
This function is especially useful when it is required that leaf 2 to start closing before the leaf 1 (see
page 01.A to know how to identify leaves 1 and 2).
The pause time is the time that the shutter is paused since the full opening operation to begin to close
automatically.
01 •
Press the
SEL
button the necessary times until the LED
T.PAUSA
start flashing.
02 •
Press the
SET
button once, wait the required time to pause and press the
SET
button once more, giving
as complete programming of pause time.
The time waited between the two times you pressed the
SET
button, is the time the control board will wait
since it ends the opening maneuver to automatically start closing the shutters.


