background image


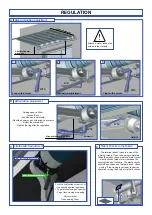
REGULATION

A

N°6

Tighten the screw.

!

2


B

N°19

3

C

D


Inclination adjustment.

1

Loosen the screw.

N°19

N°19

N°19

Arm inclination 

adjustment.

Articulation 

adjustment.

Limit-switch 

adjustment

Plastic chocks to the 

fabric.

Alleviate the arm 

with hand.

Attention, never loosen the 

screws in their totality.

Alleviate the arm with hand.

Loosen

Adjust

Awning open on 50cm.

-Loosen the 

nut

(don’t 

loosen in its totality

)

-Hit with a hammer on 

nut

 to bring up arm axis.

-Adjust the articulation.

-Tighten the ring after the regulation.

-The terminal doesn't close in a side of the 

awning corners. Open the awning completely.

Utilise the maneuvering area for a motor. Insert 

plastic chocks, folded in two, between the 

winding tube and the fabric. The plastic chocks 

should be positioned on the fabric ends. Check 

closing. If the closing is not ideal, repeat the 

operation, raising the number of plastic chocks.

-Turn the limit switch screw to + or 

- to have the desired regulation.

+ To get more closing or opening,

 - To get less closing or opening.

-Perform a test.

Open awning 30cm.

Closing regulation screw

Open Awning

Opening regulation screw

Summary of Contents for MONOBLOCO 300

Page 1: ... N 17 N 19 IMPORTANT 2 3000 3000 a 4500 4500 a 5000 5500 a 6000 6500 a 7000 3 4 5 6 Before the application Chock WALL WALL AWNING AWNING Wall brackets fixation No of wall brackets Awning dimensions mm ATTENTION check the wall leveling where you will apply the awning In case the wall is hollow or curved apply chocks to align it correctly for your security don t open the awning before v2 0 REV 08 20...

Page 2: ...LATION Perform the same from to 1 8 4 Adapt the awning fixation to the wall type Fixation with Ø12mm screws Screws Kit anchors and washers are not included provided Fixation with Ø12mm screws Screws Kit anchors and washers are not included provided Safe s installation ...

Page 3: ...Adjust the articulation Tighten the ring after the regulation The terminal doesn t close in a side of the awning corners Open the awning completely Utilise the maneuvering area for a motor Insert plastic chocks folded in two between the winding tube and the fabric The plastic chocks should be positioned on the fabric ends Check closing If the closing is not ideal repeat the operation raising the n...

Page 4: ...in the spare outlet axis For electrical installation with an unstable switch make sure you leave it in stop position after each use The awning balcony disintegrated from the structure Screws are not the most appropriate Check proper placement of the supports according to the manual s instructions In case of fixing with a chemical seal report to the manufacturer INFORMATION TO THE CONSUMER To know ...

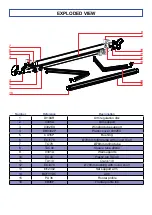
Page 5: ...m rolling tube with round shaft 7 TO78 Ø78mm rolling tube 8 TAC40 Square tube 40x40 9 0301A Wall supports 10 EC40 T Plastic top AC40 11 TA1 9 Crank 1 9 12 EOI378 Ø78mm bushing with round shaft 13 EI12302 14 BOFYYDC Arm Set support arm 15 PU36 Frontal profile 16 EB36P Frontal profile top Number Reference Designation 3 4 5 6 8 9 10 13 14 15 16 2 11 7 12 1 ...

Reviews: