2.3
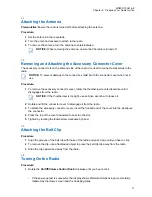
Attaching the Antenna
Prerequisites:
Ensure the radio is turned off before attaching the antenna.
Procedure:
1
Set the antenna in the receptacle.
2
Turn the antenna clockwise to attach to the radio.
3
To remove the antenna, turn the antenna counterclockwise.
NOTICE:
When removing the antenna, ensure that the radio is turned off.
2.4
Removing and Attaching the Accessory Connector Cover
The accessory connector is on the antenna side of the radio. It is used to connect accessories to the
radio.
NOTICE:
To prevent damage to the connector, shield it with the connector cover when not in
use.
Procedure:
1
To remove the accessory connector cover, rotate the thumbscrew counterclockwise until it
disengages from the radio.
NOTICE:
If the thumbscrew is too tight, use an Allen wrench at to loosen it.
2
Rotate and lift the connector cover to disengage it from the radio.
3
To attach the accessory connector cover, insert the hooked end of the cover into the slot above
the connector.
4
Press the top of the cover downward to seat it in the slot.
5
Tighten by rotating the thumbscrew clockwise by hand.
2.5
Attaching the Belt Clip
Procedure:
1
Align the grooves of the belt clip with those of the radio and push down until you hear a click.
2
To remove the clip, use a flat-bladed object to press the belt clip tab away from the radio.
3
Slide the clip upward and away from the radio.
2.6
Turning On the Radio
Procedure:
1
Rotate the
On/Off/Volume Control Knob
clockwise until you hear a click.
• If the power-up test is successful, the display shows Motorola Solutions logo momentarily,
followed by the Home screen and the Codeplug Alias.
MN003110A01-AK
Chapter 2: Preparing Your Radio for Use
17


