background image

INTUITY AUDIX  LX Release 1.0 
Centrex Integration     

Issue 1

May 2002

Setting the 202T Modem 

Page 6-3

Setting Options for the 202T Motorola Modem 

6

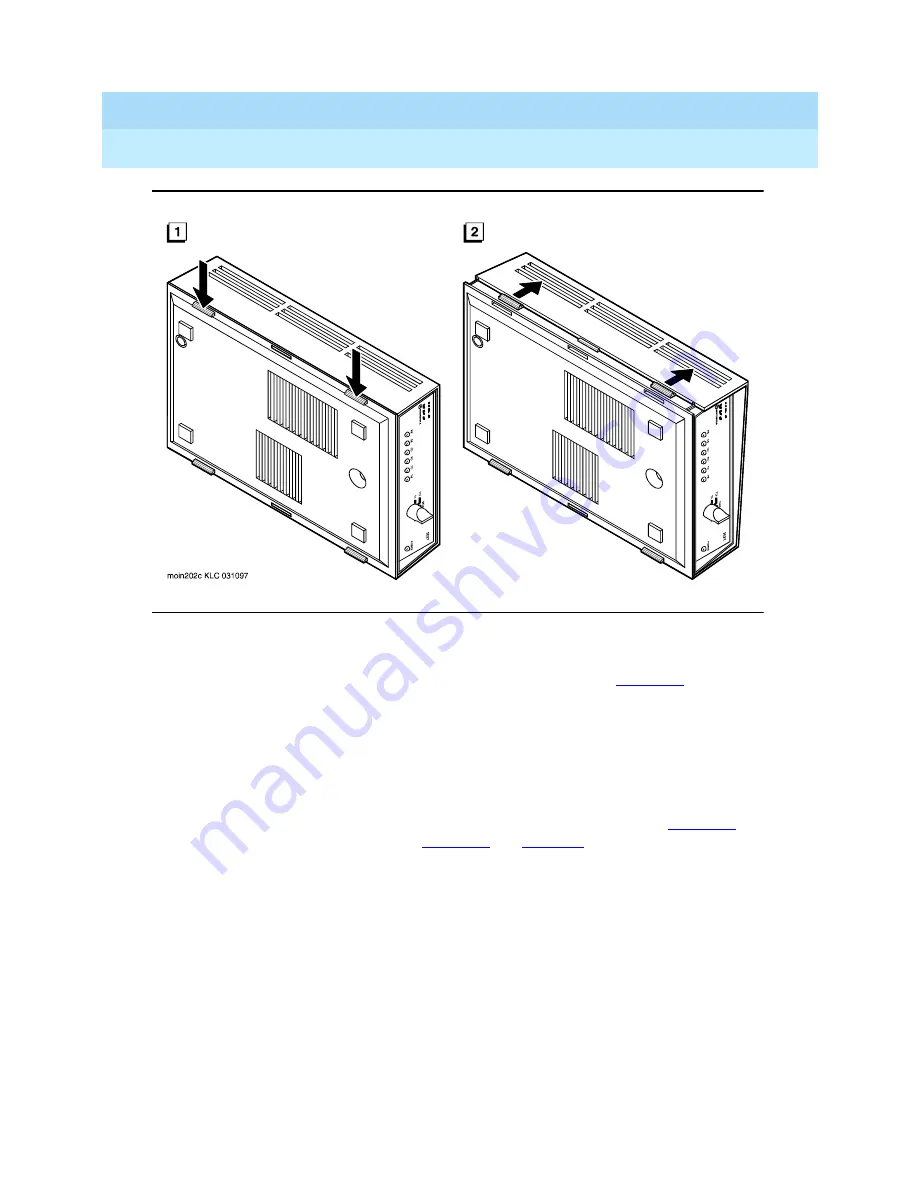
Figure 6-1.

Removing the Top Cover of the Motorola 202T Modem: Releasing the First 

Set of Latches

c. Press the tabs down and toward the modem (

Figure 6-1

, View 2). 

Use your fingers to gently push the top cover away from the body. 
Do not remove the top cover.

d. Turn the modem so that the opposite side faces you.

e. Gently push above the latches to release the other side of the cover.

f. Pull the released cover off.

2. Verify the settings. To locate the jumpers in the modem, see 

Figure 6-2

. To 

verify the jumpers, see 

Figure 6-3

 and 

Table 6-1

. Correct any as necessary.

Summary of Contents for 202T

Page 1: ...Centrex switch integration does not require the installation of a 202T modem if the distance between the Avaya INTUITY system and the switch is less than or equal to 15 3 m 50 ft the RS232 standard If the distance is greater than 15 3 m 50 ft use a 202T modem The 202T modem supports only a baud rate of 1200 To use the 202T modem verify that the SMDI link is configured for 1200 as specified in Chap...

Page 2: ... set to the default options If the Intuity AUDIX modem is an AT T Dataphone 202T the modem options at the service provider switch may differ See Modem Settings for the Service Provider Switch on page 6 11 The manufacturer s name appears on the faceplate of the unit Setting Options for the 202T Motorola Modem The Motorola 202T modem contains 14 jumpers that must be correctly set Use this procedure ...

Page 3: ... the tabs down and toward the modem Figure 6 1 View 2 Use your fingers to gently push the top cover away from the body Do not remove the top cover d Turn the modem so that the opposite side faces you e Gently push above the latches to release the other side of the cover f Pull the released cover off 2 Verify the settings To locate the jumpers in the modem see Figure 6 2 To verify the jumpers see F...

Page 4: ...ut and P strapped Call Turnaround Squelch Call Turnaround Squelch set to out P and O strapped Turnaround Squelch Time 8 3 ms squelch P and 8 3 strapped Soft Carrier Turnoff 0 Do Not Send Soft Carrier 0 strapped Test Generator Baud Rate Select 18 bps Option 4 strapped Chassis System Ground Option Out Out and P strapped RTS CTS Delay RTS CTS Delay 33 ms 33 strapped Transmit Carrier Strapped for term...

Page 5: ...ITY AUDIX LX Release 1 0 Centrex Integration Issue 1 May 2002 Setting the 202T Modem Page 6 5 Setting Options for the 202T Motorola Modem 6 Figure 6 2 Motorola 202T Modem Circuit Board and Jumper Locations ...

Page 6: ...INTUITY AUDIX LX Release 1 0 Centrex Integration Issue 1 May 2002 Setting the 202T Modem Page 6 6 Setting Options for the 202T Motorola Modem 6 Figure 6 3 Motorola 202T Modem Default Jumper Settings ...

Page 7: ...cover clicks when the latches are secure NOTE Installers in Canada should replace the screw or the locking tabs 4 Set the front dial to DATA see Figure 6 4 Figure 6 4 Front Panel of the Motorola 202T Modem Showing the Dial Setting for DATA 5 Continue with Chapter 7 Hardware Installation for Centrex Switch Integration with the 202T Modem Setting Options for the AT T Dataphone 202T Modem The AT T Da...

Page 8: ... open or down closed Figure 6 6 shows an example of a switch on the 202T modem In this example options 1 through 5 are closed indicated by rockers down on the numbered side of the switch Options 6 through 10 are open indicated by rockers up on the numbered side of the switch NOTE Figure 6 6 is an example only Use the switch settings in Table 6 2 Figure 6 6 Example of 202T Modem Switch Option Setti...

Page 9: ...the modem housing Table 6 2 AT T Dataphone 202T Modem Option Settings Switch Segment Position Feature Option factory setting Description S1 1 Closed 4 wire operation ZK 2 Closed Soft turnoff and squelch intervals Z 0 soft turnoff 0 squelch 3 Closed Fast carrier detection N Out normal mode 4 Open Clear to send interval M 8ms 5 Open 6 Open Soft turnoff and squelch intervals Z 0 soft turnoff 0 squelc...

Page 10: ...elch intervals Z 0 soft turnoff 0 squelch 8 Open Soft turnoff and squelch intervals Z 0 soft turnoff 0 squelch 9 Closed 0 Open Clear to send interval M 8 msec S3 1 Open 4 wire operation ZK 2 Open Compromise delay equalization ZU Maximum 3 Open Channel condition ZY Basic 4 Open 4 wire operation ZK 5 Open Compromise amplitude equalization ZW Maximum 6 Closed 4 wire operation ZK 7 Closed 4 wire opera...

Page 11: ...type of modem The following tables show the modem options for the commonly supported modems Modem Options for the AT T Dataphone 202T Modem Use the same options as are defined in this document for the modem options the Intuity AUDIX system uses Modem Options for the General Data Communications 202T Modem Pin x4 4w Pin x5 chout Pin x2 eqin S4 1 Closed Continuous carrier ZN In 2 Open Carrier detecto...

Page 12: ... Page 6 12 Modem Settings for the Service Provider Switch 6 Table 6 3 Modem Options for the General Data Communications 202T Modem Switch 4 Switch 6 Switch 7 Switch 8 1 OFF OFF ON OFF 2 OFF OFF ON OFF 3 OFF OFF ON OFF 4 OFF OFF ON OFF 5 ON OFF OFF X 6 OFF OFF X X 7 OFF OFF X X 8 OFF ON X X ...

Page 13: ...dem Settings for the Service Provider Switch 6 Modem Options for the Rexon 202T Modem Table 6 4 Modem Options for the Rexon 202T Modem Switch S2 Switch S3 Segment Position Segment Position 1 ON 1 OFF 2 OFF 2 OFF 3 OFF 3 ON 4 ON 4 ON 5 OFF 5 OFF 6 OFF 6 OFF 7 OFF 7 OFF 8 ON 8 ON 9 OFF 9 ON 10 OFF 10 ON ...

Page 14: ...for the Service Provider Switch 6 Modem Options for the NEC 202T Modem Table 6 5 Modem Option for the NEC 202T Modem NEC soft options Line detect 4 wire On Fast carrier detect On Continuous carrier On Anti stream Off RD Recv data squelch 0 ms Clear to send delay 8 2 ms Soft turnoff 0 Local copy Off Transmit level 0 ...

Reviews: