background image

AP 7181 Access Point:  

Installation Guide


44


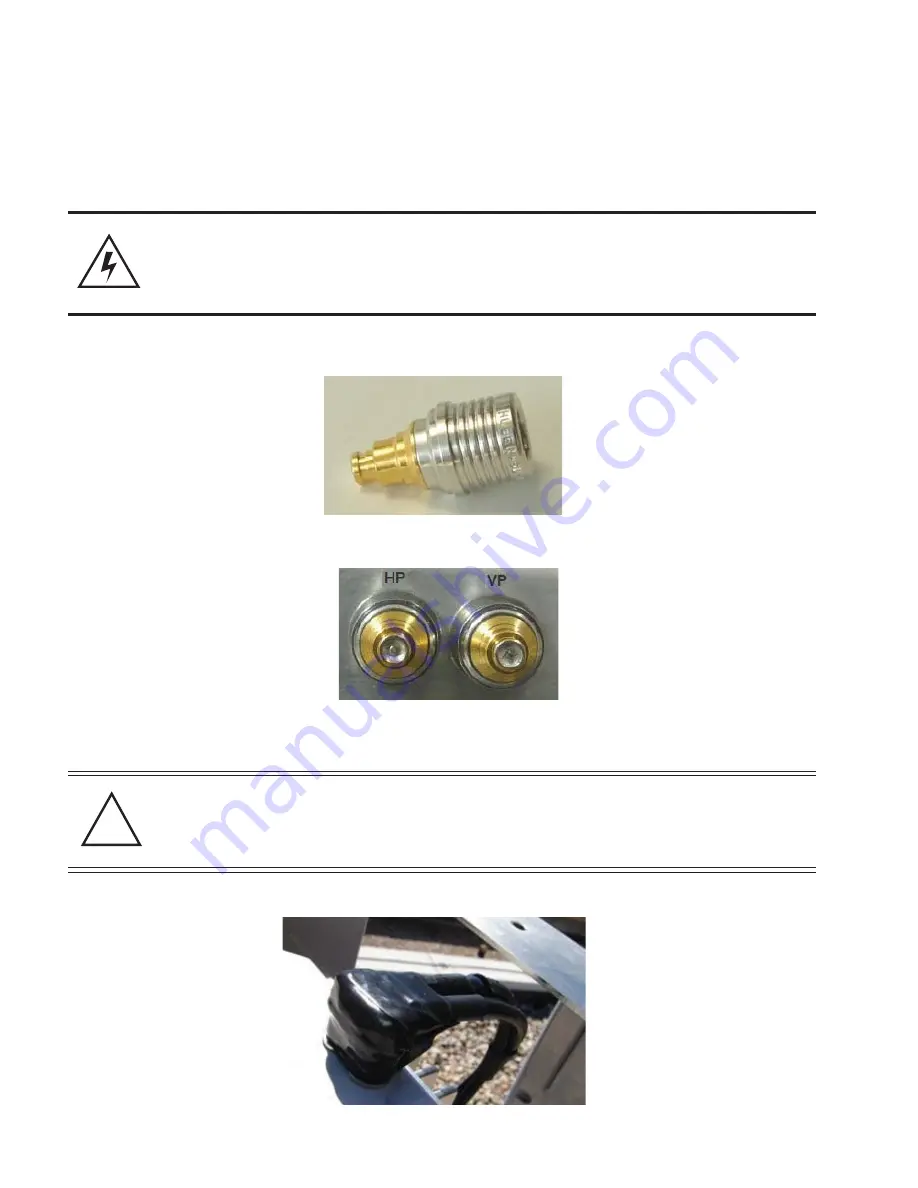
WARNING!

When disconnecting the antenna cables from the unit or 
removing an antenna panel and replacing it with a Blank panel, 
terminators MUST be placed on the unused horizontal and 
vertical connectors on the top of the unit.

CAUTION

It is also recommended that the antenna cable connectors and 
terminators on the horizontal and vertical connectors on the top 
of the AP 7181 be wrapped with both mastic tape and electrical 
tape.

!

Summary of Contents for AP 7181

Page 1: ...AP 7181 Access Point Installation Guide Version 1 0 0 A March 12 2010 68009287001 ...

Page 2: ......

Page 3: ...y 4 2 4 Grounding Requirements 4 2 5 Minimum Installation Requirements 5 2 6 Package Contents 5 2 7 Access Point Placement 5 2 7 1 Site Surveys 5 2 7 2 Root Node Placement 6 2 7 3 Non Root Node Placement 6 2 7 4 Mounting Locations 7 2 7 5 Device Deployment Height 7 2 8 Antenna Options 8 2 9 AP 7181 Power Options 8 2 9 1 Power Cables 8 Contents ...

Page 4: ... 33 2 13 Remote Panel Antenna Installation 42 2 13 1 Preparing the AP 7181 45 2 13 2 Installing the Remote Panel Antenna 47 2 13 3 Installing the Blank Antenna Panel 51 3 Getting Started 55 3 1 Initially Connecting to the Access Point 55 3 1 1 Connecting to the Access Point Using the WAN Port 56 3 1 2 Connecting to the Access Point Using the LAN Port 57 3 2 Basic Device Configuration 59 3 2 1 Conf...

Page 5: ...the Use of Wireless Devices 85 4 1 2 Potentially Hazardous Atmospheres 85 4 1 3 Reducing RF Exposure Use Properly 85 4 2 Power Supply 85 4 3 FCC Regulatory Information 86 4 3 1 RF Exposure 86 4 3 2 Intentional and Unintentional Radiators 86 4 3 Canada Requirements 86 5 Customer Support 87 ...

Page 6: ...MOTOROLA and the Stylized M Logo are registered in the US Patent Trademark Office All other product or service names are the property of their respective owners Motorola Inc 2010 All rights reserved ...

Page 7: ...P 7181 is also designed to meet the needs of large distributed outdoor networks The network can be configured and managed for optimal performance using the Wireless Manager WM network Management application The most current versions of this manual and other AP 7181 documentation can be found at http motorola wirelessbroadbandsupport com support mesh library 1 1 Document Conventions The following g...

Page 8: ...tory bodies of the country where the devices are being deployed All common precautions for grounding and ESD Electrostatic Discharge protection should be observed during deployment and installation AP 7181 devices are designed to be installed outdoors and must be installed such that no harmful interference results from device operation Installations must be performed by professionals who are prope...

Page 9: ...network devices should not exceed 30 to 35 feet Mounting height should vary to accomodate the topography of the deployment area foliage and other obstructions Devices can be deployed using either the Bottom Mount Installation or the Top Mount Installation procedure Point to Point PTP Slave or Point to Multipoint PMP SM nodes providing backhaul should be oriented to point away from AP 7181 antenna ...

Page 10: ...rectly to AP 7181 deployments SPD Surge Protection Device considerations for broadband shall include the use of SPDs to protect pole mounted access points and ground based cabinet architecture It is important to install proper SPD applications on both ends of Ethernet Power Over Ethernet POE Giga Ethernet GigE and AC cable runs SPDs shall be located within the node or cabinet or as close to the en...

Page 11: ...ioning items Refer to Customer Support 2 7 Access Point Placement Typically roadways in the deployment area become main arteries for the wireless mesh network Roadways can provide LoS coverage over large distances between Root and Non Root APs 2 7 1 Site Surveys Motorola recommends conducting a site survey prior to installing an access point A thorough site survey must include a visit to the custo...

Page 12: ...th the exception of a backhaul requirement The placement of Non Root nodes will depend heavily on the RF network design Consider the guidelines for optimizing wireless network performance when identifying potential mounting sites In addition consider the following when planning for Non Root node placement Light Poles Utility Poles or Traffic Poles Obtain all required supplemental agreements from l...

Page 13: ...so consider any requirements to coordinate requests with multiple utility agencies within the same community Verify that light pole selections have power available continuously and that the power source is within the operational range of the device being connected 2 7 4 Mounting Locations To avoid distortion of the RF pattern device locations should be chosen such that the AP 7181 ADvanced Element...

Page 14: ...er Options Details of the power sourcing equipment for the AP 7181 should be handled by a professional installer The requirements for deploying the system are Over current protection device with a maximum rating of 20 Amps AP 7181 AC Model 100 240 VAC input capable of sourcing 180 watts AP 7181 DC Model Nominal 48 Volt Power source 41 58 VDC capable of sourcing 150 watts Battery floating voltage s...

Page 15: ...can be deployed using either the Bottom Mount Installation or the Top Mount Installation procedure Mounting options are available for light pole building roof tops and building walls Choose one of the following mounting options based on the physical environment coverage area requirements CAUTION Never plug a power cable wired to a power source for an AC unit into a DC unit CAUTION Do not use the c...

Page 16: ...ortion pointing either up or down If using a bottom mount drill a 1 4 inch diameter hole at the lowest point on the bend to allow water to drain from the Gooseneck 2 11 Installing an AP 7181 The following guidelines and procedures should be observed when installing an AP 7181 device 2 11 1 Required Tools The following is a list of the minimal tool set required to install an AP 7181 device 24 mm So...

Page 17: ...que Wrench Adjustable Wrench Standard Level Tube of Lithium Grease 2 11 2 AP 7181 Connections and Ports The power cable and grounding connections power indicator light Ethernet and reset ports and LED Status Panel on the bottom the AP 7181 are shown in the figure below ...

Page 18: ...the antenna cables are loacted on the top of the AP 7181 All Radome antenna panel cables are labeled as HP or VP Attach each cable to the corresponding connector when performing a Remote Panel Antenna Installation or any other procedure which requires attaching antenna cables to the connectors ...

Page 19: ...ing it with a Blank panel terminators MUST be placed on the unused horizontal and vertical connectors on the top of the unit CAUTION It is also recommended that the antenna cable connectors and terminators on the horizontal and vertical connectors on the top of the AP 7181 be wrapped with both mastic tape and electrical tape ...

Page 20: ...display characteristics and functionality LED 1 LED 2 LED 3 LED 4 5 GHz LED 5 2 4 GHz LED 6 Blinking Red indicates booting Solid Red defines a failure condition White defines normal operation Green defines normal GE1 operation Yellow defines a collision Green defines normal GE2 operation Yellow defines a collision Amber defines 5 GHzradioas configured Emerald defines 2 4 GHzradioas configured Not ...

Page 21: ... carton and remove top packaging material CAUTION Never lift an AP 7181 using the Radome antenna panels or other plastic parts Always lift the unit by the Yoke or metal antenna rings WARNING An AP 7181 weighs 39 pounds Use all appropriate cautions when lifting and consider a two man lift when necessary ...

Page 22: ... pack from the shipping carton In the accessories box you will find the following items Water Proof Ethernet Adaptor Cable Gland Part number 09009302001 Power Cable Part number 30009307001 30009308001 or 30009315001 Sun Shields with Captive Screws Part number HKLN4446A ...

Page 23: ...antenna assembly 2 11 5 Staging the Device Prior to Installation 1 Place on solid surface with the Yoke facing up 2 Using the 6mm Allen Wrench loosen the Allen head bolts to remove the Yoke WARNING An AP 7181 weighs 39 pounds Use all appropriate cautions when lifting and consider a two man lift when necessary CAUTION Never lift an AP 7181 using the Radome antenna panels or other plastic parts Alwa...

Page 24: ... protective caps A 22 mm socket will be required to remove the Ethernet port caps covering Gigabit Ethernet ports GE1 and GE2 A 19 mm socket is required to remove the console port cap if required 4 Using the 22 mm socket remove the port caps for Gigabit Ethernet GE1 and GE2 5 Remove the cap on the cable gland as shown below ...

Page 25: ...use a 24 mm socket and finishing tighten the gland If the node is going to be configured as a Mesh Point Root node Mesh Point Root nodes have a direct wired Ethernet connection to the core network or an Ethernet connection to a wireless backhaul a cable gland will be required for Gigabit Ethernet port GE1 ...

Page 26: ...gabit Ethernet port GE2 make sure the WAN port GE2 has been configured to permit an attached external device during the configuration process NOTE The AP 7181 supports 802 af compliant Power over Ethernet PoE on Ethernet port GE1 and can provide power to an external PoE capable device such as a surveillance camera PoE is auto sensing and is enabled when the AP 7181 senses a PoE capable device ...

Page 27: ...de no wired connection to the core network and no external device is going to be attached then no cable glands are required If the Mesh Point node is going to have an external device attached e g surveillance camera a cable gland is required for Gigabit Ethernet port GE1 ...

Page 28: ...rnal laptop for configuring the unit You will also need to terminate the flying lead power cable with the proper plug for the country of operation so the unit can be powered for configuration After preparing the power cable attach the cable to the power port Notice that the power connector is keyed Next configure the unit Refer to Getting Started for initial device configuration ...

Page 29: ...ch the port cap If the GE2 port is going to be used to attach and external device attach the cable gland to the GE2 port 10 Reattach the Yoke 11 Return the unit to the shipping carton for transport to the installation site Due to the nature of the electronic components and antenna array using the shipping carton is the most secure method for transport ...

Page 30: ... contact with overhead power lines Avoid falling tools or equipment Be aware of vehicular traffic in the vicinity of the work area CAUTION Observe the following precautions to avoid damage to the unit during installation WARNING Observe the following safety precautions to avoid personal injury during installation WARNING When disconnecting the antenna cables from the unit or removing an antenna pa...

Page 31: ...ering the pole mount adapter The pole mount adapter can be mounted to poles 3 inches to 15 inches in diameter and has a load rating of 75 lbs 1 Attach the pole mount adapter or other mounting bracket hardware to the mounting asset and ensure that the mounting bracket is level 2 Using the 4 hex head bolts 3 8 x16 x1 included with pole mount adapter Part Number RLN6197A secure the Gooseneck to the p...

Page 32: ...neck In the picture below two professional installers in a bucket truck are lifting the unit onto the Gooseneck NOTE Apply lithium grease to the threads of the Gooseneck This will help prevent corrosion from occurring and facilitate removal of the Yoke if the unit needs to be serviced WARNING An AP 7181 weighs 39 pounds Use all appropriate cautions when lifting and consider a two man lift when nec...

Page 33: ...y Tighten the set screws to between 214 2 and 250 0 inch pounds lbf in 8 If the AP 7181 you are mounting is a Mesh Point Root node or a Mesh Point node with an external device e g surveillance camera perform the required Ethernet cabling The Ethernet cable gland is optimized for cables of diameter 39 to 55 inches Smaller diameter cables can achieve a watertight seal if the cable gland is properly ...

Page 34: ...2 In most cases Ethernet cable will need to be custom cut to length After preparing the Ethernet cable and attaching shielded RJ 45 end connectors feed the cable through the cable gland cap and rubber insert as shown below 9 Insert data cable through cable gland i e the cable gland on Gigabit Ethernet port GE1 a Connect the RJ45 Ethernet cable to the Ethernet port b Hand tighten the cap for the ca...

Page 35: ...Electric Code NEC or wiring requirements in the country of installation All location building and structure codes must be observed Ensure that the power source for the AP 7181 is de energized prior to installation Avoid exposure to high voltage power sources Avoid contact with overhead power lines Avoid falling tools or equipment Be aware of vehicular traffic in the vicinity of the work area CAUTI...

Page 36: ... feet long The installer should splice the power cable to the AP 7181 flying lead cable in accordance to the National Electric Code NEC or wiring requirements in the country of operation Only outdoor rated power cable should be used 10 Once the power cable has been prepared connect the power cable to the unit CAUTION AC versions of the AP 7181 require an input voltage of 100 240 VAC DC versions re...

Page 37: ...ding to the Motorola R56 2005 Manual for Standards and Guidelines for Communication Sites The grounding screw is shown below in green 12 Secure and conceal the cables using UV resistant tie wraps Tie wraps should be used to secure the cables along the Gooseneck ...

Page 38: ...e sun shields to the bottom of the unit first remove the knock out discs in the center to fit around the Yoke Tighten the captive screws to between 39 9 and 53 1 inch pounds lbf in 14 Once physical installation is completed the circuit powering the AP 7181 can be energized Verify that the green power LED is lit and the unit is powered on ...

Page 39: ...e Yoke and the Allen socket head screws from the bottom of the unit The pole mount adapter Part Number RLN6197A will accommodate a banding strap up to 1 inch width Banding straps and the banding tool are not included when ordering the pole mount adapter The pole mount adapter can be mounted to poles from 3 inches to 15 inches in diameter and has a load rating of 75 lbs ...

Page 40: ...at the mounting bracket is level 5 Using the 4 hex head bolts 3 8 x16 x1 included with pole mount adapter Part Number RLN6197A secure the Gooseneck to the pole mount adapter NOTE Apply lithium grease to the threads of the Gooseneck This will help prevent corrosion from occurring and facilitate removal of the Yoke if the unit needs to be serviced ...

Page 41: ...d the Mounting Bracket are level 8 Loosely attach the Allen socket head screws to the top of the unit Leave the screws loose enough to attach the Yoke WARNING Carefully align the Yoke with the Mounting Bracket to avoid cross threading WARNING An AP 7181 weighs 39 pounds Use all appropriate cautions when lifting and consider a two man lift when necessary ...

Page 42: ...sition 10 Torque the Allen socket head screws to between 108 7 and 145 0 Inch Pounds lbf in 11 The Set Screws can now be inserted to increase stability Using a 21mm socket with torque wrench tighten the Set Screws to between 214 2 and 250 0 Inch Pounds lbf in CAUTION Ensure that the Allen socket hex screws are tight and in the locked position before releasing the full weight of the unit ...

Page 43: ...stallation It is recommended that an Outdoor UV Rated shielded cable is used in AP 7181 deployments Some examples are Superior Essex 04 001 55 Best Tronics BT 0562 In most cases Ethernet cable will need to be custom cut to length After preparing the Ethernet cable and attaching shielded RJ 45 end connectors feed the cable through the cable gland cap and rubber insert as shown below 13 Insert the d...

Page 44: ...National Electric Code NEC or wiring requirements in the country of installation All location building and structure codes must be observed Ensure that the power source for the AP 7181 is de energized prior to installation Avoid exposure to high voltage power sources Avoid contact with overhead power lines Avoid falling tools or equipment Be aware of vehicular traffic in the vicinity of the work a...

Page 45: ...g The installer should splice the power cable to the AP 7181 flying lead cable in accordance to the National Electric Code NEC or wiring requirements in the country of operation Only outdoor rated power cable should be used 14 Once the power cable has been prepared connect the power cable to the unit CAUTION AC versions of the AP 7181 require an input voltage of 100 240 VAC DC versions require an ...

Page 46: ...181 Access Point Installation Guide 40 15 The unit must be grounded according to the Motorola R56 2005 Manual for Standards and Guidelines for Communication Sites The grounding screw is shown below in green ...

Page 47: ... to the top bottom using the captive screws If attaching the sun shields to the bottom of the unit first remove the knock out discs in the center to fit around the Yoke Tighten the captive screws to between 39 9 and 53 1 inch pounds lbf in Once physical installation is completed the circuit powering the AP 7181 can be energized Verify that the green power LED is lit and the unit is powered on ...

Page 48: ...tenna array The Remote Panel antenna kit can be used to address this use case In addition to the standard hardware the following items are also required for installing a Remote Panel antenna Antenna Extension Cables 6 or 10 feet Canopy Subscriber Module SM Mounting Bracket Terminators for the Horizontal HP and Vertical VP antenna connections on the top of the unit NOTE In addtion to the required t...

Page 49: ...hould be attached to cover the side of the device facing the obstruction Using a Blank antenna panel will help protect the interior of the AP 7181 Blank antenna panels can also be used when a device is installed directly against a wall or the side of a building See Installing the Blank Antenna Panel ...

Page 50: ...nd replacing it with a Blank panel terminators MUST be placed on the unused horizontal and vertical connectors on the top of the unit CAUTION It is also recommended that the antenna cable connectors and terminators on the horizontal and vertical connectors on the top of the AP 7181 be wrapped with both mastic tape and electrical tape ...

Page 51: ... for installation using the Remote Panel antenna 1 Remove the screws for one of the four Radome antenna panels 2 Grasp the lower part barrel of the antenna cable connector and carefully detach the antenna cables from the connectors on the device Remove the Radome antenna panel ...

Page 52: ...AP 7181 Access Point Installation Guide 46 3 Attach the extension cable for the Remote Antenna panel to the device 4 Carefully route the extension cable inside the antenna rings on the device ...

Page 53: ...the Remote Panel Antenna To complete the installation of the Remote Panel antenna at the site 1 At the installation site install the AP 7181 using the appropriate Field Installation procedure 2 Assemble the Canopy SM Mounting Bracket using the instruction sheet supplied with the hardware 3 Test fit the Canopy SM Mounting Bracket at the installation site positioning the bracket so that when the Rem...

Page 54: ...the support arm remains in the desired position 5 Use a cordless drill and a 3 6 mm bit to drill the hole for the set screw on the mounting bracket 6 Insert and tighten the M4 8 set screw for the mounting bracket 7 Using the supplied clamps attach the Remote Antenna panel to the mounting bracket ...

Page 55: ...t antenna panel and wrap the connections with Mastic tape and Electrical tape CAUTION When adjusting the Remote Mount antenna panel on the mounting bracket ensure that the mounting bracket does not extend past the top of the antenna panel to comply with wind loading requirements NOTE Both 6 and 10 foot extension cables are available The extension cables can be configured in a daisy chain if additi...

Page 56: ...AP 7181 Access Point Installation Guide 50 10 Secure the cables to the mounting bracket using UV resistant tie wraps 11 After the Remote Panel installation is complete apply power to the AP 7181 ...

Page 57: ...n to Remote Panel antenna installations Blank antenna panels can also be used if the unit is going to be placed directly against a wall or building The Radome antenna should be removed and the Blank panel should be attached to side of the unit that will be facing any obstruction ...

Page 58: ...nd replacing it with a Blank panel terminators MUST be placed on the unused horizontal and vertical connectors on the top of the unit CAUTION It is also recommended that the antenna cable connectors and terminators on the horizontal and vertical connectors on the top of the AP 7181 be wrapped with both mastic tape and electrical tape ...

Page 59: ...k antenna panel 1 Remove the screws for one of the four Radome antenna panels 2 Grasp the lower part barrel of the antenna cable connector and carefully detach the antenna cables from the connectors on the device Remove the Radome antenna panel ...

Page 60: ... terminators to the antenna cable connectors 4 Wrap the terminators with mastic tape and electrical tape 5 Using the four screws provided attach a Blank antenna panel to the unit to cover the side of the device where the functional antenna panel was removed ...

Page 61: ...ation on using the Web UI to set access point default configuration refer to Basic Device Configuration or chapters 4 through 7 of the AP 7181 Access Point Product Reference Guide Command Line Interface CLI via Serial Telnet and SSH The access point CLI is accessed through the RS232 port via Telnet or SSH The CLI follows the same configuration conventions as the device user interface with a few do...

Page 62: ...nect AC power to the access point 2 The WAN or GE2 port default is configured with an IP address of 10 1 1 1 Configure a laptop with an IP address of 10 1 1 2 255 0 0 0 and connect to the GE2 port 3 Launch a browser and enter the access point s static IP address 10 1 1 1 The default password is motorola NOTE These procedures are only valid for initially connecting to an AP 7181 ...

Page 63: ...emulation program Configure the following settings Baud Rate 115200 Data Bits 8 Stop Bits 1 No Parity No Flow Control 3 Press ESC or Enter to access the access point CLI 4 Enter the default username of admin and the default password of motorola 5 Since this is the first time you are logging into the access point you will be prompted to enter a new password and set the county code 6 At the CLI prom...

Page 64: ...AP 7181 Access Point Installation Guide 58 9 Using a Web browser use the access point s IP address to access the access point ...

Page 65: ...access point Configure the access point as a DHCP client For optimal screen resolution set your screen resolution to 1024 x 768 pixels or greater 1 Open a browser If you used the WAN method point your browser to 10 1 1 1 If you used the LAN method point your browser to the IP address provided by the DHCP server NOTE For optimum compatibility use Java Runtime Environment 1 5 or higher and disable t...

Page 66: ...provided Click Apply Once the admin password has been updated a warning message displays stating the access point must be set to a country The export function will always export the encrypted Admin User password The import function will import the Admin Password only if the access point is set to factory default If the access point is not configured to factory default settings the Admin User passw...

Page 67: ...en you change the settings in the Quick Setup screen the values also change for other screens where these parameters are displayed Additionally if the values are updated in these other screens the values initially set within the Quick Setup screen will be updated Basic Settings To define a basic access point configuration 1 If the Quick Setup screen is not already displayed select System Configura...

Page 68: ...n select either 2 4 GHz or 5 x GHz from the RF Band of Operation field IP Settings The LAN 1 interface on the AP 7181 supports several different functions The IP address assigned to the LAN by DHCP or via a static address is the management IP address for the access point By default the LAN 1 interface is tied to physical port GE1 and is configured for DHCP Mesh Point Root nodes are gateway nodes A...

Page 69: ...ocol that includes mechanisms for IP address allocation and delivery of host specific configuration parameters such as IP address network mask and gateway from a DHCP server to a host 4 Select DHCP Server to use the access point as a DHCP server over the LAN connection Select the Bootp client option if network addressing is provided by a Bootp server 5 If using the static or DHCP Server option ent...

Page 70: ...s will be identified by 802 11 stations when searching for a network to connect to b Use the Available On checkboxes to define whether the target WLAN is operating in the 2 4 or 5 x GHz radio band Ensure the radio selected has been enabled 2 Once the WLAN s radio designations have been made the radio must be configured in respect to intended 2 4 or 5 GHz radio traffic and the antennas used Select ...

Page 71: ...802 11b g n Radio in the AP 7181 Product Reference Guide for an understanding of configurable radio values and their implications NOTE Even an access point with a minimal configuration must be protected against data theft and corruption A security policy should be configured for WLAN1 as part of the basic configuration outlined in this guide A security policy can be configured for the WLAN using t...

Page 72: ...is used for initial configuration In order to use GE2 to connect external devices such as an IP surveillance camera you will need to configure the port from a WAN role to a LAN role This is done by clicking on the WAN branch under Network Configuration and selecting LAN in the drop down box for GE2 This will bridge the GE1 and GE2 ports Any device plugged into GE2 will then be on the same LAN segm...

Page 73: ...ce from GE2 1 Select Network Configuration WAN from the menu tree 2 In the Role drop down box select LAN For more information on WAN port configuration options refer to Configuring WAN Settings in the AP 7181 Access Point Product Reference Guide ...

Page 74: ...g the Role parameter to LAN GE1 GE2 WAN 10 1 1 1 DHCP LAN1 Bridge IP Stack GE1 DHCP LAN1 Bridge IP Stack GE2 Default Configuration After changing the role of GE2 from WAN to LAN GE1 GE2 WAN 10 1 1 1 DHCP LAN1 Bridge IP Stack GE1 DHCP LAN1 Bridge IP Stack GE2 Default Configuration After changing the role of GE2 from WAN to LAN ...

Page 75: ...n values must be protected against data theft and corruption A security policy should be configured for WLAN1 as part of the basic configuration outlined in this guide A security policy can be configured for the WLAN from within the Quick Setup screen Policies can be defined over time and saved to be used as needed as security requirements change Motorola recommends you familiarize yourself with t...

Page 76: ...Pass Key used to generate the WEP keys 5 Click the Apply button to save the security policy and return to the access point Quick Setup screen You can now test the access point for MU 801 11 station interoperability Key Settings Click the ASCII Passphrase box and enter a passphrase 8 to 63 characters long Mixed Mode Under WPA2 CCMP Mixed Mode select the Allow WPA WPA2 TKIP clients checkbox to enabl...

Page 77: ... is particularly important if your AP 7181 is addressed via DHCP as the IP address would be lost if a node became stranded If the AP 7181 is statically addressed you can connect any configured WLAN mapped to LAN 1 1 Click the Enable button next to LAN2 in the LAN branch under Network Configuration After enabling LAN2 you will see an entry for LAN2 under the LAN branch Select LAN2 Notice that LAN2 ...

Page 78: ...used for each AP 7181 Since the recovery WLAN is going to be on the 2 4 GHz radio we chose to use the MAC address of the 2 4 GHz radio This can be found by selecting Radio1 802 11b g n located under Network Configuration Wireless Radio Configuration The radio MAC address is located in the properties window Record this MAC address ...

Page 79: ...Getting Started 73 3 Create a non broadcasting secure WLAN Select Network Configuration Wireless Click Create ...

Page 80: ...AP 7181 Access Point Installation Guide 74 4 Enter an ESSID use the MAC address recorded in the previous step Under Available On select the 802 11 b g n checkbox ...

Page 81: ... Security Policy you previously created for WPA2 CCMP Sele the Use Secure Beacon checkbox to suppress the broadcasting of this network 6 Click Apply 7 To map the secure WLAN to LAN2 select Network Configuration LAN Click WLAN Mapping ...

Page 82: ...LAN WLAN Mapping find the ESSID you created and use the drop down box under LAN and select LAN2 Click OK 9 The LAN Configuration screen will be displayed again Click Apply 10 The secure recovery WLAN is now configured Record the ESSID for future reference ...

Page 83: ...of Responses value to assess the number of responses from the MU versus the number of ping packets transmitted by the access point Use the NOTE Before testing for connectivity the target MU needs to be set to the same ESSID as the access point Since WPA PSK security has been configured on the recovery WLAN for the access point the MU will be prompted for a passphrase after associated to the ESSID ...

Page 84: ...oot Mesh Point is an AP 718 connected to the wired network direct via Ethernet or via a wireless backhaul When configuring a Mesh Point on an AP 7181 you must define whether or not the AP 7181 is a Root Mesh Point Non Root Mesh Points are simply referred to as Mesh Points These Mesh Points are AP 7181 s that are not connected to the wired network or wireless backhaul although they may still have a...

Page 85: ...d 79 To create a Mesh Point 1 Select Network Configuration Wireless Radio Configuration Radio1 or Radio2 Confirm that the Channel Selection parameter in the Channel power and Rates Settings field is set to Automatic ...

Page 86: ...AP 7181 Access Point Installation Guide 80 2 Select Network Configuration MeshConnex and click Create ...

Page 87: ...nsitive This Mesh ID must be the same on all AP 7181 devices Next select a radio to mesh on by selecting the appropriate box under Available On If this AP 7181 will be connected to the wired network Root node Gateway node select the Is Root checkbox 8 Click Apply to save your settings ...

Page 88: ...ess Point Installation Guide 82 9 The Mesh Point you created will be displayed in the MeshConnex Configuration window Highlight the Mesh Point and click Enable 10 Repeat the process for each device you are staging ...

Page 89: ... name of the desired Mesh Point 12 Select the Neighbor tab In this example only one neighbor is displayed NOTE A neighboring device will not be displayed in the table on the Neighbor tab if only a single device has been configured Another Non Root device must have already been created and the devices must be interconnected ...

Page 90: ...indicate Valid and the Bind State should indicate Bound 3 3 Where to Go from Here Once basic connectivity has been verified the access point can be fully configured to meet the needs of the network and the users it supports Refer to the AP 7181 Product Reference Guide for detailed information on AP 7181 devices in wireless networks ...

Page 91: ...t the uncontrolled environmental limits found in OET 65 and ANSI C95 1 1991 Proper operation of this radio according to the instructions found in this manual and the AP 7181 Product Reference Guide will result in user exposure that is substantially below the FCC recommended limits 4 1 1 Warnings for the Use of Wireless Devices Please observe all warning notices with regard to the usage of wireless...

Page 92: ... near unshielded blasting caps or in an explosive environment unless it is a type especially qualified for such use Do not operate the radio or attempt to transmit data unless the antenna is connected otherwise the radio may be damaged 4 3 1 RF Exposure This equipment complies with the FCC RF radiation exposure limits set forth for an uncontrolled environment This equipment should be installed and...

Page 93: ... made every effort to resolve installation or operation issues yourself and still require support please contact your regional Motorola support representatives or visit the Motorola Mesh Networks web site at http motorola wirelessbroadbandsupport com support mesh contact php ...

Page 94: ...AP 7181 Access Point Installation Guide 88 ...

Page 95: ......

Page 96: ...MOTOROLA INC 1303 E ALGONQUIN ROAD SCHAUMBURG IL 60196 http www motorola com Version 1 0 0 A March 2010 ...

Reviews: