3-4
CB3000 Client Bridge User’s Guide
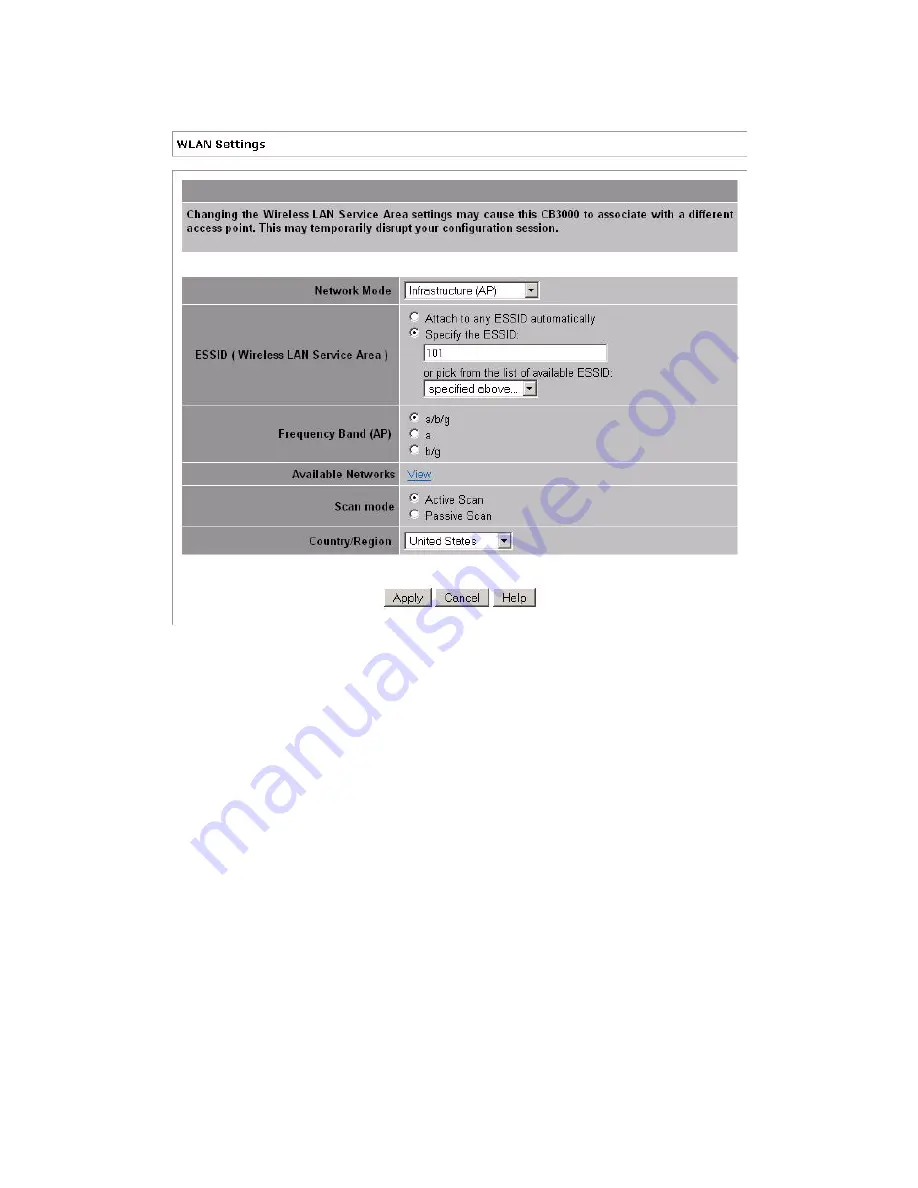
Figure 3.2 WLAN Settings—Infrastructure Network Configuration
3. Configure the
ESSID (Wireless LAN Service ID)
field, as appropriate:
•
Attach to any ESSID automatically
– Select this radio button to enable the CB3000 to randomly
select a target WLAN for connection.
•
Specify the ESSID
– Select this button to enter the name of a target WLAN or use the drop-down
menu to select an existing WLAN. Click ‘
View
’ to display the available networks first, if unsure of
which network to connect to.
4. Select the
Frequency Band
.
Options include ‘a/b/g’,’a’, or ‘b/g’.
Ensure the frequency band selected is consistent with the WLAN network. By restricting the Frequency
Band on the CB3000, you can reduce the time the CB3000 takes to search for available APs.
5. Click the
‘
View
’
Available Networks
link to view the Available Networks screen.
Use this screen to view a list of available ESSIDs (networks), and possibly select an ESSID. For more
information, see
Available Networks on page 3-1
6. Select the
Scan Mode
as either
Active Scan
or
Passive Scan
.
Active Scan
mode takes less time when searching for APs by sending probe requests.
Passive Scan
takes
more time during a scan, but only listens for AP beacons.
Summary of Contents for CB3000 - Client Bridge - Wireless Access Point
Page 1: ...M CB3000 Client Bridge User s Guide ...
Page 24: ...2 12 CB3000 Client Bridge User s Guide ...
Page 65: ...Management Options 4 7 Figure 4 4 View Log Screen ...
Page 74: ...4 16 CB3000 Client Bridge User s Guide ...
Page 90: ...5 16 CB3000 Client Bridge User s Guide ...
Page 94: ...B 2 CB3000 Client Bridge User s Guide ...
Page 96: ...C 2 CB3000 Client Bridge User s Guide ...
Page 104: ...D 8 CB3000 Client Bridge User s Guide ...
Page 105: ......


