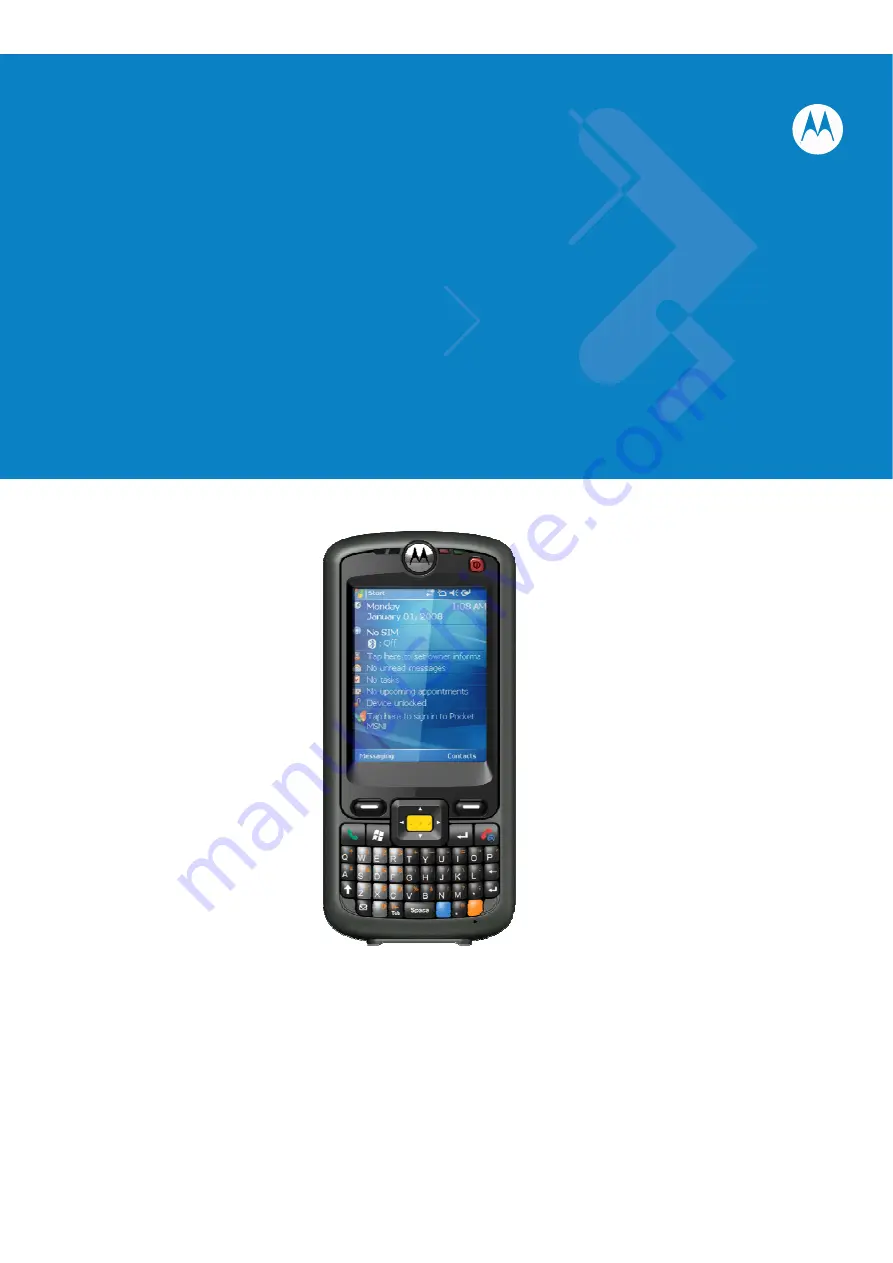
background image


FR6876 Mobile Computer   
User Guide


Summary of Contents for FR6876

Page 1: ...FR6876 Mobile Computer User Guide ...

Page 2: ...2 FR6876 EnterpriseDigital Assistant User Guide Rev A Jan 2009 ...

Page 3: ...torola The user agrees to maintain Motorola s copyright notice on the licensed programs delivered hereunder and to include the same on any authorized copies it makes in whole or in part The user agrees not to decompile disassemble decode or reverse engineer any licensed program delivered to the user or any portion thereof Motorola reserves the right to make changes to any software or product to im...

Page 4: ...FR6876 User Guide 4 RevisionHistory Changes to the original manual are listed below Change Date Description 01 Rev A Initial release ...

Page 5: ... B digital device pursuant to Part 15 of the FCC Rules These limits are designed to provide reasonable protection against harmful interference in a residential installation This equipment generates uses and can radiated radio frequency energy and if not installed and used in accordance with the instructions may cause harmful interference to radio communications However there is no guarantee that i...

Page 6: ...dy Use of other enhancements may not ensure compliance with FCC RF exposure guidelines Using Your Phone With a Hearing Aid Device FR6876 is compliant with the FCC Hearing Aid Compatibility HAC requirements For additional HAC information including the HAC rating of this product some wireless phones are used near some hearing devices hearing aids and cochlear implants users may detect a buzzing humm...

Page 7: ...g is on FR6876 sends the audio from your phone calls to the telecoil rather than to the microphone of your hearing aid You are likely to hear calls much better because volume is increased and background noise and feedback are diminished The HAC setting improves only the calls you listen to through the earpiece Turn off the Bluetooth function Turn off the WiFi function It does not affect calls hear...

Page 8: ...sories 13 Getting Started 14 Installing the SIM Card 14 Installing the Main Battery 15 Charging the Battery 15 Charging the Main Battery and Memory Backup Battery 15 Charging Spare Batteries 17 Charging Temperature 17 Powering Onthe FR6876 17 Calibrating the Screen 17 Checking Battery Status 17 Micro Secure Digital microSD Card 18 Removing the Screen Protector 19 ReplacingtheMainBattery 19 Battery...

Page 9: ...Scanning 43 Scanning Considerations 43 Taking Photos 44 Recording Video 44 Infrared Connection 46 Exchanging FilesusingIR Connection 46 Adding New Network 51 Chapter 3 Using GPS 54 Introduction 54 Software Installation 54 FR6876 GPS Setup 54 Operation 55 GPS Maps on microSD Cards 55 Downloading GPS Data 55 Answering a Phone Call While Using GPS 56 Losing the GPS Signal While in a Vehicle 56 Assist...

Page 10: ... Dial Entry 78 Deleting a Speed Dial Entry 79 Using Call History 80 Managing Call History 80 Changing the Call History View 80 Resetting the Recent Calls Counter 80 Deleting Call History Items by Call Date 81 Deleting All Call History Items 82 Viewing Call Status 83 Using the Call History Menu 83 Swapping Calls on an FR687676 84 Conference Calling on an FR687676 85 Text Messaging 86 Viewing Text M...

Page 11: ...taining the FR6876 95 Battery Safety Guidelines 96 Cleaning 97 Materials Required 97 Cleaning the FR6876 97 Housing 97 Display 97 Scanner Exit Window 97 Connector 97 Cleaning Cradle Connectors 98 Cleaning Frequency 98 Troubleshooting 99 Bluetooth Connection 101 Single Slot USB Serial Cradle 102 Cables 103 ...

Page 12: ...ries NOTE Screens and windows pictured in this guide are samples and can differ from actual screens Documentation Set The documentation set for the FR6876 provides information for specific user needs and includes FR6876 Quick Start Guide describes how to get the FR6876 up and running FR6876 User Guide describes how to use the FR6876 ...

Page 13: ...oftware configurations and references are made to operating system or software versions for Adaptation Kit Update AKU version Phone version AKU Version To determine the Adaptation Kit Update AKU version Tap Start Settings System tab About icon Version tab The second line lists the operating system version and the build number The last part of the build number represents the AKU number For example ...

Page 14: ... describes the available accessories and how to use them with the FR6876 Chapter 7 Maintenance Troubleshooting includes instructions on cleaning and storing the FR6876 and provides troubleshooting solutions for potential problems during FR6876 operation Appendix A Technical Specifications provides the technical specifications for the FR6876 Appendix B Voice Quality Manager provides inflammation on...

Page 15: ...obility Application Guide p n 72E 68901 xx Enterprise Mobility Developer Kits EMDKs available at http support symbol com Latest ActiveSync software available at http www microsoft com For the latest version of this guide and all guides go to http www symbol com manuals Service Information If you have a problem with your equipment contact Motorola Enterprise Mobility support for your region Contact...

Page 16: ...cing and will be given specific directions Motorola is not responsible for any damages incurred during shipment if the approved shipping container is not used Shipping the units improperly can possibly void the warranty If you purchased your Enterprise Mobility business product from a Motorola business partner contact that business partner for support ...

Page 17: ...ower on the FR6876 for the first time Figure 1 1 FR6876 Front View Figure 1 2 FR6876 Rear View 1 Scan Button 2 Up Button 14 Battery Door 15 Door Latch 3 Down Button 4 Headset Jack 16 Speaker 17 Camera Flash 5 I O Connector 6 Microphone 18 Self view Mirror 19 Camera 7 Keypad 8 Touch Screen 20 Tether Point 21 Scan Window 9 Power Button 10 Scan Decode LED 22 Stylus 23 Scan Button ...

Page 18: ... for later storage and shipping Verify that you received the following FR6876 EDA 1950 mAh Lithium ion battery Battery cover strap assembly Tethered stylus Protective overlay installed on display window Regulatory Guide Quick Start Guide Inspect the equipment for damage If any equipment is missing or damaged contact the Motorola Enterprise Mobility Support center immediately See page xvi for conta...

Page 19: ...14000 148R Option Power adapter HP O2040D43 manufacture from HIPRO with following 1 Input 100 240V 50 60Hz 1 5A 2 Output 12V 3 33A 50 14000 249R Option Power adapter EADP 16BBA manufacture from Delta Electronics Ltd with following 1 Input 100 240V 50 60Hz 0 4A 2 Output 5 4V 3A USB Charging Cable 25 118703 01R Option FR6000 series USB Charging Cable Requires power adapter P N 50 14000 249R Model EA...

Page 20: ...Mobile phone service provider account details Information regarding service access and preferences Contact information which can be moved to Contacts on the FR6876 Any additional services to which you have subscribed NOTE For more information about SIM cards refer to the service provider s documentation To install the SIM card Located Under Battery Place SIM card with contacts facing down 1 Lift t...

Page 21: ...bed in Battery Safety Guidelines on page 7 2 Charging the Main Battery and Memory Backup Battery Before using the FR6876 for the first time charge the main battery until the amber Charging Battery Status LED remains lit see Table 1 2 on page 1 7 for charge status indications To charge the FR6876 use a cable or a cradle with the appropriate power supply For information about the accessories availab...

Page 22: ...the 3600 mAh battery charges in approximately seven hours Table 1 2 LED Charge Indicators Charging Battery Status LED Indication Off FR6876 is not charging FR6876 is not inserted correctly in the cradle or connected to a power source Charger cradle is not powered Slow Blinking Amber 1 blink every 2 seconds FR6876 is charging Solid Green Charging complete Note When the battery is initially inserted...

Page 23: ...R6876 does not power on perform a warm boot See Resetting the FR6876 on page 2 14 When turning the FR6876 on for the first time the splash screen displays for about a minute as the FR6876 initializes its flash file system then the calibration window appears Note that these windows also appear upon cold boot NOTE When the FR6876 powers up after inserting a battery for the first time the device boot...

Page 24: ...er ESD precautions include but are not limited to working on an ESD mat and ensuring that the operator is properly grounded To install the microSD card 1 Power off the FR6876 2 Remove the memory card cover on the side of the FR6876 Figure 1 6 Card Installation 3 Insert the card with the card contacts facing up and the cut corner on the left until you feel a click 4 Replace the memory card cover To...

Page 25: ... KT 93765 01R Screen Protector 3 pk Replacingthe MainBattery 1 Press the red Power button to suspend the FR6876 2 Open the battery cover latches on either side of the battery cover 3 Lift the top of the battery cover and remove 4 Press the battery release latch on the bottom of the battery to unlock and lift the battery out of the well 5 Insert the replacement battery top first into the battery co...

Page 26: ...arge at a faster rate Changing the Power Settings To set the FR6876 to turn off after a short period of non use 1 Tap Start Settings System tab Power icon Advanced tab 2 Select the On battery power Turn off device if not used for check box and select a value from the drop down list 3 Select ok Changing the Backlight Settings To change the backlight settings in order to conserve more battery power ...

Page 27: ... the Connectivity icon or tap Wireless Manager on the Today screen Connectivity icon Figure 1 8 Opening Wireless Manager Select Wireless Manager Figure 1 9 Wireless Manager Window Figure 1 10 Wireless Manager Menu NOTE Wireless connection options vary depending upon configurations To enable or disable a wireless connection tap the specific button To enable or disable all wireless connections tap t...

Page 28: ...uetooth OFF Phone ON Wireless LAN ON Today Screen The Today screen displays important information such as upcoming appointments and status indicators Tap a section on the screen to open the associated program Alternatively tap Start Today to display the Today screen Connectivity Notification WAN Status Open the Start Menu Adjust volume Battery Status Change the date and time Change the date and ti...

Page 29: ...kup Battery Low Notification that one or more instant messages were received Notificationthat one or more e mail textmessageswere received Notification that one or more voice messages were received There are more notification icons than can be displayed Tap to display remaining icons Indicates a reminder of an upcoming calendar event Connectivity Connection is active Connection is not active Synch...

Page 30: ...hing HSDPA connecting FR6876 HSDPA in use FR6876 3G connecting FR6876 3G in use FR6876 GPRS connecting FR687674 and FR687676 GPRS in use FR687674 and FR687676 EGPRS connecting FR687606 and FR687696 EGPRS in use FR687606 and FR687696 Roaming SIM Card not installed FR687674 and FR687676 Speaker All sounds are on All sounds are off Vibrate is on Battery Main battery is charging Battery power complete...

Page 31: ...ists the default programs on the Start menu Table 2 3 Programs in the Start Menu Icon Name Description Office Mobile Use the complete suite of Microsoft Office applications for your mobile device Excel Mobile Create new workbooks or view and edit Microsoft Excel workbooks OneNote Mobile Create new notes or view existing notes PowerPoint Mobile View Microsoft PowerPoint slides and presentations Wor...

Page 32: ...information between the FR6876 and a host computer or the Exchange Server Games Bubble Breaker Solitaire Sample AP DataWedge Notify and Scanner Calculator Perform basic arithmetic and calculations such as addition subtraction multiplication and division File Explorer Organize and manage files on your device GPSXtra Allow you to download GPS data to enhance GPS performance Getting Started Help abou...

Page 33: ...s and video files Search Search contacts data and other information on your FR6876 SIM Toolkit Manage the contacts that are stored on your SIM card Copy SIM contents to Contacts on the FR6876 Task Manager Show and stop all the tasks on run Tasks Keep track of your tasks Windows Live Use this mobile version of Windows Live to find information on the web WindowsMediaPlayer Mobile Play back audio and...

Page 34: ...onal information on the FR6876 Phone Make and receive calls switch between calls and set up conference calling Sounds Notifications Enable sounds for events notifications and more and set the type of notification for different events Today Customize the appearance and the information to be displayed on the Today screen SystemTab About View basic information such as the Windows Mobile version and t...

Page 35: ...chnical support if you choose to send it External GPS Set the appropriate GPS communication ports if required You may need to do this when there are programs on your device that access GPS data or you have connected a GPS receiver to the FR6876 Managed Programs View installation history Memory Check the device memory allocation status and memory card information and stop currently running programs...

Page 36: ... or more types of modem connections for your device such as phone dial up GPRS Bluetooth and more so that your device can connect to the Internet or a private local network Domain Enroll Enroll in domain USB to PC Enables or disables the enhanced network connectivity Wi Fi Setup wireless network connection and customize settings Wireless Manager Enables or disables the FR6876 s wireless radios and...

Page 37: ...ndow or use the Up Down button on the side of the FR6876 Battery StatusIndications Battery icons appear on the navigation bar indicating the battery power level When the main battery or backup battery power falls below a predetermined level the icon indicates the status and a battery dialog box appears indicating the status of the main or backup battery Figure 2 3 Battery Status Dialog Box The Bat...

Page 38: ...tle Bar Also view the battery status using the Power window Power Setting 1 Tap Start Settings Power icon Main tab A power remaining capacity bar appears Figure 2 5 Main Tab 2 Tick the following options to save the power and tap ok Figure 2 6 AdvancedTab ...

Page 39: ...uld move to an environment within proper operating temperature Level 2 Temperature Warning this level is similar to main battery very low warning It indicates the battery temperature has reached the second threshold level The user should stop using the FR6876 Level 3 Temperature Error this level indicates the battery has reached an unusable temperature threshold and immediately suspends the FR6876...

Page 40: ...abled Charging Battery Status LED Slow blinking amber Main battery in FR6876 is charging Solid green Main battery in FR6876 is fully charged Fast blinking amber Charging error Off Not charging Single blink amber when power button is pressed Battery depleted Blinking amber when power button is pressed Battery over temperature condition Radio Status LED Slow blink green The radio BT WIFI GPS RIL can...

Page 41: ...ne what actions wake up the mobile computer after it has gone into suspend mode The mobile computer can go into suspend mode by either pressing the Power button or automatically by Control Panel time out settings These settings are configurable and the factory default settings are shown in Table 2 7 are subject to change update Table 2 7 Wake up Default Settings Condition for Wake up Power Button ...

Page 42: ... input To lock the device tap the Device unlocked icon The icon changes to locked Figure 2 11 Device Locked Unlocked Icons To unlock the device and free it for use tap Unlock Figure 2 12 Unlock Device Window Tap Unlock on the Unlock window NOTE You can make emergency calls even when the FR6876 is locked See Making an Emergency Call on page 5 7 for more information ...

Page 43: ...y is pressed Press the Blue key twice to lock this mode This displaysthe following icon at the bottom of the screen Press the Blue key a third time to unlock Press and hold the Blue key while selectinga sequenceof keys to activatethis mode temporarily This displaysthe followingicon at the bottomof the screenas long as the key is pressed OrangeKey Accessesthe secondarylayer of charactersand actions...

Page 44: ...ly This displays the following icon at the bottom of the screen as long as the key is pressed Press the Shift key twice to lock this mode This displays the following icon at the bottom of the screen Press the Shift key a third time to unlock Backspace Producesa backspace Enter Executesa selecteditem or function Star Producesan asterisk OK Use this key in conjunctionwith the Blue key as an OK or cl...

Page 45: ...ey Orange Key Blue Key Q q Q W w W 1 E e E 2 R r R 3 T t T Y y Y _ U u U I i I O o O P p P A a A S s S 4 D d D 5 F f F 6 G g G H h H J j J K k K L l L Backspace Backspace Shift Shift Z Z Z 7 X x X 8 C c C 9 V v V B b B N n N M m M ENTER Enter O O O O Mail Mail Mail Mail Mail ...

Page 46: ...Usingthe FR6876 40 TAB Tab Tab Tab Tab SPACE Space Space Space Space Note An application can change the key functions The keypad may not function exactly as described ...

Page 47: ...r button to turn the FR6876 screen on and off The FR6876 is in suspend mode when the screen is off For more information see Powering On the FR6876 on page 1 8 Also use the Power button to reset the FR6876 by performing a warm or cold boot See Resetting the FR6876 on page 2 14 Scan Press to scan bar codes See Data Capture on page 2 29 Up Down Press to increase or decrease the FR6876 s volume ...

Page 48: ...nd drag across the screen to select text and picture Drag in a list to select multiple items NOTE Motorola recommends using the spring loaded tip of the stylus to write on the screen and the back end of the stylus to tap the screen Use your finger to press the Power button and keypad buttons CAUTION To prevent damage to the screen do not use any device other than the Motorola provided stylus Enter...

Page 49: ... bar code density and scanning device optics Scanning within range brings quick and constant decodes scanning too close or too far away prevents decodes Move the scanner closer and further away to find the right working range for the bar codes being scanned Angle Scanning angle is important for promoting quick decodes When laser beams reflect directly back into the scanner from the bar code this s...

Page 50: ...er Aiming Pattern Taking Photos To take a photo 1 Tap Start Programs Pictures Videos icon 2 Tap Camera on the command bar 3 Check the picture on the view finder adjust if necessary 4 Press the Enter key to take the picture Hold the FR6876 still until the camera flash occurs or the shutter sound is heard Recording Video To record a video clip 1 Tap Start Programs Pictures Videos icon 2 Tap Camera o...

Page 51: ...ding Recording stops when you press the Enter button again Viewing Photos and Videos NOTE For detailed information on the Photos and Videos refer to the Microsoft Applications User Guide for Mobile 6 p n 72E 108299 xx To view photos and video clips 1 Tap Start Programs Pictures Videos icon 2 Tap the picture or video clip to view ...

Page 52: ...r IrDA device To activate the Beam function 1 Tap Start Settings Connections tab Beam icon 2 Tap Receive all incoming beams check box Figure 2 17 Beam Window 3 Tap ok Infrared Connection Using infrared you can enable short range file exchange between your FR6876 and another IrDA device Exchanging Files using IR Connection Ensure that the IrDA function on both the FR6876 and the other device are en...

Page 53: ...hen tap Beam type of item on the pop up menu 4 Tap the device that you want to send the file to Figure 2 19 Beam Contact Figure 2 20 Receive File To receive files via IrDA connection 1 Align the IrDA port of the FR6876 with that of the other IrDA device so that they are unobstructed and within a close range 2 On the other device send the file to the FR6876 3 When the Receiving Data dialog displays...

Page 54: ...nnection tab Wireless Manager icon Menu Or tap the operator name on the Today screen Figure 2 21 Wireless Manager menu 2 Tap Wi Fi settings to enter the configuration screen Figure 2 22 Wireless networks configuration 3 Tap the item in the Network to access drop box and select the desired item ...

Page 55: ...rk Adapters tab in the Figure 2 26 Figure 2 24 Network Adapter 5 IntheFigure2 28 tap Edit or tap the network card connections to or tap an adapter to modify the settings Figure 2 25 Network Adapter settings modification 6 Tap Use specific IP address in the Figure2 29 ...

Page 56: ...Usingthe FR6876 50 Figure 2 26 IP address setting 7 Tap the Name Servers tab in the Figure2 30 Figure 2 27 Name Servers setting ...

Page 57: ...Adding New Network Figure 2 28 Wireless networks configuration 1 Tap Add New in the Figure 2 31 Figure 2 29 New wireless networks configuration Note Only one of the two check box works 2 Enter the name in the Figure 2 32 ...

Page 58: ...orks configuration 3 Tap Next in the in the Figure 2 33 Figure 2 31 Configure Network Authentication 4 Tap Next in the Figure 2 34 Figure 2 32 Configure Network Authentication 5 Tap Next in the Figure 2 35 Figure 2 33 Configure Network Authentication ...

Page 59: ...Usingthe FR6876 53 6 In the Figure 2 36 tick the Use IEEE 802 1x network access control check box then tap Finish to finish the network adding Figure 2 34 Configure Network Authentication ...

Page 60: ... to the exclusion of safe driving practices It is unsafe to operate the controls of the device while driving Software Installation Third party GPS navigation software is required Evaluation software is available from various suppliers If interested in purchasing GPS navigation software check with the GPS software vendor before purchasing downloading or installing any software to determine that the...

Page 61: ...navailable NOTE When using a GPS navigation application ensure that the FR6876 does not go into suspend mode If the FR6876 suspends then the power to the GPS radio is removed Upon resume the GPS receiver must reacquire a valid GPS signal resulting in a delay of positional information GPS Maps on microSD Cards GPS navigation software vendors may sell maps on microSD cards If using a microSD card wi...

Page 62: ...g a GPS signal from satellites To improve GPS signal strength place the FR6876 where there is a clear view of the sky A direct line of sight is required between the FR6876 and the GPS satellites to access information from the satellites The Global Positioning System GPS is a system that allows the user to track their position anywhere on the earth Assisted GPS GPS can be used in stand alone or Ass...

Page 63: ...PS Using 57 A GPS follows the Secure User Plane Location SUPL protocol which allows the FR6876 to communicate with a location server Refer to the EMDK Help file for information on setting up SUPL on the FR6876 ...

Page 64: ...ing fixed frequency interferers and can be used with Bluetooth voice All devices in the piconet Bluetooth network must be AFH capable in order for AFH to work There is no AFH when connecting and discovering devices Avoid making Bluetooth connections and discoveries during critical 802 11b communications AFH for Bluetooth consists of four main sections Channel Classification A method of detecting a...

Page 65: ...ng on the link between the devices Device authentication is a mandatory feature of Bluetooth while link encryption is optional Pairing of Bluetooth devices is accomplished by creating an initialization key that is used to authenticate the devices and create a link key for them Entering a common PIN number in the devices being paired generates the initialization key The PIN number is never sent ove...

Page 66: ......

Page 67: ...icate only with Bluetooth radios in close proximity NOTE To achieve the best battery life turn off radios not in use Disabling Bluetooth To disable Bluetooth tap Bluetooth icon to enter Wireless Manager Tap Bluetooth icon to change on to off The Bluetooth icon changes to indicate that Bluetooth is disabled Figure 4 1 Disable Bluetooth Enabling Bluetooth To enable Bluetooth tap Bluetooth icon to en...

Page 68: ...ectable modes 3 Ensure that the two devices are within 30 feet 10 meters of one another 4 Tap the Bluetooth icon to enter Wireless Manager Then tap Menu Figure 4 3 Enter Bluetooth Window 5 Tap Menu to enter Settings window Then tap Add new device to search for Bluetooth Devices Figure 4 4 Add new device Window 6 After the device appears tap it and enter a passcode to establish a secure connection ...

Page 69: ...d another Bluetooth enabled device please ensure the FR6876 is discoverable and connectable NOTE Some devices might not require a PIN This depends upon the device s authentication 1 Choose one file as below tap Menu Beam picture Menu Figure 4 6 Select file 2 Then choose the destination device and wait till Done is showed ...

Page 70: ...fo tab to add and bond new devices Please refer to Bond new device s Mode Tab Use the Mode tab to configure the FR6876 s Bluetooth connection modes Figure 4 8 BTExplorer Settings Device Info Tab 1 Before bonding a new device make sure to turn on Bluetooth 2 If you want other devices to find your FR6876 please tick Make this device visible to other devices COM Ports Tab Use the COM Ports tab set sp...

Page 71: ... 65 1 Tap New Outgoing Port Figure 4 9 Add COM Ports 2 Select the device you want to add Then tap Next Figure 4 10 Select device 3 Select a port from drop down list Then tap Finish Figure 4 11 Select a Port for device ...

Page 72: ...igh Speed Downlink Packet Access HSDPA FR687676 using Cellular Line or using the modem specified by the mobile operator For more information or to customize the FR6876 phone by changing phone settings see the FR6876 Integrator Guide Accessing the Phone Keypad NOTE Keypads vary depending on services and the state of the phone For example place calls on hold and use Swap to switch active calls on ho...

Page 73: ... and Off Windows Mobile 6 devices include Wireless Manager which provides a simple method of enabling and disabling the phone To open Wireless Manager tap the Connectivity icon Figure 5 2 Opening Wireless Manager Select Wireless Manager The Wireless Manager window appears To toggle on or off the phone tap blue Phone bar To configure settings for a connection tap Menu Phone Settings NOTE To receive...

Page 74: ...o the FR6876 audio connector or a Bluetooth headset is configured for use with the FR6876 the earpiece and speakerphone are muted and audio is heard through the headset NOTE While using a Bluetooth headset during a call the mobile computer will not go into suspend mode Handset Mode Speaker Mode Headset Mode Figure 5 3 Audio Modes Using a Wired Headset You can use a stereo headset for audio communi...

Page 75: ...tions to use the Bluetooth Hands free profile instead of the Headset profile See Chapter 4 Using Bluetooth for more information NOTE When using a Bluetooth headset during a call the FR6876 power button is disabled and the FR6876 will not go into suspend mode Once the call is completed the power button functionality is enabled The following dialog box displays when a Bluetooth headset connection is...

Page 76: ...ke a call from the phone contacts speed dial and call history Using the Phone To make a call using the phone keypad 1 Tap Start Phone or press the green phone key on the FR6876 s keypad 2 From the Phone keypad tap the number to call 3 Tap Talk 4 Tap End to stop dialing or end the call NOTE Alternatively use the green and red phone keys on the FR6876 keypad to dial green and end red calls If you ta...

Page 77: ... the green phone key on the FR6876 s keypad 2 From the Phone keypad tap Call History Phone icon Figure 5 8 Call History 3 Tap the phone icon next to the number to begin dialing and return to the phone keypad 4 Tap End or press the red phone key on the FR6876 keypad to stop dialing or end the call Making a Speed Dial Call Use Speed Dial to call someone saved in the speed dial directory To make a sp...

Page 78: ...hone is locked or the SIM card is not inserted on FR687676 Your service provider can program additional emergency numbers into your SIM card However your SIM card must be inserted in your phone in order to use the numbers stored on it See your service provider for additional information When the alpha numeric keypad phone is locked press the Orange key twice to set the keypad to numeric mode and t...

Page 79: ... call tap Answer or press the Send key to place the current call on hold and answer the incoming call To put a call on hold to call another number or answer an incoming call tap Hold on an FR687676 To move from one call to another tap Swap on an FR687676 Smart Dialing Smart Dialing makes it easy to dial a phone number When you start entering numbers or characters Smart Dialing automatically search...

Page 80: ... John and Parks Celine Figure 5 11 Finding a Contact To make a call or send a text message using Smart Dialing 1 Begin entering the first few numbers or characters 2 In the Smart Dialing panel use the up and down arrows on the keypad to navigate to the desired contact or phone number 3 When the correct contact is selected press TALK to make a voice call 4 To send a text message to the selected con...

Page 81: ...formation about creating notes see the Windows On Device Help To access a note created during a call 1 Tap Start Phone or press the green phone key on the FR6876 s keypad 2 From the Phone keypad tap Call History 3 Tap and hold the number or the Note icon for the phone call entry containing the note Note icon Figure 5 13 Call History Notes Menu 4 Tap View Note ...

Page 82: ... numbers with a single tap Before creating a speed dial entry ensure the phone number exists in Contacts Adding a Speed Dial Entry To add a speed dial entry from the phone keypad 1 Ensure the contact and phone number are in the Contacts list 2 Tap Start Phone or press the green phone key on the FR6876 s keypad 3 Tap Menu Speed Dial Menu New Figure 5 15 Contacts 4 Tap the desired contact name and n...

Page 83: ... available location to assign as the new speed dial entry The first speed dial location is reserved for voice mail 6 Tap ok to add the contact to the speed dial list Figure 5 17 Speed Dial Contact List 7 Tap ok to exit the Speed Dial Contact List To add a speed dial entry from the Contacts window 1 Tap Start Contacts ...

Page 84: ...eed Dial Contact Location 4 Tap the up down arrows to select an available location to assign as the new speed dial entry The first speed dial location is reserved for voice mail 5 Tap ok Editing a Speed Dial Entry 1 Tap Start Phone or press the green phone key on the FR6876 s keypad 2 Tap Menu Speed Dial ...

Page 85: ...contact information in Contacts Start Contacts Deleting a Speed Dial Entry 1 Tap Start Phone or press the green phone key on the FR6876 s keypad 2 Tap Menu Speed Dial 3 Tap and hold the contact name Figure 5 21 Speed Dial Delete Menu 4 Tap Delete 5 Tap Yes to confirm permanently deleting the speed dial entry NOTE Deleting names and phone numbers in Speed Dial does not delete the contact informatio...

Page 86: ...rs next to the contact information for all missed calls Managing Call History Change views reset the call timer and delete calls to manage the calls stored in Call History Changing the Call History View 1 Tap Start Phone or press the green phone key on the FR6876 s keypad to display the Phone keypad 2 From the Phone keypad tap Call History 3 Tap Menu Filter to show the menu Figure 5 22 Call Histor...

Page 87: ...ory Call Timers 5 Tap Reset The All Calls counter cannot be reset 6 Tap ok to exit the Call Timers window Deleting Call History Items by Call Date 1 Tap Start Phone or press the green phone key on the FR6876 s keypad to display the Phone keypad 2 From the Phone keypad tap Call History 3 Tap Menu Call Timers ...

Page 88: ...s 5 Tap ok to exit the Call Timers window Deleting All Call History Items 1 Tap Start Phone or press the green phone key on the FR6876 s keypad to display the Phone keypad 2 From the Phone keypad tap Call History 3 Tap Menu Figure 5 26 Call History Tools Menu 4 Select Delete all calls Figure 5 27 Call History Delete All Dialog 5 Tap Yes 6 Tap ok to exit the Call History window ...

Page 89: ...nly the duration of the first call is recorded 4 Tap ok and then ok to exit Using the Call History Menu Use the Call History menu to dial voice mail access the Activation Wizard save to contacts view a note delete a listing send an SMS and make a call 1 Tap Start Phone or press the green phone key on the FR6876 s keypad to display the Phone keypad 2 From the Phone keypad tap Call History 3 Tap and...

Page 90: ... or press the green phone key on the FR6876 s keypad to display the Phone keypad 2 Enter the first phone number and press Talk When the call connects Hold appears on the keypad FR687676 Figure 5 30 Call Swapping Hold 3 Tap Hold on to place the first number on hold 4 Enter the second number and tap Talk Figure 5 31 Call Conferencing Conferencing 5 Tap Swap to move from one call to the other 6 Tap E...

Page 91: ...re 5 34 Conference Call Hold 3 Tap Hold to place the first call on hold 4 Enter the second phone number and tap Talk 5 After the call is answered tap Menu Conference to place the calls in conference mode Figure 5 35 Creating a Conference Call 6 Tap Hold to place the conference on hold 7 Enter another phone number and tap Talk 8 After the call is answered tap Menu Conference to place all the calls ...

Page 92: ...vailable the message is stored and can be sent later Viewing Text Messages To view a text message You can view a text message whether the phone is on or off When the phone is on you can view a text message from its notification callout Tap the text message notification icon on the navigation bar to display the message Text Message Notification Icon Figure 5 38 New Text Message Notification The Cal...

Page 93: ...u can still view received text message in Messaging 1 Tap Start Messaging Text Messages or on the Today screen tap Text Messages Tap Text Messages Figure 5 40 Text Messaging on Today Screen The Messaging window appears Figure 5 41 Messaging Window 2 In the message list tap a Text Messages ...

Page 94: ...create a text message 1 On the Phone screen select a contact name that you want to send a message to 2 Tap Menu Send Text Message Figure 5 43 Phone Screen Contact List 3 Compose your message Address Area Message Area Figure 5 44 Create Text Message The auto correct feature automatically fixes common spelling errors as you type so your messages are more accurate The character counter lets you see a...

Page 95: ...ned on your text message is sent If it s off you are prompted to turn on the phone If you do so the message is sent otherwise when you tap ok the message is saved in the Drafts folder and sent when the phone is turned on If you are out of coverage area the message is saved in the Drafts folder and sent when you return to a coverage area NOTE On FR687676 devices the message remains in the Drafts fo...

Page 96: ...with a host computer Headset Used in noisy environments Single Slot USB Serial Cradle This section describes how to use a Single Slot USB Serial cradle with the FR6876 For USB communication setup procedures refer to the FR6876 Integrator Guide The Single Slot USB Serial Cradle Provides 5 4 VDC power for operating the FR6876 Synchronizes information between the FR6876 and a host computer Refer to t...

Page 97: ... Charging Error It is recommended that this product be charged for 24 hours before the first use to ensure that the internal battery is fully charged Figure 6 1 FR6876 Battery Charging Charging the Spare Battery Spare Battery Figure 6 2 Spare Battery Charging ...

Page 98: ...harges in less than seven hours Charging Temperature Charge batteries in temperatures from 0 C to 45 C 32 F to 114 F Charging is intelligently controlled by the FR6876 To accomplish this for small periods of time the FR6876 or accessory alternately enables and disables battery charging to keep the battery at acceptable temperatures The FR6876 or accessory indicates when charging is disabled due to...

Page 99: ... recommends a 2 5mm jack headset p n 50 11300 050R Figure 6 5 Headset Connection Cables This section describes how to set up and use the cables The cables are available with a variety of connection capabilities The following communication charge cables are available USB Client Charge cable standard A connector and a barrel receptacle for power Auto charge cable Charge only cable The following prin...

Page 100: ...nnector end of the communication charge cable and gently press in until it latches into the FR6876 The FR6876 amber Charge LED indicates the FR6876 battery charging status The 3600 mAh standard battery charges in less than five hours and the 4800 mAh standard battery charges in less than seven hours See Table 1 2 on page 1 7 for charging status indications 3 When charging is complete remove the ca...

Page 101: ...the surface of the FR6876 screen Motorola recommends using a screen protector p n KT 67525 01R The touch sensitive screen of the FR6876 is glass Do not to drop the FR6876 or subject it to strong impact Protect the FR6876 from temperature extremes Do not leave it on the dashboard of a car on a hot day and keep it away from heat sources Do not store or use the FR6876 in any location that is dusty da...

Page 102: ...products that bear the USB IF logo or have completed the USB IF compliance program To enable authentication of an approved battery as required by IEEE1725 clause 10 2 1 all batteries will carry a Motorola hologram Do not fit any battery without checking it has the Motorola authentication hologram Do not disassemble or open crush bend or deform puncture or shred Severe impact from dropping any batt...

Page 103: ...he alcohol wipes but care should be taken not to allow any pooling of liquid around the edges of the display Immediately dried the display with a soft non abrasive cloth to prevent streaking Scanner Exit Window Wipe the scanner exit window periodically with a lens tissue or other material suitable for cleaning optical material such as eyeglasses Connector 1 Remove the main battery from mobile comp...

Page 104: ...d air in the connector area by pointing the tube nozzle about inch away from the surface CAUTION do not point nozzle at yourself and others ensure the nozzle or tube is pointed away from your face 6 Ensure that there is no lint left by the cotton tipped applicator remove lint if found 7 If grease and other dirt can be found on other areas of the cradle use lint free cloth and alcohol to remove 8 A...

Page 105: ...e 2 14 FR6876 removed from cradle while battery was charging Insert FR6876 in cradle The 3600 mAh batteryfully chargesin less than six hours Extremebattery temperature Batterydoesnot chargeif ambienttemperatureis below0 C 32 F or above 45 C 113 F Cannotseecharacters on display FR6876 not powered on Press the Powerbutton During data communication no data transmitted or transmitteddata was incomplet...

Page 106: ...Tappingthe window buttonsor icons does not activatethe correspondingfeature Screenis not calibratedcorrectly Re calibratethe screen See Calibrating the Screen on page 1 8 The systemis not responding Warm boot the system See Resetting the FR6876 on page 2 14 A messageappears stating that the FR6876 memoryis full Too many files storedon the FR6876 Delete unusedmemosand records If necessary save thes...

Page 107: ...ryis low the scannershuts off before the FR6876 low batteryconditionnotification Note If the scanneris still not readingsymbols contactthe distributoror Motorola Bluetooth Connection Table 7 2 Troubleshooting Bluetooth Connection Problem Cause Solution FR6876cannotfind any Bluetooth devices nearby Too far from other Bluetoothdevices Move closer to the other Bluetoothdevice s within a range of 10 m...

Page 108: ... Batteryis faulty Verify that other batterieschargeproperly If so replacethe faulty battery The FR6876 is not fully seatedin the cradle Removeand re insertthe FR6876 into the cradle ensuringit is firmly seated Ambient temperatureof the cradle is too warm Move the cradle to an area where the ambienttemperatureis between0 C 32 F and 35 C 95 F Extremebattery temperature Batterydoesnot chargeif ambien...

Page 109: ...3600 mAh battery fully chargesin less than six hours Batteryis faulty Verify that other batterieschargeproperly If so replacethe faulty battery The FR6876 is not fully attachedto Detachand re attachthe power cable to the FR6876 ensuringit is firmly connected During data communication no data transmits or transmitteddata was incomplete Cable was disconnectedfrom FR6876 during communications Re atta...

Reviews: