background image

MTM800 Enhanced

TETRA Mobile Terminal

Installation Manual

When printed by Motorola

Publication Number

6866539D30-L

@6866539D30@

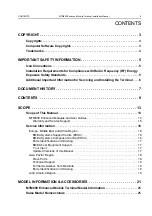
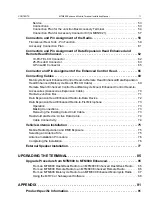
Summary of Contents for M80NCA6TZ5AN

Page 1: ...MTM800 Enhanced TETRA Mobile Terminal Installation Manual When printed by Motorola Publication Number 6866539D30 L 6866539D30 ...

Page 2: ......

Page 3: ...ited to the exclusive right to copy or reproduce in any form the copyrighted computer program Accordingly any copyrighted Motorola computer programs contained in the Motorola products described in this manual may not be copied reproduced modified reverse engineered or distributed in any manner without the express written permission of Motorola Furthermore the purchase of Motorola products shall no...

Page 4: ...4 MTM800 Enhanced Mobile Terminal Installation Manual THIS PAGE INTENTIONALLY LEFT BLANK ...

Page 5: ...ith each radio Motorola Publication part number 6866537D37 to ensure compliance with Radio Frequency RF energy exposure limits For a list of Motorola approved antennas and other accessories visit the following web site which lists approved accessories for your radio model http www motorola com governmentandenterprise The signal word Warning with the associated safety icon implies information that ...

Page 6: ...ion fuses in the Power and Ignition Sense Cable Replace these fuses only with the original ratings Fuse for Power Cable GKN6270 GKN6274 10A Motorola Part Number 6500139767 Fuse for Ignition Sense Cable HKN9327 4A Motorola Part Number 6580283E02 Failure to use correct manufacturer approved parts may result in physical damage to this unit ADDITIONAL IMPORTANT INFORMATION FOR SERVICING AND INSTALLING...

Page 7: ...7 6866539D30 D Changes in ferrite clamp installation Accessory part numbers updated Aug 2007 6866539D30 E Note regarding installation PIN 12 description corrections Jul 2008 6866539D30 F Toroids added for Remote Mount Installation Mar 2009 6866539D30 G Data Box solution included May 2009 6866539D30 H Rated Power and Distance table corrected May 2009 6866539D30 J Dual Control Head installation Jul ...

Page 8: ...8 MTM800 Enhanced Mobile Terminal Installation Manual THIS PAGE INTENTIONALLY LEFT BLANK ...

Page 9: ...f This Manual 13 MTM800 Enhanced Manuals and User Guides 14 Warranty and Service Support 15 Service Information 16 Europe Middle East and Africa Region 16 EMEA Systems Support Centre ESSC 16 EMEA Systems Component Centre ESCC 16 Parts Identification and Ordering 17 EMEA Test Equipment Support 17 Your Input 17 Updated Versions of this Manual 17 Asia Pacific Region 18 Piece Parts 18 Technical Suppor...

Page 10: ...ion 40 Installing the Remote Mount Enhanced Control Head onto the Remote Mount Trunnion 41 Installing the Remote Mount Enhanced Control Head in a DIN Mount Bracket 42 Inserting the Remote Mount Enhanced Control Head with the DIN Mount Bracket into the DIN Frame 43 Adding Extra Connectivity to the Remote Head 44 Installing the Accessories Expansion Cable 44 Motorcycle Mount Enhanced Control Head In...

Page 11: ...cle Mount Enhanced Control Head to Accessories Accessories Expansion Cable 70 Radio to Junction Box 71 Data Expansion Head Enhanced Radio to Data Device 72 Data Expansion Head Enhanced Radio to Fist Microphone 73 Operation 73 Making Connections 73 Removing the Existing Coiled Cord Cable 73 Radio to Data Device Active Data Cable 74 Cable Connectivity 74 Vehicle Antenna Installation 75 Mobile Radio ...

Page 12: ...12 MTM800 Enhanced Mobile Terminal Installation Manual CONTENTS Equipment Electrical Ratings 91 Normal Load Conditions 91 Fuse Identification 92 ...

Page 13: ...nges which occur after printing date may be incorporated by a complete Manual revision or alternatively as additions This manual is divided into the following sections Safety and General Information Document History Contents Scope of this manual Model Information Installation APPENDIX Product Specific Information The mobile terminal has to be installed by trained service personnel only All install...

Page 14: ...k Start Guide Simplified Chinese 68015000224 MTM800 Enhanced Quick Start Guide Korean 68015000221 MTM800 Enhanced Quick Start Guide Arabic 68015000222 MTM800 Enhanced Quick Start Guide Lithuanian 68015000303 MTM800 Enhanced Quick Start Guide Portuguese 68015000304 MTM800 Enhanced Quick Start Guide Russian 68015000305 MTM800 Enhanced Quick Start Guide Greek 68015000312 MTM800 Enhanced Quick Start G...

Page 15: ...guidance purposes only In instances where the product is covered under a return for replacement or return for repair warranty a check of the product should be performed prior to shipping the unit back to Motorola This is to ensure that the product has been correctly programmed or has not been subjected to damage outside the terms of the warranty Prior to shipping any terminal back to the appropria...

Page 16: ...ce or if you would like more information about the Technical Support Service please contact your local customer support or account manager for further information Contact details Email ESSC motorola com List of Telephone Numbers It is recommended that access from any other country uses 44 2030 277499 EMEA Systems Component Centre ESCC The European Systems Component Centre provides a repair service...

Page 17: ...d be placed directly on Motorola s local distribution organization or via the Extranet site Motorola Online at https emeaonline motorola com EMEA Test Equipment Support Information related to support and service of Motorola Test Equipment is available by calling the Motorola Test Equipment Service Group in Germany at 49 0 6128 702179 Telefax 49 0 6128 951046 through the Customer Care Organization ...

Page 18: ...tre All orders for parts information should include the complete Motorola identification number All part orders should be directed to your local AAD office Please refer to your latest price pages Technical Support Technical support is available to assist the dealer distributor in resolving any malfunction which may be encountered Initial contact should be by telephone wherever possible When contac...

Page 19: ... Ave Nueva Tajamar 481 Edif World Trade Center Of 1702 Torre Norte Las Condes Santiago Chile 562 338 9000 MOTOROLA DE COLOMBIA LTDA Carrera 7 71 52 Torre A Oficina 1301 Bogotá Colombia 571 376 6990 MOTOROLA DE COSTA RICA Parque Empresarial Plaza Roble Edificio El Portico 1er Piso Centro de Negocios Internacional Guachepelin Escazu San Jose Costa Rica 506 201 1480 MOTOROLA DEL ECUADOR Autopist Gral...

Page 20: ...20 MTM800 Enhanced Mobile Terminal Installation Manual THIS PAGE INTENTIONALLY LEFT BLANK ...

Page 21: ...70 MHz REMOTE MTM800 ENH 350 390 MHz REMOTE MTM800 ENH 380 430 MHz REMOTE M3 MT512M MT712M MT812M MT912M M80RCS6TZ2AN M80UCS6TZ2AN M80NCS6TZ2AN M80PCS6TZ2AN MTM800 ENH 410 470 MHz M CYCLE MTM800 ENH 806 870 MHz M CYCLE MTM800 ENH 350 390 MHz M CYCLE MTM800 ENH 380 430 MHz M CYCLE M4 MT512M MT712M MT812M MT912M M80RCA6TZ5AN M80UCA6TZ5AN M80NCA6TZ5AN M80PCA6TZ5AN MTM800 ENH 410 470 MHz DATA MTM800 E...

Page 22: ...MTM800 ENH MTM800 ENH 380 430 MHz 806 825 MHz 350 390 MHz 410 470 MHz Power Supply Minimum Nominal Maximum Max Current 10 8 Vdc 13 2 Vdc 15 6 Vdc Approx 3 5 A Intermodulation Blocking 50 100 kHz 47 dBm 40 dBm Frequency Range DMO MTM800 ENH MTM800 ENH MTM800 ENH MTM800 ENH 380 430 MHz 851 870 MHz 350 390 MHz 410 470 MHz Dimensions HxWxD in mm Spurious Rejection 45 dBm Frequency Stability Transceive...

Page 23: ...obile Terminal with Remote Mount Enhanced Control Head optional either with Remote Head Enhanced or Data Expansion Head Enhanced Speaker Microphone or Handset Remote Mount cables Standard User Guide and Installation Accessories M4 Motorcycle Mount with Mobile Terminal with Motorcycle Mount Enhanced Control Head optional either with Remote Head Enhanced or Data Expansion Head Enhanced Speaker Micro...

Page 24: ...4309 X Remote Mount Enhanced Control Head English Keypad Hungarian GMWN4606 X Motorcycle Mount Enhanced Control Head English Keypad GMWN4600 X Motorcycle Mount Enhanced Control Head Chinese Keypad GMWN4601 X Motorcycle Mount Enhanced Control Head Korean Keypad GMWN4602 X Motorcycle Mount Enhanced Control Head Arabic Keypad GMWN4603 X Motorcycle Mount Enhanced Control Head Bopomofo Keypad GMWN4604 ...

Page 25: ...NTN7373 X X Euro Linecord 3060665A05 Packed NTN7374 X X UK Linecord 3002120F02 Packed NTN7375 X X Argentina Linecord NTN9246 X Cables Part Number M1 M2 M3 M4 M5 Remote Mount Cable Terminal to C H 3m RKN4077 X X Remote Mount Cable Terminal to C H 5m RKN4078 X X Remote Mount Cable Terminal to C H 7m RKN4079 X X Remote Mount Cable Terminal to C H 10m PMKN4020 X X Accessories Expansion Cable 2 3m PMKN...

Page 26: ...es is available on the Data Expansion Head Enhanced and the Active Data Cable GMKN1022 is not required Installation Part Number M1 M2 M3 M4 M5 External Alarm Relay GKN6272 X X X X Accessory Connector Kit GMBN1021 X X X X Buzzer Kit GLN7282 X X X X Mounting Transceiver Part Number M1 M2 M3 M4 M5 Key Lock Mount RLN4779 X X X X X High Profile Mounting Bracket GLN7317 X X X X X Low Profile Mounting Br...

Page 27: ...sture 3 Verify that there will be sufficient space around the mobile unit for air flow and installation 4 Check that there is enough routing space for the power cable connector and the antenna coaxial cable 5 Plan the best place to run connections to minimize pinching crushing and overheating of wires and cables This product must be installed in a vehicle in accordance with the vehicle manufacture...

Page 28: ... bag Uninstaling the radio OPTION 1 Before disconnecting the 13 2 V main power supply from the radio 1 Switch off the radio 2 Wait for a minimum of 4 seconds after the radio switch is released 3 Disconnect the 13 2 V main power supply OPTION 2 Turn off the main power supply WITHOUT switching OFF the radio This terminal must be operated only in negative ground electrical systems Operating the termi...

Page 29: ... power cable 3 From inside the vehicle feed the red and black leads without the lugs attached through the access hole and into the engine compartment see Figure 1 4 Connect the black lead of the DC power cable to the nearest vehicle chassis ground point using the provided ring lug if necessary Shorten the black lead to remove any excess cable see Figure 2 In cases of blown fuses replace ONLY with ...

Page 30: ...ing lug from the fuse holder to the positive battery terminal Make sure the adapter cable is connected to the main power cable red lead 8 Carefully check that all connections are proper Insert the fuse into the fuse holder and close the cover Locate a good vehicle ground point The vehicle frame provides the best ground Optimum terminal performance can only be achieved with a very low resistance gr...

Page 31: ...e with attached tie wrap 3 Connect the other lead of the accessory cable to the ignition switch of the vehicle 4 Insert the fuse into the fuse holder and close the cover Figure 3 Accessory Connector with Ignition Sense Cable Table 2 Ignition Sense Cable Number Description Rating HKN9327 Ignition Sense Cable with fuse 4 A Ignition Sense Cable Length 3 m 6580283E02 Fuse 4 A for Ignition Sense Cable ...

Page 32: ...and most ergonomically ideal position The Enhanced Control Head may then be turned to provide the most convenient access To reposition the Enhanced Control Head 1 Insert the Dismantling tool Motorola P N 6686119B01 in the groove between the Enhanced Control Head and the terminal assembly as shown in the figure below 2 Press on the dismantling tool until the snap connectors on the side of the Enhan...

Page 33: ...ecurely fixed to the vehicle chassis 2 Ensure the surface can support the weight of the terminal 3 Although the trunnion can be mounted to a plastic dashboard it is recommended that the mounting screws be located so they penetrate the supporting metal frame of the dashboard Figure 5 Terminal into High Profile Trunnion GLN7317 Figure 6 Terminal into Key Locked Mount Trunnion RLN4779A 2x Wingscrews ...

Page 34: ... a flat surface such as under the dash 3 Centre punch the spots you marked and use a 4 mm 5 32 inch bit to drill a hole at each location 4 Secure the trunnion mounting bracket to the mounting surface with the three self tapping screws provided See Figure 7 5 Slide the terminal into the trunnion Secure the terminal with the two wing screws provided Figure 7 Transmission Hump Mounting Top and Below ...

Page 35: ...n all the connectors and push the radio with its Remote Head Enhanced or alternatively the Data Expansion Head Enhanced firmly onto the mounting frame until the two springs snap into place The tabs are easily bent back by twisting a large flat bladed screwdriver into the slot behind the tabs For a more secure installation the top and rear of the frame should also be secured with screws The demount...

Page 36: ...erminal Installation Manual INSTALLATION Figure 8 Mounting the Radio into the Frame Shown with Enhanced Control Head Table 3 DIN Mount Kit Components Item Description Part Number DIN Mount Kit PMLN5094 1 Demount Tool 8166514A01 1 ...

Page 37: ...Radio from the Frame 1 Remove both rubber side caps from the Enhanced Control Head 2 Insert the demount tool into the two openings as shown in Figure 9 below Figure 9 Removing the Radio from the Frame 3 Push the demount tools through the openings in the frame 4 Slide out the radio ...

Page 38: ...Electrotechnical Commission Installation 1 Be sure line voltage power is available 2 Make sure sufficient air can flow around the terminal to permit adequate cooling 3 Choose a flat surface for the desktop tray and external loudspeaker 4 Be sure the mounting surface is able to adequately support the weight of the terminal and tray 5 If an outdoor antenna is used choose a location for the terminal ...

Page 39: ...NTN9246 11 Lightning Protector with Quarter Wave Stub Protector in the appropriate frequency range for example HUBER SUHNER type 3400 17 0389 UHF or type 3400 17 0277 800 MHz 5W speaker GMSN4078B cannot sustain the maximum audio output power of 13 W coming from the radio when the volume is set to the maximum in Loudspeaker Volume Max code plug This causes the speaker cone to dislocate C C C C C C ...

Page 40: ...084 6 Remote Head Enhanced PMLN4904 7 Data Expansion Head Enhanced PMLN4908 8 Toroid EMC Suppression Kit 01015001001 The Remote Mount Cable have to be wound 10 times around each toroid Each toroid have to be placed 30 0 2 5 cm respectively from the expansion head and the control head Winding at both ends reduces the effective cable length approximately by 0 8 m Fix the toroids firmly to a stable s...

Page 41: ...n the screws at both sides of the trunnion After a few turns tilt the control head for an optimum view of the display Then complete the tightening of the screws Figure 12 Remote Mount Enhanced Control Head Installation with Remote Mount Trunnion Table 6 Remote Mount Enhanced Control Head Installation with Remote Mount Trunnion Mechanical Parts List for Installation Item Description Part Number 1 2...

Page 42: ...the DIN Mount Bracket until it snaps into place 2 Tighten the screws at both sides of the DIN Mount Bracket Figure 13 Remote Mount Enhanced Control Head Installation with DIN Mount Bracket Table 7 Remote Mount Enhanced Control Head Installation with DIN Mount Bracket Mechanical Parts List for Installation Item Description Part Number 1 2 DIN Mount Bracket Kit PMLN5093 1 2 155 0 15 m m 76 5 mm ...

Page 43: ...the relevant fixing tabs Use all 6 tabs if necessary to hold it in place Figure 14 Mounting the Remote Mount Enhanced Control Head with the DIN Mount Bracket into the DIN Frame The tabs are easily bent back by twisting a large flat bladed screwdriver into the slot behind the tabs For a more secure installation the top and rear of the frame should also be secured with screws The demount tool can be...

Page 44: ... in the Accessories Expansion Cable to the subD Port of the Remote Mount Enhanced Control Head 2 Tighten the screws at the subD connector to secure the Accessories Expansion Cable in place 3 The Mobile Microphone Port MMP USB port module can be mounted to a variety of surfaces Tighten the two screws at both sides of the module to fix it securely in place For more information on the connector pin f...

Page 45: ...box at the back of the motorcycle 2 Mount the Motorcycle Mount Enhanced Control Head horizontally at a position which enables the driver to view the controls and operate them easily 3 Be sure the Motorcycle Mount Enhanced Control Head is close enough to the vehicle operator to permit easy access to operating controls 4 It is recommended to mount the Motorcycle Mount Enhanced Control Head directly ...

Page 46: ...ews 3 There are two ways to mount the motorcycle trunnion each limited to a 77 degree of allowable movement as shown in Figure 18 and Figure 19 If an additional GPS antenna or a combined TETRA GPS antenna is used the antenna housing carries the GPS receiver Take care not to cover the antenna housing with metal or other radio wave absorbing material TRANSCEIVER LOUDSPEAKER FIST MICROPHONE MOTORCYCL...

Page 47: ...INSTALLATION MTM800 Enhanced Mobile Terminal Installation Manual 47 Figure 18 Upward Movement Figure 19 Downward Movement ...

Page 48: ... TELCO connector to the TELCO socket of Motorcycle Mount Enhanced Control Head Adding Extra Connectivity to the Motorcycle Mount Enhanced Control Head Please see Adding Extra Connectivity to the Remote Head on page 44 for more information on adding extra connectivity using the Accessories Expansion Cable and the Mobile Microphone Port MMP USB Port module Table 8 Motorcycle Mount Enhanced Control H...

Page 49: ...can be used without a control head This configuration allows the use of the radio without any control head allowing the radio to be powered on via the ignition switch The packet data SDS via the AT commands are available from the 9 pin subD connector PEI The Remote PTT can be connected via the 20 pin rear connector Only one talkgroup is available and that talkgroup is the first one on the CPS list...

Page 50: ...e for the Enhanced Control Head The Control Terminal is connected to the 25 pin socket of the Data Expansion Head Enhanced via the GMKN4079 cable see section Connecting Cables on page 69 for more information Figure 21 Configuration with Remote Control Terminal and Data Terminal Accessory Connector 20 Pin Power Connector BNC Antenna Connector FME GPS Conn 8 Wire RS232 Interface Data Terminal MTM800...

Page 51: ...Data Terminal is connected to either the 9 pin socket of the Data Expansion Head Enhanced via the RS232 cable or to the 20 pin accessory connector via the active data cable see section Connecting Cables on page 69 for more information Figure 22 Data Box Radio Configuration Accessory Connector 20 Pin Power Connector BNC Antenna Connector Data Terminal Data Terminal MTM800 Enhanced Transceiver Box T...

Page 52: ...nstallation purposes Ingress Protection IP Code IP30 The junction box has no connector sealing and is designed for use in dust and water protected location only 1 Secure the junction box GMLN3002 with the four screws supplied with kit 2 Connect the connection cable GMKN4192 length 6 m GMKN4193 length 4 m or GMKN4194 length 2 m from the junction box to the accessory connector on the rear side of th...

Page 53: ...ctors on the Junction Box Front Panel PIN 4 Use an adapter between the radio and the accessory connector to short the ignition to ground Interference can cause radio to hang 1 2 3 7 7 6 5 4 3 2 1 6 5 4 3 2 1 1 2 3 4 5 6 7 1 Connecting cable from Junction Box to MTM800 Enhanced rear side accessory connector for installation purpose only GMKN4192 length 6 m GMKN4193 length 4 m GMKN4194 length 2 m 2 ...

Page 54: ... Box Accessory Terminal Connection Plan for the Speaker 4 5 6 7 4 Connector for programming cable FLN 9636 5 Connector for accessory connector kit GMBN1021 6 Connector for adapting a laptop via RS232 cable 7 TELCO connector for fist microphone GMMN4063 or telephone style handset GMUN1006 1 2 SPEAKER JUNCTION BOX TERMINAL External Speaker 1 2 3 4 5 6 7 ...

Page 55: ...e MTM800 Enhanced to be turned on and off by the vehicle ignition switch 5 5 ALTERNATIVE ALTERNATIVE BLK BLK 86 87 85 30 RED RED BLK ALARM RELAY 12 V ALARM RELAY 86 87 85 30 RED 12 V BLK 5 BLK RED 12V BUZZER 12 V JUNCTION BOX TERMINAL 12 V RED 12 V External alarm 1 2 3 4 5 6 7 EMERGENCY SWITCH JUNCTION BOX TERMINAL 1 2 3 4 5 6 7 IGNITION SENSE CABLE SWITCHED BATTERY VOLTAGE JUNCTION BOX TERMINAL 4...

Page 56: ...ires as required 3 Cut the thin cable to the required length crimp the supplied red lead to the stripped lead of the thin cable and connect it to the blue terminal of the fuse holder cable 4 Connect the other end of the ignition sense thin cable to pin 4 of the junction box terminal 5 Insert the provided fuse into the fuse holder and close the cover Connection Plan for External PTT PIN 4 If the ig...

Page 57: ...n Cable Connectivity GMSN4066 Speaker 13W GMSN4078 Speaker 5W GMMN4065 Visor Microphone Cannot be used if connector 7 TELCO is in use RLN4856 Footswitch PTT RLN4857 Push button PTT RLN4858 Gooseneck PTT These accessories can be used for PTT or Emergency function RLN4836 Tri State Emergency Footswitch and Cable HKN9327 Ignition Sense Cable GMKN4084 Speaker Extension Cable GKN6272 External Alarm Rel...

Page 58: ...ut a Data Expansion Head Enhanced the jumper between pins 6 and 15 of the junction box connector 5 should be removed Table 9 Jumper on Accessory Connector MTM800 Enhanced Mobile Terminal Fit Jumper Pins 6 15 Use Junction Box RS232 PEI With Data Expansion Head Enhanced Yes No Use the Data Expansion Head Enhanced 9 pin PEI instead Without Data Expansion Head Enhanced No Yes ...

Page 59: ...he DC impedance is 660 ohms and the AC impedance is 560 ohms 3 EXTERNAL PTT This is a digital input to trigger external PTT active low non active high 4 EXTERNAL ALARM This is a digital output for External Alarm Fault Indication active low open collector with 4k7 Ohms pull up to B 5 TX_AUDIO This input is intended for injecting signals into the transmit path Input impedance 10 k Ohms Input level 7...

Page 60: ...ed flashing Reserved for Service Aids 16 SPEAKER Positive output of radio s audio PA see Pin 1 17 SCI_CTS Radio OUTPUT Clear To Send Reserved for Service Aids 18 SCI_RTS Radio INPUT Request To Send Reserved for Service Aids 19 SCI_RXD Radio OUTPUT Receive Data Reserved for Service Aids 20 SCI_TXD Radio INPUT Transmit Data Reserved for Service Aids The 4 wire 3 Volts SCI interface on the accessory ...

Page 61: ... outside pins are not connected see grey square at figure above Alternatively a 20 pin connector can be used as well Part Number 1586184B01 86 85 87 30 12V Ext Alarm 4 86 85 87 30 12V Ext Alarm 4 12V 12V SWB 13 4A 12V Ignition 10 1 16 GND 7 MIC 2 PTT 3 GND 8 Emergency 9 12k GND 8 4 13 GMSN4066 Speaker 13W GMSN4078 Speaker 5W GMMN4065 Visor Microphone GMMN1033 Visor Mic omni directional RLN4856 Foo...

Page 62: ...non Motorola accessory or an external PTT The customized adapter will be connected via the cable RKN4077 b The 10 pin TELCO connector can be used to connect a remote mount Enhanced Control Head DO NOT connect any other accessories for example microphone This might result in malfunctioning hardware failure Remote Head Enhanced The 10 pin TELCO connector of the Remote Head Enhanced can be used in th...

Page 63: ...addition it switches on the radio s voltage regulators The idle state is a level below 0 6V 6 Ground Ground 5 Speaker Negative output of the radio s audio PA 4 Audio Balanced Audio Bidirectional 3 BUS This is used for communication between the radio and an Enhanced Control Head 2 Speaker Positive output of the radio s audio PA 1 Audio Balanced Audio Bidirectional Table 12 25 Pin subD Connector Pin...

Page 64: ...ce is 560 ohms 17 SB9600 Reset This output can be used to reset a SB9600 device 18 NC Not Connected 19 GROUND Ground 20 IGNITION The radio can be switched on by connecting this pin with pin 6 FLT A As long as both pins are connected the radio will be switched on 21 ON_OFF_GND This is On Off control for the old Control Head J MTM300 Control Head 22 EXPANSION PTT When this input is used to key up th...

Page 65: ...has to be used is a standardized serial interface cable which allows to connect a data device with an RS232 Interface such as for example PC Laptop Console Table 13 9 Pin subD Connector Pin Function Description PC Direction 1 DCD Data Carrier Detect Input 2 RXD Received Data Serial IN 3 TXD Transmitted Data Serial OUT 4 DTR Data Terminal Ready Output 5 GND Ground Output 6 DSR Data Set Ready Input ...

Page 66: ...tions USB Functions RS232 Functions 1 1 WIRE 1 WIRE 1 WIRE 1 WIRE 1 WIRE 2 GPIO_3 PTT GP Input or Output GP Input or Output RS 232 RTS 3 SPEAKER SPEAKER SPEAKER SPEAKER SPEAKER 4 GPIO_2 GPIO_2 INPUT GP Input or Output DATA RS 232 RXD 5 GND GND GND GND GND 6 OPT 5V HIGH Impedance OPT 5V VBUS OPT 5V 7 MIC MIC MIC MIC MIC 8 GPIO_1 GPIO_1 INPUT GP Input or Output DATA RS 232 TXD 9 GPIO_4 HOOK GP Input...

Page 67: ...Balanced Audio Bidirectional 5 SPKR Speaker 6 GND Ground 7 ON_OFF_CONTROL Radio Turn On Signal 8 SCI_TX Serial Bus Data sent to the Enhanced Control Head 9 FLT_A Supply voltage 10 GND Ground Table 16 25 Pin Back Connector Back Connector Pin Function Description Default 1 GPIO_9 GPIO Output Active for duration of call car radio mute 2 GPIO_6 GPIO PTT Input TX audio from MIC_REAR_2 3 GPIO_8 GPIO Dis...

Page 68: ...32 RX 12 MIC_REAR_2 Second Rear Microphone Disabled 13 GND Ground 14 GPIO_5 GPIO Disabled 15 GPI_7 4 Level Analogue Input Enabled 16 1_WIRE GCAI PIN 1 Bi directional Serial Bus Disabled 17 HANDSET GCAI PIN 3 Handset Audio Output Parallel to front GCAI 18 GND GCAI PIN 5 Ground 19 MIC_REAR_1 GCAI PIN 7 Microphone Input Disabled 20 GPIO_4 GCAI PIN 9 GPIO Hook Input 21 USB_D Second USB D 22 USB_D Seco...

Page 69: ...ation Manual 69 Connecting Cables Motorcycle Mount Enhanced Control Head to Remote Head Enhanced Data Expansion Head Enhanced Motorcycle Mount TELCO Cable Part Number PMKN4030 Length 2 3 m 7 55 feet Figure 31 Connecting Cable Motorcycle Mount TELCO Cable ...

Page 70: ...25 Pos 1 VBUS 9 2 D 22 3 D 21 4 Ground 18 Mobile Microphone Port MMP 1 1_WIRE 16 2 GPIO_3 PTT 4 3 Speaker to Headset 17 4 GPIO_2 D 6 5 GPIO_1 D 7 6 Ground 7 VBUS 5 8 MIC 19 9 GPIO_4 HOOK 20 10 GPIO_0 8 Customised Wire Color BROWN BLACK GPIO_9 1 ORANGE BLACK GPIO_6 2 YELLOW BLACK GPIO_8 3 GREEN BLACK TX 10 BLUE BLACK RX 11 GRAY BLACK MIC_2 12 BLUE Ground 13 PINK BLACK GPIO_5 14 BLACK WHITE GPI_7 15...

Page 71: ...ITION CTS RX UART TX N C EXT_MIC D_GND AUDIO_GND AUDIO_PA_ENABL HOOK SWITCH_BATT TX_AUDIO D_GND SPKR SPKR RX_AUDIO TWISTED PAIR TWIST 25 4 ALUMINIUM SHIELD TWISTED PAIR TWIST 25 4 ALUMINIUM SHIELD 20 SCI_TXD GREEN 26 26 EXTERNAL_PTT 3 BLUE 20 16 N C EMERGENCY EXTERNAL_ALARM KEYFAIL IGNITION N C EXT_MIC_AUDIO ANA_GROUND AUDIO_PA_ENABL HOOK SWITCH_BATT TX_AUDIO DIGITAL_GROUND SPKR SPKR RX_AUDIO 11 1...

Page 72: ... Use the 9 pin socket on the front side of the Data Expansion Head Enhanced Radio to connect this cable with the data device Figure 34 Standardized RS232 Cable The Data Expansion Head Enhanced has a protection grade of IP54 To maintain IP54 sealing when connecting an RS232 data cable make sure to use an IP54 specified cable example ROLINE AT Modem cable ST BU 1 8m order no 11 01 4518 ...

Page 73: ... accessory socket on the rear side of the radio The connector block plugs into the center of the 20 pin accessory connector four outside pins do not connect Removing the Existing Coiled Cord Cable 1 Rotate the locking collar at the base of the microphone in a counterclockwise direction until it stops 2 Pull the cord out and away from the base of the of the microphone Install the new coiled cord GM...

Page 74: ... Data Device for example PC Laptop console The GMKN1022 Active Data Cable is not repairable Order a replacement cable as necessary Length 2 0 m 6 56 feet Figure 36 Active Data Cable GMKN1022 Cable Connectivity Table 18 Pin Assignment Active Data Cable GMKN1022 9 Pin Connector Function 20 Pin Connector Function 1 DCD 3 External PTT 2 RXD 8 GND 3 TXD 13 SWB 4 DTR 15 DTR 5 GND 17 CTS 6 DSR 18 RTS 7 R...

Page 75: ...the trunk lid is grounded by connecting grounding straps between the trunk lid and the vehicle chassis 3 Ensure the antenna cable can be easily routed to the radio Ensure that the antenna cable is routed separately and not in parallel to any other vehicle wiring or mobile radio cable wiring 4 Check the antenna location for any electrical interference according to vehicle manufacturer requirements ...

Page 76: ...io 3 In case of an installed GPS board connect the GPS antenna to the GPS antenna connector on the rear side of the radio Figure 37 Connections to the Back of the Radio Completing the Installation 1 Mount the microphone clip to a convenient spot near your radio 2 If your microphone has a telephone type connector at the end of its cord plug this connector into the 10 pin TELCO connector of your Jun...

Page 77: ...mission housing is not affected 3 Use the trunnion bracket as a template to mark the positions of the mounting holes 4 Centre punch the spots you marked and drill a 4 mm 5 32 inch diameter hole at each location 5 Mount the trunnion bracket with the screws supplied see Figure 38 6 Insert the speaker into the trunnion bracket and tighten the two wing screws 7 Insert the external speaker accessory pl...

Page 78: ...78 MTM800 Enhanced Mobile Terminal Installation Manual INSTALLATION ...

Page 79: ...INSTALLATION MTM800 Enhanced Mobile Terminal Installation Manual 79 ...

Page 80: ...80 MTM800 Enhanced Mobile Terminal Installation Manual INSTALLATION ...

Page 81: ...INSTALLATION MTM800 Enhanced Mobile Terminal Installation Manual 81 ...

Page 82: ...82 MTM800 Enhanced Mobile Terminal Installation Manual INSTALLATION ...

Page 83: ...INSTALLATION MTM800 Enhanced Mobile Terminal Installation Manual 83 ...

Page 84: ...84 MTM800 Enhanced Mobile Terminal Installation Manual THIS PAGE INTENTIONALLY LEFT BLANK ...

Page 85: ...quent Software on page 88 2 Replace the control head with an Enhanced Control Head 3 Replace the fist microphone desk microphone with a new accessory Description Part Number Enhanced Control Head English Keypad GMWN4298 Enhanced Control Head Chinese Keypad GMWN4299 Enhanced Control Head Korean Keypad GMWN4300 Enhanced Control Head Arabic Keypad GMWN4301 Enhanced Control Head Bopomofo Keypad GMWN43...

Page 86: ...scription Part Number Remote Mount Enhanced Control Head English Keypad GMWN4304 Remote Mount Enhanced Control Head Chinese Keypad GMWN4305 Remote Mount Enhanced Control Head Korean Keypad GMWN4306 Remote Mount Enhanced Control Head Arabic Keypad GMWN4307 Remote Mount Enhanced Control Head Bopomofo Keypad GMWN4308 Remote Mount Enhanced Control Head Cyrillic Keypad GMWN4309 Remote Mount Enhanced Co...

Page 87: ...new accessory Description Part Number Motorcycle Mount Enhanced Control Head English Keypad GMWN4600 Motorcycle Mount Enhanced Control Head Chinese Keypad GMWN4601 Motorcycle Mount Enhanced Control Head Korean Keypad GMWN4602 Motorcycle Mount Enhanced Control Head Arabic Keypad GMWN4603 Motorcycle Mount Enhanced Control Head Bopomofo Keypad GMWN4604 Motorcycle Mount Enhanced Control Head Cyrillic ...

Page 88: ... 3 Run the CPS click Tools Options to open the Options dialog Set Default Software Path to contain the new software archive file 4 Connect the MTM800 to the computer using a flashing cable Power up the computer to enter bootstrap mode 5 Click Tools Upgrade Phone the radio will automatically detect the new software If the new software file is not found select Customize Choice on the upgrade dialog ...

Page 89: ...UPGRADING THE TERMINAL MTM800 Enhanced Mobile Terminal Installation Manual 89 6 Power off the MTM800 ...

Page 90: ...90 MTM800 Enhanced Mobile Terminal Installation Manual UPGRADING THE TERMINAL ...

Page 91: ...n planning the installation that there is a current consumption of approx 3 5A during PTT and even 30mA when terminal is switched off Transmitter Frequency Range TMO 380 430 MHz MT912M 350 390 MHz MT812M 806 825 MHz MT712M 410 470 MHz MT512M DMO 380 430 MHz MT912M 350 390 MHz MT812M 851 870 MHz MT712M 410 470 MHz MT512M Receiver Frequency Range 380 430 MHz MT912 MT912M 350 390 MHz MT812M 851 870 M...

Page 92: ...Identification In case of blown fuses during the installation replace ONLY with those of identical value Never insert ones of different values Fuse for Power Cable GKN6270 GKN6274 10 A Motorola Part Number 6500139767 Fuse for Ignition Sense Cable HKN9327 4 A Motorola Part Number 6580283E02 ...

Reviews: