background image

2   S y s t e m  T o u r

Hardware interface

14

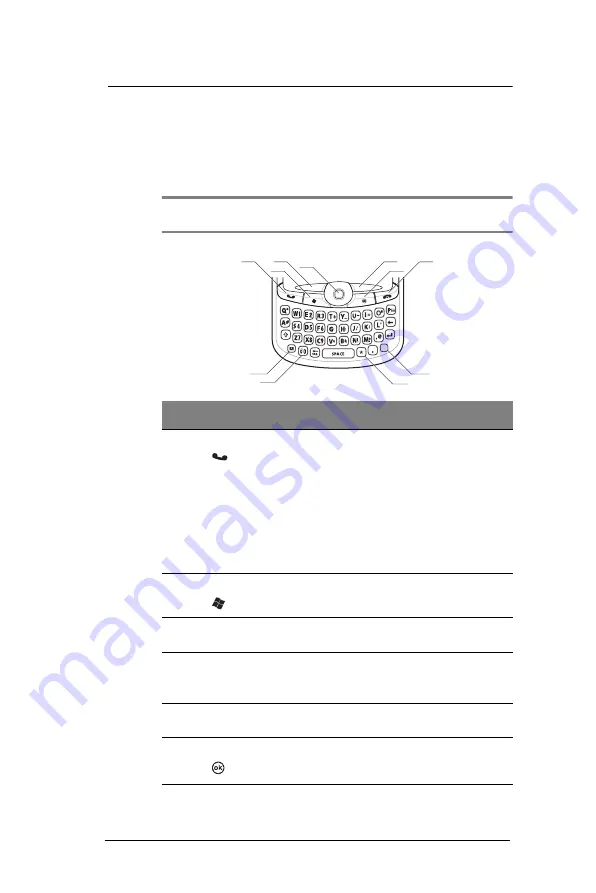
Soft buttons and keypad

The MC35 keypad has alphanumeric keys that produce the 26-character alphabet (A-Z, 
both lowercase and uppercase), numbers (0-9), and assorted special characters. The 
keypad is color-coded to indicate when the modifier key is pressed to produce a 
particular character or action. In addition to alphanumeric keys, the keypad also has soft 
buttons and special keys to launch particular applications, control the screen backlight, 
and display the on-screen keyboard. 

NOTE:

The keypad illuminates when a key is pressed and stays lit for approximately 

five seconds.

No.

Component

Description

1

Send button

When there’s an incoming call, press to accept 
the call. 

During an ongoing call, press and hold to toggle 
on/off the speakerphone mode. 

From Speed Dial, press to call the currently 
selected number.

From Call History, press to call the currently 
selected log item. 

In Messaging, press to send a composed e-mail/
text message or display options for a received 
e-mail/text message.

Change between an active call and call that is on 
hold. 

2

Start button

Press to display the Start menu.

3

Left soft button

Press to perform the function indicated on the lower 
left corner of the display. 

4

Joystick

Press the center of the joystick to access menu 
options and confirm your selection. 

Move the joystick in a left, right, up or down 
direction to navigate through the menu options.

5

Right soft button

Press to perform the function indicated on the lower 
right corner of the display. 

6

OK button

Press to close the active program and display the 
Today screen.

1

3

2

4

5

6

7

8

9

10

11

Summary of Contents for MC35 EDA

Page 1: ...MC35 EDA User Guide ...

Page 2: ......

Page 3: ...User Guide MC35 Enterprise Digital Assistant ...

Page 4: ...torola s copyright notice on the licensed programs delivered hereunder and to include the same on any authorized copies it makes in whole or in part The user agrees not to decompile disassemble decode or reverse engineer any licensed program delivered to the user or any portion thereof Motorola reserves the right to make changes to any software or product to improve reliability function or design ...

Page 5: ...sonal and work related information with the connectivity function of a mobile phone The device also supports high speed General Packet Radio Services GPRS for on the go Internet access as well as a high quality Global Positioning System GPS solution to meet your travel needs Selected MC35 models have a built in camera for taking pictures and bar code data capture All these features make your MC35 ...

Page 6: ...Welcome vi ...

Page 7: ... interface 17 Today screen 17 Start menu 18 Navigation bar 18 Command bar 20 Pop up menus 20 Notifications 20 3 Entering Information 21 Using the MC35 keypad 21 Using the Input Selector 21 Keyboard 22 Block Recognizer 23 Letter Recognizer 23 Transcriber 24 Star Key 25 Writing on the screen 25 Drawing on the screen 27 Recording a message 28 Using My Text 29 Using ActiveSync 30 Synchronizing informa...

Page 8: ...tomizing the Player 92 Internet Explorer Mobile 96 Pocket MSN 99 MSN Hotmail 101 MSN Messenger 103 7 Using Phone 109 Phone setup 109 Installing the SIM card 109 Entering your PIN 111 Dialer screen 112 Dialer buttons 112 Phone status icons 113 Phone operation 113 Turning the phone function on and off 113 Erasing number input 115 Answering a call 116 Rejecting a call 116 Ending a call 116 Adjusting ...

Page 9: ... 181 AirBEAM Smart 181 Rapid Deployment Client 190 Download Agent 192 9 Customizing your MC35 193 Adjusting system preferences 193 Personal tab 193 System tab 198 Connections tab 203 Program management 206 Adding programs to your device 206 Removing programs 208 10 User Support 209 Customer support 209 Protecting your MC35 210 Using system locks 210 Creating backup files 211 Troubleshooting 213 Tr...

Page 10: ...x ...

Page 11: ...pack 2 Charge your device 3 Install ActiveSync 4 2 or higher on your computer 4 Start the MC35 5 Create an ActiveSync partnership between your device and your computer Installing the battery pack Your MC35 uses a high density removable and rechargeable 1370 mAh lithium polymer standard life battery See Battery problem on page 213 for more information on how to conserve power consumption to make yo...

Page 12: ... detach the battery pack from the device 2 Charging the MC35 Initial charging of a standard life battery takes about four hours The extended life battery type requires at least eight hours After the initial charging charge your device everyday to restore the battery to full capacity Charge your device using the AC adapter cable see instructions below While waiting for the initial charging to compl...

Page 13: ...icrosoft ActiveSync ActiveSync is already installed on your MC35 you only need to install it on your computer System installation requirements Supported operating systems Windows 2000 Service Pack 4 Windows Server 2003 Service Pack 1 Windows Server 2003 Service Pack 1 for Itanium based Systems Windows Server 2003 Standard x64 Edition Windows XP Media Center Edition Windows XP Professional x64 Edit...

Page 14: ...r device where you will calibrate the display learn basic stylus usage and set up the system date and time To start your MC35 NOTE After pressing the power button wait four seconds for the device to power on before pressing the power button again 1 Turn on your device by pressing the Power button located on the right side of the touch screen 2 Follow the on screen Welcome Screen Wizard instruction...

Page 15: ...synchronization problems select the Synchronize directly with a server running Microsoft Exchange Server option only if you are certain that your company is running Microsoft Exchange Server with Exchange ActiveSync and you know the server address and logon credentials For more information contact your corporate network administrator or service provider By default ActiveSync only synchronize infor...

Page 16: ...n types you ve selected for synchronization are copied to your device Disconnect your device from your computer and you re ready to go The next time you connect your device your computer recognizes it automatically You don t need to set up the partnership again You can initiate synchronization from your device anytime via several connection options via USB sync cable infrared or Bluetooth connecti...

Page 17: ...uid Crystal Display TFT LCD Quarter Video Graphics Array QVGA resolution 65 K color depth support Hardware and software backlight controls Microsoft ClearType technology for clearer crisper font display Audio Embedded AC 97 CODEC with CD quality stereo output Built in industry standard 2 5 mm earphone jack Built in speaker and microphone Separate volume control for system sounds and phone function...

Page 18: ...acity Standard life battery four hours Extended life battery eight hours Operation time in hours NOTE Length of battery operation depends on power consumption which in turn is based on system resources use For example constantly using the backlight or using power demanding applications shortens the length of battery operation Design and ergonomics Stylish and sleek design Dimensions Length 127 mm ...

Page 19: ...rovider about feature availability The PTT button can also be set to launch another program Tap Start Settings Personal Buttons to customize this button Camera Bar Code switch for enabling camera or data capture mode Camera button for launching the Pictures Videos program Accessories Vehicle kit includes the auto mounting kit auto charger and hands free handset Leather case USB charge sync cable T...

Page 20: ...e camera lens mode from bar code data capture to camera mode for device configurations with camera function only 5 Reset button Press the tip of the stylus into the button to reset your device 6 Earphone jack Connects to an audio line out device such as earphones or headphones 7 Connector For ActiveSync operation accepts the USB sync cable which in turn connects to a computer s USB port For rechar...

Page 21: ...ty Install add on applications or use files stored in it for use with internal applications You can also use it to back up data from your device 18 Stylus To use the stylus remove it from its holder and hold it the same way you hold a pen or pencil 19 Push To Talk button Press this button to Create voice recordings See Recording a message on page 28 for more information Initiate Push to Talk calls...

Page 22: ... see a list of actions available for that item In the pop up menu that appears tap the action you want to perform Using the SD MMC expansion slot Your device has an expansion slot compatible with a range of SD and MMC storage cards which are primarily used to back up or transfer files and data The slot also supports SDIO cards for added connectivity options To insert a storage card NOTE This devic...

Page 23: ...e rubber cover back into place To remove a storage card 1 Hold your device securely then lift the rubber cover from the SD MMC expansion slot 2 Push against the top of the card as if you were pushing it further into the slot letting the card spring out An audible system sound indicates that the card has been released 3 Gently remove the card from the slot 4 Close the rubber cover 2 ...

Page 24: ... During an ongoing call press and hold to toggle on off the speakerphone mode From Speed Dial press to call the currently selected number From Call History press to call the currently selected log item In Messaging press to send a composed e mail text message or display options for a received e mail text message Change between an active call and call that is on hold 2 Start button Press to display...

Page 25: ...cter key To illustrate pressing the Orange key then J will allow you to type a slash Press the Orange key twice to lock the keypad in secondary character action mode Press the Orange key again to revert to the default keypad mode alphabetic lower case Press and hold the Orange key while entering characters or actions 9 Star key Press this key to display the on screen keyboard 10 Backlight 0 key Pr...

Page 26: ...y Orange Key Q q Q W w W 1 E e E 2 R r R 3 T t T Y y Y _ U u U I i I O o O P p P áü A a A S s S 4 D d D 5 F f F 6 G g G H h H J j J K k K L l L Z z Z 7 X x X 8 C c C 9 V v V B b B N n N M m M Brightness Brightness Brightness 0 Note The following keys only have one action Backspace Shift Enter Messaging Tab Space and Star ...

Page 27: ...s important reminders and status To display the Today screen When viewing another screen press the OK button or tap Today You can also define a preset period of inactivity after which the Today screen is displayed Follow the steps below 1 Tap Settings 2 On the Personal tab tap Today 3 On the Items tab select the Today timeout option 4 Tap the pick list beside the check box to set the period of ina...

Page 28: ...he screen It shows the status icons for the battery volume and data connectivity Notifications icons for system alarms and reminders are also displayed here Status icons The table below describes some of the status icons you may see on the navigation bar NOTE See Phone status icons on page 113 for more information on the status icons related to the phone function Tap a program icon to open it Tap ...

Page 29: ...activate the device s Phone WiFi Bluetooth or cellular data wireless connection GPRS Device is not synchronized with a computer Data connection is active Phone and wireless features such as WiFi Bluetooth or GPRS on your device are turned on Device is synchronized with a computer Roaming GPRS network is available GPRS data connection is active GPRS signal status 1xRTT single carrier radio transmis...

Page 30: ...m that you want to perform the action on 2 When the menu appears lift the stylus then Tap the action you want to perform Tap anywhere outside the menu to close the menu without performing an action Notifications Your device reminds you in a variety of ways when you have something to do or receive a message For example if you ve set up an appointment in Calendar a task with a due date in Tasks or a...

Page 31: ...ys that perform specific action See Soft buttons and keypad on page 14 for more information Using the Input Selector Use Input Selector to enter typed text in any program where text entry is possible You can either tap the keys on an on screen keyboard or by use any of the handwriting recognition options To show or hide the Input Selector Tap the Input Selector arrow then select an input option Wo...

Page 32: ...board allows you to type information just like in a regular keyboard by tapping the on screen keys To use the soft keyboard 1 Tap the Input Selector arrow then select Keyboard or you can press the Star key on the MC35 keypad 2 On the soft keyboard that is displayed tap the keys with your stylus TIP To make the keys larger tap the Input Selector arrow and then Options In the Input method list selec...

Page 33: ... area Enter letters by writing in the abc left area of the box Enter numbers by writing in the 123 right area of the box Enter symbols and punctuation by tapping in either area of the box and then writing the desired character TIP For help with writing characters with Block Recognizer tap the question mark near the writing area Letter Recognizer With Letter Recognizer you can write individual lett...

Page 34: ...ith writing characters with Letter Recognizer tap the question mark near the writing area Transcriber Transcriber allows you to write anywhere on the screen using the stylus just as you would on paper It recognizes cursive or printed handwriting or a combination of both To use Transcriber 1 Tap the Input Selector arrow then select Transcriber 2 Write anywhere on the screen 3 Pause and let transcri...

Page 35: ...e on the regular soft keyboard such as and To enter special symbols 1 Tap the Input Selector arrow then select Star Key 2 On the soft keyboard that is displayed tap the special symbol keys with your stylus Writing on the screen In Notes you can use your stylus to write directly on the screen Write the way you do on paper You can edit and format what you ve written and convert the information to te...

Page 36: ...old the selected words b Tap an editing command on the pop up menu To convert writing to text Tap Menu Tools Recognize If you want to convert only certain words select them before tapping Recognize on the Tools menu or tap and hold the selected word then tap Recognize on the pop up menu If a word is not recognized it is left as writing If the conversion is incorrect you can select different words ...

Page 37: ...asily tell where words begin and end Drawing on the screen In Notes you can draw on the screen in the same way that you write on the screen The difference between writing and drawing on the screen is how you select items and how they can be edited For example selected drawings can be resized while writing cannot To create a drawing 1 Draw a triangle on the screen A drawing box appears 2 Subsequent...

Page 38: ...te a recording during a call In Messaging you can attach a recording to an e mail message To create a recording in Notes 1 Tap Programs Notes If you want to include the recording in a note open the note first 2 Tap Menu View Recording Toolbar 3 Position your device s built in microphone near your mouth or other source of sound You can also use the microphone in the stereo headset single earbud hea...

Page 39: ... and hold a voice recording in Notes then select Set As Ringtone on the pop up menu Using My Text When using Messaging or MSN Messenger use My Text to quickly insert preset messages into the text entry area To insert a My Text message 1 Tap Menu My Text then tap a message 2 Tap ok ...

Page 40: ...rer Mobile favorites on your computer Synchronizing information with your computer ActiveSync supports the following connection options between your device and your computer USB connection using the USB sync cable This connection is established when you created your device s ActiveSync partnership with your computer IMPORTANT Using an external USB hub when establishing an ActiveSync connection may...

Page 41: ...ynchronize all PCs using this connection option d Select USB e Tap ok 3 Connect your device to your computer using the USB sync cable Synchronization is automatically initiated To set up an infrared ActiveSync connection 1 Perform the steps below on your computer a Configure the infrared port on your computer Refer to your computer s user documentation for instructions b Once your computer s IR po...

Page 42: ...h connection on page 45 for more information IMPORTANT For additional security disable network bridging on the computer specifically bridging to a Remote NDIS adapter before connecting to the computer to pass though to the Internet or a network For more information on network bridging see Windows Help on your computer NOTE The instructions below are for computers that support the Windows XP SP2 or...

Page 43: ...ctiveSync i Click File Connection Settings j On the Allow connections to one of the following drop down list select the COM port with the number you noted in step f 2 Ensure that the Bluetooth is turned on your computer and discoverable and within close range 3 Make MC35 discoverable to your PC a Tap Settings Connections tab Bluetooth b On the Mode tab select the check box for the Turn on Bluetoot...

Page 44: ...able when you first create a partnership Note that this option only synchronizes information for Contacts Calendar Messaging Outlook E mail and Tasks After your first full synchronization with Microsoft Exchange server you can schedule automatic synchronization between your device and the server every time an item arrives or is changed in the Microsoft Exchange server Enable server synchronization...

Page 45: ...th the server 9 Define the synchronization settings for each information type by tapping the type of information then tap Settings 10 Tap Finish To set up automatic synchronization with a server 1 Tap Programs ActiveSync 2 Tap Menu Schedule 3 Perform one or both of the following Under Peak times select the When new items arrive option It is more cost efficient to synchronize on a regular schedule ...

Page 46: ... below only applies to copying files Refer to the ActiveSync Help on your computer for instructions on how to copy Pocket Access Windows CE Store information To copy files 1 Connect your device to your computer 2 In ActiveSync on your computer click Explore Windows Explorer opens the Mobile Device window for your device 3 Locate the file that you want to copy on your device or computer 4 Perform o...

Page 47: ...r you can set ActiveSync to synchronize appointments within a certain date range and for specific categories only For example business appointments from the past two weeks only To control the volume of information synchronized see the Synchronizing section Using the Windows Mobile Programs on page 63 NOTE ActiveSync does not support synchronizing subfolders in Calendar and Contacts To select the t...

Page 48: ...tion options listed below to download information to your MC35 For more information on using these options See 5 Wireless Communications on page 43 for more information IR port for short range file exchange Bluetooth for PAN connection High speed GPRS for mobile Internet access Optional WiFi IEEE 802 11b g for WLAN connection ...

Page 49: ...o open a program Tap a program name from the menu You can select which programs are displayed on the menu See To add a program to the Start menu program using Settings on page 207 for more information NOTE Some programs have abbreviated labels for check boxes and drop down lists To see the full spelling of an abbreviated label tap and hold the stylus on the label Drag the stylus off the label so t...

Page 50: ...bile programs Calendar Keep track of your appointments and create meeting requests Contacts Keep track of your friends and colleagues Messaging Send and receive text and e mail messages Notes Create handwritten or typed notes drawings and voice recordings Tasks Keep track of your tasks Microsoft Office Mobile programs Excel Mobile Create new workbooks or view and edit Excel workbooks created on yo...

Page 51: ...ernet Sharing Configure your device as a modem for connecting to the Internet via a USB or Bluetooth personal area network PAN connection Push to Talk Conduct walkie talkie style conversations using a mobile phone connection Terminal Services Client Log onto a Windows NT server type PC that is running the Terminal Services software and use all of the programs that are available on that PC from you...

Page 52: ...le name of the file you re searching then select a data type 3 Tap Search Using File Explorer Use File Explorer to locate files on your device and to organize these files into folders Tap Programs File Explorer Tap here to select a sort criterion for the list Tap here to display a pop up menu Tap and hold a blank area to display the New Folder command ...

Page 53: ...receive e mail messages by using Messaging and view Web or WAP pages by using Internet Explorer Mobile Contact your mobile phone service provider to have your WAP or GPRS connection activated Beam function In a Microsoft Windows Mobile program except Messaging and Picture Videos you can exchange files using either infrared or Bluetooth TIP You can also beam files not folders from the File Explorer...

Page 54: ...oth your MC35 and on other device you want to exchange files with are enabled To send files via IR connection 1 Switch to the program where you created the item you want to send and locate the item in the list 2 Align the IR port of your device with that of the IR enabled device so that they are unobstructed and within a close range 3 Tap and hold the item then tap Beam type of item on the pop up ...

Page 55: ...120 for more information Print files to a Bluetooth enabled printer Additional software is required on your device to enable you to print files to a Bluetooth enabled printer Contact your local dealer for more information Once connected to another Bluetooth enabled device or computer you can locate and use any of the services available on the device Activating the Bluetooth function You have two o...

Page 56: ...u need to create a partnership with another Bluetooth enabled device to be able to exchange information with it To create a Bluetooth partnership 1 Ensure that your MC35 and the other Bluetooth enabled device s are turned on visible and within close range of each other 2 Perform either of the following On the Wireless Manager screen tap Menu Bluetooth Settings Tap Settings Connections tab Bluetoot...

Page 57: ...an alphanumeric passkey then tap Next enter the same passkey on the other device The passkey is recommended for enhanced security Your passkey must be between 1 to 16 alphanumeric characters If you do not want to use a passkey tap Next 5 On the Partnership Settings screen perform the following a Type in a meaningful device name on the Display Name box to identify the device later b Select the type...

Page 58: ...bered COM port from the list 10 Select Secure Connection option to designate the COM port for Bluetooth partnership 11 Tap Finish then tap ok Exchanging files using Bluetooth IMPORTANT Ensure that the two devices have Bluetooth turned on discoverable and within close range To send files via Bluetooth 1 Switch to the program where you created the item you want to send and locate the item in the lis...

Page 59: ... such as paging and fax services Once you ve established a GPRS connection you can Use Messaging to send and receive e mail messages Use Internet Explorer Mobile to access Web or WAP pages Use Windows Media Player 10 Mobile for Pocket PC to listen to streaming media Use MSN Messenger to conduct IM sessions with your friends and colleagues Configuring your GPRS connection NOTE GPRS Settings applica...

Page 60: ...i connection Your MC35 supports an optional WiFi hardware IEEE 802 11b g you can use to scan for existing wireless local area network WLAN access points or hot spots WLAN access points or hot spots can be found in homes and office or public areas such as inside airports restaurants coffee shops hotels or other public areas Just like in a GPRS connection a WiFi access allows you to connect to a com...

Page 61: ...Wireless communication features 51 2 Select Enable Wi Fi Card To activate WiFi using the Settings option 1 Tap Settings 2 On the Connections tab tap WiFi Card Setting 3 Select Enable WiFi Card then select a running mode 4 Tap ok ...

Page 62: ...k settings Before performing the procedure in this section determine if authentication information is needed Check the following before setting up a wireless network connection for your device Make sure that the Internet Protocol TCP IP is installed on your computer Make sure the network system and remote access server in your workplace supports TCP IP protocol Make sure you have remote access acc...

Page 63: ...Previously configured networks are already listed To change network settings tap a network and follow the on screen instructions 4 In the Networks to access drop down list select the type of network you wish to connect to Options include All available Only access points Only computer to computer 5 Tap ok To configure a network adapter 1 On the WiFi screen tap the Network Adapters tab 2 Make your d...

Page 64: ...ally detected you can add the network provided you know the wireless network settings Contact your network administrator for wireless network settings applicable to your network 1 Open the Configure Wireless Networks screen by performing one of the following Tap Wireless Manager Menu WiFi Settings Tap Settings Connections tab WiFi 2 On the Wireless tab tap Add New 3 Enter the Network name then cho...

Page 65: ...Data Encryption drop down list select an encryption method 8 Tap The key is automatically provided check box or enter the network key NOTE Obtain network security settings from the network administrator 9 Tap Next 10 Tap the Use IEEE 802 1x network access control check box 11 In the EAP type drop down list select an appropriate EAP method 12 Tap Finish ...

Page 66: ...oth and Phone settings To open Wireless Manager Perform one of the following On the Today screen tap Wireless Manager On the navigation bar tap the Data connectivity icon or signal icon then from the Connectivity drop down box tap Wireless Manager Tap Settings Connections tab Wireless Manager Activating wireless features You can use Wireless Manager to turn the following wireless features on and o...

Page 67: ...ap Bluetooth 3 Tap Done To activate WiFi connection via the Wireless Manager 1 On the Today screen tap Wireless Manager 2 Tap WiFi Done To activate Phone via the Wireless Manager 1 On the Today screen tap Wireless Manager 2 Tap Phone Done To disconnect cellular data GPRS connection via the Wireless Manager 1 On the Today screen tap Wireless Manager Tap to launch the Wireless Manager ...

Page 68: ...creen tap Menu 2 Select Phone Settings The Phone Settings screen has four tabs Phone Services Network and Band See Phone preferences on page 136 for the configuration options available for each tab To configure the Bluetooth settings See Bluetooth connection on page 45 for more information To configure the WiFi settings See WiFi connection on page 50 for more information For information on configu...

Page 69: ...Settings 2 On the Connections tab tap Connections 3 On the Tasks tab tap Add a new modem connection from either My ISP 4 Enter a name for the connection e g Internet 5 In the Select a modem list select your modem type If you will be using a mobile phone network select Cellular Line If you will be using GPRS select Cellular Line GPRS 6 Tap Next 7 Enter the access point name provided by your mobile ...

Page 70: ... below obtain the following information from your network administrator or your wireless service provider For a modem connection ISP server phone number or access point User name and password For a VPN connection User name password and domain name TCP IP settings VPN server host name or IP address ISP server phone number or access point If you will be using a modem or a VPN connection perform the ...

Page 71: ... intranet URL TIP If you use URLs that share the same root company name you can add them as group by entering corporatename com 6 Tap Finish Setting an e mail server connection You can set up a connection to an e mail server so that you can send and receive e mail messages on your device You can use multiple e mail accounts to receive your messages For each e mail account you intend to use first s...

Page 72: ... items synchronized from your computer 4 If you have selected POP3 or an IMAP e mail account follow the succeeding steps 5 Enter your e mail address then tap Next This will initiate auto configuration which attempts to connect your device to your e mail server and automatically download the necessary e mail connection settings If auto configuration is successful you can begin sending receiving e m...

Page 73: ...ith the Microsoft Outlook information on your computer or to a Microsoft Exchange server See Using ActiveSync on page 30 for more information Calendar Calendar enables you to conveniently manage your schedules and appointments or any other activities associated with a time and date You can schedule appointments including meetings and other events Checking your appointments is easy using one of sev...

Page 74: ...ng an appointment You can view an appointment schedule in all views except for Year and Agenda view To see the details of an appointment tap the appointment To see a pop up menu of available actions for an appointment tap and hold the appointment In Year view the time of appointments are indicated by symbols An upward triangle means a morning appointment a downward triangle means an afternoon appo...

Page 75: ... Calendar to set up meetings with users of Outlook or Pocket Outlook The meeting request is created automatically and is sent when you synchronize Messaging or when you connect to your e mail server Indicate how you want meeting requests sent by tapping Menu Options To schedule a meeting 1 Create an appointment 2 In the appointment details hide the input panel then tap Attendees 3 Select the check...

Page 76: ...of the following On the Today screen press the right soft button or tap Contacts Tap Contacts Contacts opens to the contact list To change the way contact information is displayed in the list tap Menu Options To create a contact 1 Tap New 2 Using the soft keyboard enter a name and other contact information To select a field tap it Hide the soft keyboard to see all available fields 3 To add notes t...

Page 77: ... clear text from the box or tap the button to the right of the box Tap Programs Search enter the contact name select Contacts for the type then tap Search Using the Contacts summary screen When you tap a contact in the contact list or select it using the joystick a summary screen displays This is referred to as a contact card To change the contact information tap Menu Edit Calling a contact You ca...

Page 78: ...hardware buttons a Move the joystick up or down to scroll through the contact list and select the contact you want to call b Press the Send button twice once to launch Phone and another to make the call The call will be made to that contact s priority number To make a call from a contact card Tap any of the listed phone numbers Move the joystick up or down to scroll through the listed numbers and ...

Page 79: ...rd from the contact list 1 If you intend to send the contact card Via IR Ensure that the two devices have IR turned on then align the IR port of your device with that of the other device so that they are unobstructed and within close range Via Bluetooth Ensure that the two devices have Bluetooth turned on discoverable and within close range 2 Tap and hold a contact to display a pop up menu of acti...

Page 80: ...ields 3 To add notes tap the Notes tab 4 After completing the task details tap ok Managing tasks By default all created task items appear as one long list and are named based on their subject line To keep your tasks organized and allow quick searching you can choose to Filter tasks based on their category or completion status Tap Menu Filter then select a filter option Tap and hold to display a po...

Page 81: ...enu of actions or Move the joystick up or down to scroll through the list and select a task item then press the joystick to display a pop up menu of actions 3 Tap Beam Task 4 Tap the device that you want to send the task item to To beam a task item from its summary screen 1 Perform step 1 of the previous section 2 Tap Menu Beam 3 Tap the device that you want to send the task item to Using the Task...

Page 82: ...ns to the note list To create a note 1 Tap New 2 Compose the note by using any of the Input Selector options by writing drawing on the screen or by creating a recording 3 Once you ve completed the note tap ok Managing notes By default all created notes appear as one long list and are named chronologically i e Note1 Note2 etc To keep your notes organized you can choose to Move or copy notes to syst...

Page 83: ...h the list and select a note then press the joystick to display a pop up menu of actions 3 Tap Beam File 4 Tap the device that you want to send the note to To beam an open note 1 Perform step 1 of the previous section 2 Tap Menu Tools Beam 3 Tap the device that you want to send the note to To send a note via e mail from the task list 1 Tap and hold a note to display a pop up menu of actions or Mov...

Page 84: ...ing directly to an e mail server through an Internet service provider ISP or a network Send and receive text messages through your mobile service subscription Messaging supports 8 bits data with class 0 1 2 3 as well as USDD Unstructured Supplementary Service Data To open Messaging Tap Messaging To send and receive e mail messages Tap Menu Send Receive Using the message list The messages you recei...

Page 85: ...ailable e mail addresses The auto suggest feature suggests e mail addresses as you type so that you find them more quickly Tap Menu Add Recipient to display the contact list then tap a contact from the list Make sure multiple e mail addresses within the same field is separated with a semicolon 3 Compose your e mail message Outlook E Mail supports the following e mail options To enter a preset or f...

Page 86: ...t folder option 3 Tap ok 4 If you are using an Outlook E mail or a IMAP4 account select the Sent Items folder for synchronization For more information on e mail synchronization options see To configure ActiveSync e mail synchronization settings on page 77 Creating a message signature You can personalize your e mail and text messages by appending a signature to it The signature support of your devi...

Page 87: ...ly received by your device when the phone function is turned on When the phone function is disabled messages are held by your mobile phone service provider until the next time you turn the phone function on Synchronizing Outlook e mail messages Outlook e mail messages can be synchronized as part of the general ActiveSync synchronization process During ActiveSync synchronization Only the first 500 ...

Page 88: ...erver The next time you connect the e mail server sees that the messages are missing from the device s Inbox and delete them from the server This prevents you from having duplicate copies of a message but it also means that you will no longer have access to messages that you move to folders created from anywhere except your device If you are using an IMAP4 account the folders you create and the e ...

Page 89: ...emplates for creating a new document meeting notes memo phone memo and to do list To change the default template 1 On the document list tap Menu Options 2 Select another template from the Default template pick list 3 Tap ok To create a new document 1 On the document list tap New A new document appears based on the default template 2 Enter the information using any of the Input Selector options 3 F...

Page 90: ...nobstructed and within close range Via Bluetooth Ensure that the two devices have Bluetooth turned on discoverable and within close range 2 From the Word document list select the item you want to beam 3 Tap Menu Beam File 4 Tap the device that you want to send the file to To send a document via e mail from the document list NOTE Make sure that your device is properly setup to send and receive mail...

Page 91: ...ted features in Word Mobile link To synchronize Word documents 1 Connect your device to your computer 2 Click Tools Options 3 Select the Files option This will create the device name My Documents folder on your computer s desktop 4 Place all the Word documents you want to synchronize with your device in this folder 5 Initiate synchronization The documents you placed on the device name My Documents...

Page 92: ...following Tap a cell enter the information values text formula then tap Enter If you re entering a formula enter the equal sign first Tap Help for more information on how to perform more advanced workbook tasks Use the Excel toolbar It has tools for working with formulas functions and charts as well as options for sorting and filtering data You can show and hide this toolbar by tapping View Toolba...

Page 93: ...ooks You can synchronize Excel workbook created on your computer with your device You can do this in the same manner as you do with Word documents See Synchronizing Word documents on page 81 for more information PowerPoint Mobile Use PowerPoint Mobile to view slide show presentations You can download slide show presentations from a storage card company network internet e mail attachment or obtaine...

Page 94: ...rams Microsoft Office Mobile programs 84 2 Tap the slide show you want to view 3 Tap the current slide to advance to the next slide To stop a slide show presentation In a PowerPoint Mobile presentation tap and hold then tap End Show ...

Page 95: ...t option to use the timings recorded with each slide in a presentation Select the Loop continuously option to automatically advance to the first slide after the last slide in a presentation 4 Tap ok Sending a PowerPoint file You can send a PowerPoint file to another person either by e mail or by beaming it to that person s IR or Bluetooth enabled device NOTE You must first set up an e mail account...

Page 96: ...egory or other item that you want to copy 3 On the top right side of the screen click Now Playing List then select Sync List 4 Drag the items from middle portion of the screen to the Sync List pane to add them to the list of items to be synchronized 5 Click Start Sync at the bottom right corner of the screen Windows Media Player verifies that there is sufficient storage space on your device to cop...

Page 97: ...Done The playlist A playlist is a customized list of digital media files that you want to watch or listen to Using a playlist lets you group various digital media files together and specify the order you want the files to play in You can also use playlists to copy files to your computer You can create a playlist based on Source For example tracks from various CDs of your favorite artist or streami...

Page 98: ...y update the library by tapping Menu Update Library After the files have been added tap Done 3 Select a category then tap and hold the item that you want to add in the Now Playing folder 4 Tap Menu Queue Up 5 Tap Menu Now Playing 6 On the Now Playing screen tap to switch to the Library screen and find items to add to the Now Playing playlist NOTE To quickly add a group of files to the Now Playing ...

Page 99: ... Tap to move the selected item down in the playlist You can also tap and drag an item to move it down in the playlist Tap to display the Library screen and add items to the Now Playing playlist Tap to delete the selected item from the playlist Tap to view track properties of the selected item To delete an item in the Now Playing playlist 1 On the Playback screen tap Now Playing 2 Tap and hold the ...

Page 100: ...screen To view track properties from a playlist 1 On the Library screen tap My Playlists 2 Tap a playlist category 3 On the Playlist screen tap or play a file 4 Tap Menu Properties 5 Tap the scroll bar to view more fields 6 Tap ok To view track properties from the Player screen On the Playback screen tap Menu Properties or On the Playback screen tap Now Playing then tap Tap the scroll bar to view ...

Page 101: ... the card to your device See To insert a storage card on page 12 for more information 1 On the Playback screen tap Now Playing 2 Tap then the playlist location where the file you want to play is assigned located 3 Tap Play Screen shifts to the Player screen Unless you selected the last listed track in a playlist or location the rest of the tracks will automatically be played Playing a streaming me...

Page 102: ...download skins and learn related information go to http www microsoft com windows windowsmedia To download skins from your computer to your device follow the procedures described in the Using ActiveSync to copy files section on page 36 NOTE To make sure that downloaded skins appear in the Skin Chooser panel do not store the skin files in the Windows folder of your device To change Player appearanc...

Page 103: ...tening preferences To set audio and video preferences 1 On the Playback screen tap Menu Options Playback tab 2 Perform the following In the Show time as list select whether to show how much time has elapsed or remaining on the Playback screen Tap the Pause playback while using another program check box to pause or continue playback when another program screen is displayed Select the Resume playbac...

Page 104: ...hanging your network settings You can define Player settings for connecting to a network to optimized playback of streaming media To set network settings 1 On the Playback screen tap Menu Options Network tab 2 Select the check box opposite each network protocol you want to enable You must select at least one protocol 3 Select the speed of your network connection 4 Tap ok NOTE Some networks use a f...

Page 105: ...Clear the Start Player on Library screen check box to show the Playback screen when you start the Windows Media Player Mobile 3 Tap ok Setting hardware playback controls The button mapping function allows you to assign hardware buttons on your device to perform standard playback functions You can also assign a button to toggle off the screen to help minimize power consumption while continuing to l...

Page 106: ...ayer for Pocket PC tap Help Internet Explorer Mobile Use Internet Explorer Mobile to view Internet or Intranet sites from your device You can download files and programs when browsing these sites During synchronization with your computer you can choose to download your favorite links and mobile favorites that are stored in the Mobile Favorites subfolder of Internet Explorer on your computer Intern...

Page 107: ...e links to pages visited in the past to set the number of days of links 3 Tap Clear History to delete the stored links 4 Tap ok Mobile favorites To display the Mobile Favorites navigation screen 1 Tap Menu Favorites 2 Tap the page you want to view The page that was downloaded the last time you synchronized with your computer displays If the page is not on your device the favorite is dimmed Synchro...

Page 108: ...ISP or network to view the content Mobile Favorites If you are using Microsoft Internet Explorer 5 0 or later on your computer you can download mobile favorites to your device Synchronizing mobile favorites downloads Web content to your device and enables you to view pages while you are disconnected from your ISP and computer To quickly create mobile favorites use the Internet Explorer plug in ins...

Page 109: ...your device Limit the number of downloaded linked pages In Internet Explorer on the computer right click the mobile favorite you want to change then click Properties On the Download tab specify 0 or 1 for the number of linked pages you want to download Pocket MSN Pocket MSN includes support for the following MSN Hotmail You can read write and send e mail delete e mail and manage your Hotmail folde...

Page 110: ...et MSN helps to maintain a secure access to your MSN Hotmail and MSN Messenger accounts 1 Tap Today 2 Tap Tap here to sign in to Pocket MSN 3 Enter your sign in name and password Select the Save password option so you need not enter these information again the next time you sign in 4 Tap Sign In ...

Page 111: ...evice lets you access your Hotmail Inbox NOTE Make sure you create a connection to the internet before using MSN Hotmail To view your Hotmail Inbox 1 Tap Programs Pocket MSN 2 Tap MSN Hotmail To synchronize your Hotmail Inbox so you see your latest e mail messages tap Menu Send Receive ...

Page 112: ...p Options Hotmail 3 Tap the Download new e mail automatically check box 4 Tap ok To create an e mail message 1 On the Hotmail Inbox screen tap New 2 Enter the e mail add of your intended recipients in the To box 3 Enter the subject in the Subject line 4 Compose your message 5 Tap Send when you have finished the message ...

Page 113: ...Microsoft Passport account at http www passport com Get a free Microsoft Hotmail e mail address at http www hotmail com For Exchange Instant Messaging Service an Exchange account To set up an Exchange account see your network administrator To open MSN Messenger 1 Tap Programs Pocket MSN 2 Tap MSN Messenger Setting up an account Before you can connect you must enter Passport or Exchange account inf...

Page 114: ...6 Using the Windows Mobile Programs Pocket MSN 104 2 Tap MSN Mobile Home 3 Tap Sign In 4 Tap Get a new Windows live ID ...

Page 115: ...ation 7 Your sign in name and password are established the first time you sign into Pocket MSN 8 Tap OK To sign in to your account 1 Tap anywhere on the MSN Messenger screen 2 Enter your sign in name and password Select the Save password check box so you need not enter these information again the next time you sign in ...

Page 116: ... Online and Not Online categories From this view while connected you can chat send an e mail block the contact from chatting with you or delete contacts from your list using the pop up menu To see others online without being seen tap Menu My Status Appear Offline If you block a contact you appear offline but remain on the blocked contact list To unblock a contact tap and hold the contact then tap ...

Page 117: ...lti user chat tap Menu Chat then tap the contact you want to invite To return back to your chat window tap Menu Chat then select the person with whom you were chatting To see if the contact you are chatting with is responding look for the message under the text entry area To sign out of your account Tap Menu Sign Out ...

Page 118: ...6 Using the Windows Mobile Programs Pocket MSN 108 ...

Page 119: ...It also describes basic phone operations and features as well as ways of customizing the phone function based on your preferences Phone setup Dialer screen Phone operation Making phone calls Phone features Phone profiles Phone preferences Phone setup Installing the SIM card If you wish to use the phone function you need to first install a valid SIM card A SIM card is a small printed circuit board ...

Page 120: ...e 8 Reinstall the battery pack See To install the battery pack on page 2 for instructions The default settings for your device are programmed on the assumption that you ll be using the phone function once you ve properly installed a SIM card and in some cases entered a PIN you can then proceed to establishing a connection to your mobile service provider s network NOTE If you re not going to instal...

Page 121: ...nal Identity Number provided by your mobile service provider To enter your PIN 1 Tap Phone 2 On the Dialer screen enter the preset PIN from your mobile phone service provider 3 Tap Enter If you consecutively enter a wrong PIN for three times the SIM card is blocked If that happens you can unblock it with the PIN Unblocking Key PUK code also provided by your mobile phone service provider ...

Page 122: ...bile service connection Tap to view the Call History entries Tap to view the Contacts list Soft keypad for inputting Last number called is displayed here Tap Menu then Options to view Phone Settings Icon Description Tap to erase the number you entered Tap to view the Speed Dial list Tap to see all received made and missed calls Tap to call the displayed number Tap to enable speakerphone mode Tap t...

Page 123: ...ption Network search Indicates that the device is attempting to establish mobile service connection No network Indicates that the device is not able to establish mobile service connection Phone off Indicates that the phone is off In network service Indicates that the phone is connected to a network Signal status The number of bars indicates the strength of your connection signal As the strength of...

Page 124: ...unction 1 Launch the Wireless Manager application On the Today screen tap Wireless Manager or On the Today screen tap the signal icon on the upper right corner of the screen then from the Phone callout tap Wireless Manager Tap to launch the Wireless Manager ...

Page 125: ... To turn off the phone function 1 Launch the Wireless Manager application On the Today screen tap Wireless Manager or On the Today screen tap the signal icon and select Wireless Manager 2 On the Wireless Manager screen tap Phone to turn off phone function Erasing number input If you entered a wrong phone number when dialing you can either backspace to erase individual digits or you can delete the ...

Page 126: ...wmv MP3 playback To adjust the phone conversation volume 1 Tap on the navigation bar or press the volume key down to bring up the Volume drop down box 2 Drag the slider to adjust the phone volume Using the speakerphone To attend to phone calls attach the single earbud headset or activate the speakerphone mode The speakerphone function allows you to talk hands free and or let other people listen to...

Page 127: ...ute function is enabled Making phone calls The integrated nature of your device s phone function lets you make calls in a variety of ways across different applications You can make a call by Manually entering a phone number using the Dialer keypad Accessing numbers using Speed Dial Call History Microsoft Contacts or SIM Manager Once a call has been initiated the signal icon changes to indicating a...

Page 128: ...other to make the call The call will be made to that contact s priority number To make a call using Speed Dial Speed Dial is a list you create for numbers you call regularly Only numbers stored in Microsoft Contacts can be added to this list You can make a call in two ways By memorizing a phone number s position in the Speed Dial list you can dial the number by entering its location number In the ...

Page 129: ...History is a record of all incoming outgoing and missed calls 1 Tap Call History 2 Find the number you want to call You can select a call category All Calls Missed Outgoing Incoming and By Caller by tapping the pick list in the top left corner of the screen 3 Once the number has been selected press the joystick or the Send button to make the call Tap the category icon on the left of the selected n...

Page 130: ... the SIM contact then select Call from the pop up menu To make a call from a Bluetooth enabled headset You can use a Bluetooth enabled headset with your device when you create a partnership between your device and the headset 1 Make sure that the two devices are turned on discoverable and within close range 2 Tap Settings 3 On the Connections tab tap Bluetooth 4 On the Devices tab tap Add new devi...

Page 131: ... provider Generally you can make a call to these emergency numbers with or without a SIM card installed on your device as long as a mobile phone service network is available in your area However some mobile phone service providers may require that a SIM card is inserted and in some cases that the PIN has been entered as well before an emergency call can be made Contact your mobile service provider...

Page 132: ...all number with those stored in Contacts so you know who is calling you Call hold After being notified of an incoming call while already on the phone you can choose to reject a call by tapping the Ignore button on the Call Notification callout or you can use the Call hold feature to attend to both calls To put a call on hold On the Call Notification callout tap Answer to take the incoming call and...

Page 133: ...1 During an active conference call tap Menu Hold 2 Key in the new number 3 Tap Resume to return and continue with the conference call 4 Repeat steps 1 3 to add more people in the conference call Call notes The Call Notes feature allows you to create a written or recorded note during a call The call note will be saved as an attachment to your call as viewed in Call History To create a call note 1 D...

Page 134: ... 6 Tap ok To view a call note You can view call notes either from the Call History screen or from the Notes program On the Call History screen a Tap Call History b Select a log item marked with this icon c Tap and hold the selected log item then tap View Note from the pop up menu ...

Page 135: ...you can send and receive text messages using your device Your account is automatically setup in Inbox when you activated your mobile service subscription To view a text message You can view a text message whether the phone function is on or off When the phone function is on you can view a text message from its notification callout Tap the text message notification icon on the navigation bar to dis...

Page 136: ...e New Text Message callout gives you the option to call the sender or save dismiss or delete the message When the phone function is off you can still view received text message in Messaging a Tap Messaging b Tap the pick list on the top left corner to display the navigator panel c Tap Inbox d In the message list tap a text message Tap to reply the message Tap to display the navigator panel ...

Page 137: ... s information displays 2 Tap the Summary tab then tap Send Text Message or Tap Menu Send Text Message 3 In the To field enter the SMS number of one or more recipients separating them with a semicolon You can do this in two ways Manually enter the SMS number using any of the input panel options Tap the To field or Address Book to display the contact list then tap a contact from the list Tap the To...

Page 138: ... message will be sent out otherwise when you tap ok the message will be saved in the Drafts folder and you can send it out later Voice mail With the voice mail service you need not miss a message when you miss a call Unattended calls i e no answer phone function is turned off or is out of network service or a busy line will automatically forward callers to your voice mailbox where they can leave t...

Page 139: ...ontact information to Microsoft Contacts As a backup in case you lose your SIM card while using it with another device If you are using your SIM with another device you may need the numbers stored in Microsoft Contacts Exporting phone numbers to Microsoft Contacts allows you to create a more detailed record To add contacts to Microsoft Contacts You can choose to create new contacts or add contacts...

Page 140: ...mber will overwrite the number already there 4 Tap ok Sharing contacts in SIM Contacts SIM Contacts enable you to manage all contacts stored in your SIM card with the option to export this information to Microsoft Contacts To export SIM contacts You can choose to export individual or all SIM Manager contacts to Microsoft Contacts Sharing contacts in call history Call History is a record of all inc...

Page 141: ...tact name specified Call History All calls made on your device are recorded in Call History It provides the time and duration of all incoming outgoing and missed calls and a summary of total calls You can refer to it to access any notes taken during a call You can also set a limit on the number of entries or delete them as necessary to save memory space To view Call History On the Dialer screen ta...

Page 142: ...an view only missed or incoming calls If you want to see list of all calls related a specific contact select By Caller then select a contact name The Call History list can be filtered according to the following criteria Category Description All Calls Shows all calls made to and from your device in a chronological order Missed Shows calls made to your device that were not answered Outgoing Shows al...

Page 143: ...details Find the call you are interested in then tap it once Call history limit To minimize the memory space occupied by the Call History items you can set a limit for the number of entries retained after a specific period of time You can also delete items that you no longer need To set the Call History limit 1 On the command bar tap Menu Call Timers ...

Page 144: ...History entries From the command bar tap Menu Delete All Calls Phone profiles Your device supports five types of preset profiles These preset profiles allow you to personalize the ring tone image and profile expiration time settings of your device and to activate a profile for different events and environments To activate a pre defined phone profile 1 Tap Settings 2 On the System tab tap Phone Pro...

Page 145: ...lume for incoming voice calls and messages by pressing the Volume key up or down 5 Select a ringing option for incoming voice calls in the Ring Type list 6 Select a ringing option for incoming messages tap the Short Message Sound list 7 Select a picture to add to your profile by tapping Browse 8 Set the duration of the alerting signal prior to an incoming voice call or SMS message 9 Tap Advance 10...

Page 146: ... From any other screen tap Settings Personal tab Phone The Phone Settings screen has four tabs Phone Services Network and Band Refer to the following sections for the configuration options available for each tab Phone tab Configure sound and security settings in this tab NOTE Before proceeding with the configuration make sure Phone is turned on To configure ring type ring tone and keypad sounds 1 ...

Page 147: ... using a GPRS or WiFi connection Received sound files from other IR or Bluetooth enabled devices 2 After receiving the sound files in your device use File Explorer to make sure that they are located in the My Device Windows Rings folder Only then will they be listed as ring tone options 3 Create customized ring tone options by creating stand alone recordings in Notes These recordings are automatic...

Page 148: ...t for confirmation Services tab Configure the different phone services in this tab Call Barring Caller ID Call Forwarding Call Waiting Voice Mail and Text Messages and Fixed Dialing NOTE The availability of some of the phone services described in this section may depend on your mobile service subscription Contact your mobile service provider for information Call barring You have the option to bloc...

Page 149: ...ID No one to disable Caller ID 4 Tap ok Call forwarding This service allows you to forward incoming calls to another phone number You can choose to forward all calls to the same number or specify a number based on the following conditions Unavailable the phone function is turned off or is out of network service Busy when you are attending to a phone call No answer when you are not answering your p...

Page 150: ...number when the line is busy To disable call forwarding deselect all the check boxes 4 Tap ok Call waiting This service allows you to receive another call during an active call To enable or disable call waiting 1 On the services list tap Call Waiting 2 Tap the Get Settings button retrieving settings may take a few minutes 3 In the next screen define the call waiting settings Notify me to enable ca...

Page 151: ...n retrieving settings may take a few minutes Fixed dialing This service allows you to set predefined numbers or prefixes that you would like to call To create fixed number entries 1 On the services list tap Fixed Dialing 2 Tap the Get Settings button retrieving settings may take a few minutes 3 Tap the Enable fixed dialing check box then tap Done 4 To add a number to the list tap Menu Add 5 Enter ...

Page 152: ...f this tab To find a network Do this when the network status is currently out of network service and you want to conduct a search Tap the Find Network button search process may take a few minutes To select a network Set the mode for conducting a network search In the Network selection drop down list tap either Automatic or Manual Retrieving network settings may take a few minutes if you select Man...

Page 153: ...ite it 3 To set the priority level tap a preferred network then tap the Move Up or Move Down buttons 4 Tap ok Band tab MC35 operates on the GSM 850 900 1800 1900 bands Use the Band tab to select a GSM band for your device to operate on To set your device s roam mode 1 On the Band tab select a GSM band 2 Tap Apply ...

Page 154: ...7 Using Phone Phone preferences 144 ...

Page 155: ...tion offered by the mobile operators SIM Manager SIM Manager enables you to manage all contacts stored on your SIM card This program complements your device s phone function by enabling not just the addition of new phone numbers on your SIM card but more importantly exporting such contact information to Microsoft Contacts This eliminates the need to manually enter these new contact information in ...

Page 156: ...ents to load This may take a few seconds 3 Tap and hold a SIM contact then select Save To Contacts To view SIM information The SIM Manager also provides view of the settings such as the service provider phone book size phone book used maximum length of contact name maximum length of phone numbers and SMS message storage capacity On the SIM Manager screen tap Menu Tools About ...

Page 157: ...rform the various SIM Manager operations is integrated on Chapter 7 Using Phone on page 109 SIM Toolkit SIM Toolkit enables you to access the online services offered by your mobile operator This feature is dependent on your mobile operator Online services such as news weather banking and traveling information can be accessed from your MC35 Check the availability of services with your mobile phone ...

Page 158: ...ams Internet Sharing To use MC35 as a modem 1 Connect your device to your computer using USB cable or a Bluetooth 2 Tap Programs Internet Sharing 3 In the PC Connection list select the connection type 4 Select the network connection that the device should use to connect to the Internet 5 Tap Connect NOTE If your computer is Bluetooth enabled and you select Bluetooth as the PC connection you must i...

Page 159: ...articipants or for users already involved in one PTT session While using PTT you can use the other functions of the MC35 Before you can use PTT you must define the required PTT service settings See Configuring the PTT Settings on page 156 for more information PTT menu The PTT menu lets you easily view PTT contacts create an individual contact or a group create a PTT name configure auto accept invi...

Page 160: ...ur PTT service by performing one of the following Press the Push to Talk button on your device Tap Programs Push to Talk 2 Tap Yes 3 Set your PTT user name then tap ok A confirmation message box is displayed 4 Tap ok When activation is complete notification prompt is displayed and the User Presence icon appears on the navigation bar ...

Page 161: ...1 To create an individual PTT contact 1 Perform one of the following On the PTT Menu screen tap PTT Contacts Menu Add Contact On the PTT Menu screen tap Add Contact 2 Enter the name and mobile number of your contact or Open Contacts then select a contact to add to PTT ...

Page 162: ... edit a PTT contact 1 Perform one of the following On the PTT Menu screen tap PTT Contacts a contact Menu Edit Tap and hold a contact in the PTT Contact list then tap Edit 2 Enter a new name for the contact then tap ok The number in the screen is read only and cannot be modified To delete a PTT contact 1 On the PTT Menu screen tap PTT Contacts a contact Menu Delete 2 Tap Yes ...

Page 163: ...contact to add in the group then tap ok To delete a PTT group 1 On the PTT Contacts screen select a group name 2 Tap Menu Delete Group 3 Tap Yes To rename a PTT group 1 On the PTT Contacts screen select a group name 2 Tap Menu Rename Group 3 Enter the new group name then tap ok To leave the talk group 1 On the PTT Contacts screen select a group name 2 Tap Menu Leave Group 3 Tap Yes Tap to create n...

Page 164: ...your status is Available PTT calls are automatically accepted a PTT call tone is played and then caller s voice can be heard If your status is Silent Vibrate the phone vibrates prompting you to accept or reject the call If you receive a call while a call is in progress a message box appears on the screen Icon Name Description Invitation in Progress Displays when you have sent an invitation to join...

Page 165: ...y selecting a contact and pressing the Push to Talk button Initiating PTT calls to dynamic or quick groups is not allowed Delete all or select items in the list by tapping Menu Delete All or Selected View all incoming and outgoing items by tapping Menu Filter All Incoming or Outgoing To send a Call Me Alert Call Me Alert is a message displayed across the receiver s screen 1 Press the Push to Talk ...

Page 166: ...tures of the PTT to suit your preferences You do this by accessing the Set Your Name Auto Accept Off or PTT is On commands in the PTT menu To change your presence status 1 Press the Push to Talk button 2 Tap Menu My Availability turn it On or Off To auto accept invites 1 On the PTT Menu screen tap Auto Accept Off 2 Tap Yes ...

Page 167: ...e for creating a GPRS connection It is pre installed on your device NOTE The first time you use your SIM card the GPRS Settings automatically detects the phone network and operator and sets up the GPRS connection information for you If not contact your mobile phone service provider for more information You can also modify these settings to your own preference or create your own network settings To...

Page 168: ...ient Use Terminal Services Client to log onto a Windows NT server type computer that is running Terminal Services software and use all of the programs that are available on that computer from your device For example instead of running Word Mobile you can run the PC version of Microsoft Word and access all of the doc files on that computer from your device NOTE Procedures described in this section ...

Page 169: ...ces Client screen To improve display performance Display performance is improved by decreasing the time it takes for the screen to be refreshed on the PC 1 On your PC select Start Settings Control Panel 2 Double click Display 3 On the Appearance tab click Effect 4 Clear the Use the following transition effects for menus and tool tips check box 5 Click Apply then OK To improve browser performance T...

Page 170: ...ng your MC35 near a window gives it a better view to the sky and improves the chance of a successful position fix Express GPS Connect starts searching for signals based on the most recent position fix When traveling to a new location your MC35 will need extra time and more open signal conditions to obtain a location fix After your first fix in the new location full performance is restored When tra...

Page 171: ...erminal building before trying to obtain your first position fix After the device obtained the first position fix in a new region optimum Express GPS Connect performance is restored If you have traveled to another time zone you can speed up the GPS position computation by changing the time zone settings on your device This causes Express GPS Connect to proceed immediately to a global satellite sea...

Page 172: ...Download Now 3 Tap ok To refresh Express GPS Connect data You device can refresh Express GPS Connect data through the following PC with Internet connectivity using ActiveSync or Bluetooth GPRS EDGE wireless data service connection ActiveSync to obtain Express GPS Connect data files already stored on your PC This method requires you to install the supplied PC utility that retrieves Express GPS Conn...

Page 173: ...Tap Enable updates check box to enable Express GPS Connect to obtain satellite data If disabled ActiveSync must be used to obtain data Tap Initiate GPRS connection for updates check box to allow Express GPS Connect to automatically update data on the device using a GPRS connection Tap Show expiration reminders check box to receive notifications when a satellite data has expired before you start a ...

Page 174: ...s the factory default settings Media related programs Pictures Videos Camera Camera Wedge Pictures Videos Pictures Videos extends your device s function to the visual scene with its image management viewer and editing functions It supports BMP GIF and JPEG image formats as well as record and launch video clips stored on your device or on a storage card Now you can keep those images of your favorit...

Page 175: ... a storage card folder To copy image files or video clips from your computer to your device 1 Connect your device to your computer 2 In ActiveSync on your computer click Explore Windows Explorer opens the Mobile Device window for your device 3 Locate then select the file s that you want to copy on your device 4 Right click the selected file s then click Copy 5 Place the cursor on the My Pictures f...

Page 176: ...il mode Thumbnail mode is the default view mode every time you open Pictures You can perform the following while in thumbnail mode Tap and hold a thumbnail to display a pop up menu of available actions Place your stylus within the edge at the far left or far right of the screen and then drag the stylus over the images to perform multiple selections useful in deleting images by batch rather than by...

Page 177: ... another Bluetooth or IR enabled device Tap Set as Today Background to set image as background of the Today screen Full screen mode It is only in full screen mode can you perform any editing action on an image To view image in full screen mode Tap a thumbnail or press the joystick while a thumbnail is selected In this view the selected image is maximized so that it fits the entire screen with the ...

Page 178: ...it 2 Tap Menu Crop to enable the Crop tool 3 Drag your stylus across part of the image you want to crop 4 Tap inside the selection 5 Tap Menu Save As 6 Fill out the fields in the Save As screen 7 Tap ok To zoom in zoom out the image To view images in a larger or smaller scale use the Zoom tool 1 Tap the image 2 Tap Menu Zoom A zoom selection panel appears on the lower right corner of the screen ...

Page 179: ... Tap to reduce the size of the image Tap to zoom into an image Tap to return the image to its original view size Drag the red box within the small frame to pan the image in any direction you want 5 Tap Menu Zoom to hide the zoom selection panel To set an image as a Today wallpaper To add a custom look to the Today screen of your device apply a wallpaper of your choice using any image 1 Tap and hol...

Page 180: ...s to control the image display Move the joystick up or down to display the previous image rotate down to display the next image To view the Slide Show toolbar During the slide show tap anywhere on the screen or press the joystick The icons in the Slide Show toolbar lets you control the pace of the slide show as well as change the orientation of the images Tap to rotate the images counterclockwise ...

Page 181: ...ugh e mail Only pictures sent through an e mail message is resized the original picture remains unchanged Resize pictures for faster e mail transfer Rotate pictures towards left or right 3 On the Slide Show tab set the following options Select the Portrait pictures or Landscape pictures radio button to set slide show orientation Select the Play a screensaver when connected to my PC and idle for 2 ...

Page 182: ...audio when recording video files In the Time limit for videos list select the length for video clips recorded with the camera 6 Tap ok You can take photos and videos and capture bar code data with the device s built in camera The camera lens is located on the rear of the device Images can be stored on the device s onboard memory or a memory card Once you take photos or video clips you can associat...

Page 183: ...the camera Tap Programs Pictures Videos Camera Open Pictures Videos then tap Camera on the command bar Camera screen The Camera screen displays the view finder Information about the current settings or the remaining number of images that can be saved to your device are displayed on the lower right corner of the screen This screen also provides an option to toggle shooting mode between camera and v...

Page 184: ...ode data To select a camera capture mode Slide the Camera Bar Code switch to the Camera icon or the Bar code icon to switch from one capture mode to another To take a photo 1 Launch the Camera application by performing one of the following Press the Camera button located on the lower right side of the phone to activate the camera Tap Programs Pictures Videos Camera Open Pictures Videos and tap Cam...

Page 185: ...into position 1 Launch the Camera application 2 Tap Menu Mode Timer NOTE By default the self timer delay is set at five seconds To record a video clip 1 Launch the Camera application 2 Tap Menu Video to set shooting mode to video The available recording time displays on the screen NOTE By default the time limit for recording videos is set at 15 and 30 seconds 3 Press the Camera button to begin rec...

Page 186: ... main memory pictures are saved to permanent storage on your device which may require that you consider the storage needs of other programs 1 On the Camera screen tap Menu Video 2 Tap Menu Options Camera tab 3 In the Save files to list select main memory or storage card 4 Tap ok To capture bar code data 1 Start the CamWedge application Tap Programs CamWedge 2 On the Today screen tap and hold the C...

Page 187: ...eo clip that you want to see To configure the camera settings of your device 1 Launch the Camera application 2 Tap Menu then configure the device settings Video Tap to switch to video or still camera mode Mode Select from the following modes to take your picture Normal Takes picture using the default settings Burst Takes picture consecutively in continuous mode Timer Takes picture five seconds aft...

Page 188: ...ws data capture when pressing the Camera button Disable Prevents data capture from occurring when pressing the Camera button Prefix Suffix Allows modification of the bar code data Options Allows you to set options for capturing bar codes Test Allows data capture operations to be tested locally Log Displays information logged by CamWedge About Displays the CamWedge info screen Exit Closes the appli...

Page 189: ...bling this option prevents the actual data from being transmitted The prefix and suffix strings if present are still transmitted even if this option is disabled Tap the Don t treat data as text check box to read bar code data as binary data and transmit the data in hexadecimal format By default this checkbox is disabled This option does not affect the Test function in CamWedge which has its own me...

Page 190: ...liseconds If no bar code is decoded the scanner stops decoding after the given Scan Timeout elapses 5 In the Profile drop down box select a bar code symbology The profile selected determines which bar code type to decode 6 Tap ok Test Window The Test window displays information processed from the data captured by the MC35 This window is typically used to ensure that the captured data is being tran...

Page 191: ...ks and compares package version so that only updated packages are loaded AirBEAM Smart resides on radio equipped client devices and allows them to request download and install software as well as to upload files and status data Both download and upload of files can be accomplished in a single communications session The ability to transfer software over a radio network can greatly reduce the logist...

Page 192: ...es of the packages to be downloaded and other controlling parameters When the AirBEAM Smart Client is launched the device connects to the specified FTP server and checks the packages it is configured to look for If the package version was updated the client requests the transfer AirBEAM License The AirBEAM Smart Client is a licensed software product The AirBEAM Smart Client s version synchronizati...

Page 193: ...ld be entered on the seven tabs Information entered in these fields are case and space sensitive 3 On the Packages 1 tab set the following options In the Package 1 field enter the package name of the first of eight packages In the Package 2 field enter the package name of the second of eight packages In the Package 3 field enter the package name of the third of eight packages In the Package 4 fiel...

Page 194: ...d files during the AirBEAM synchronization process The specified package name must correspond to a package that is available on the specified package server NOTE Package 5 to Package 8 and Upload Pkg fields are optional fields 5 Tap Server tab then set the following options In the IP Address field enter the IP address of the server It may be a host name or a dot notation format In the Directory fi...

Page 195: ...nchronization process is occurring Tap the RAM Management check box to specify whether the automatic RAM management is enabled during the package synchronization process If enabled RAM management logic is invoked when there is not enough free disk space to download a package The RAM management logic attempts to remove any disposable AirBEAM packages resident on the client Tap the Suppress Separato...

Page 196: ...se Test check box to specify whether the AirBEAM Smart Client tests to determine if a file is in use before downloading If the In use Test feature is enabled the AirBEAM Smart Client downloads a temporary copy of any files that are in use If any temporary in use files are downloaded the AirBEAM Smart Client automatically resets the client to complete the copy of the in use files If the In use Test...

Page 197: ...special RF network registry settings are included but commented out in the radio network registry initialization files essid_xxxx_yy reg Tap the Use DHCP bootfile check box to specify whether the AirBEAM Smart Client uses the DHCP response option 67 to specify the Package and Package 1 parameters If enabled special RF network registry settings are required to force the DHCP server to return the Bo...

Page 198: ...ization is complete unless an error occurs If an error occurs the user is required to press the OK button to dismiss the dialog Background Nothing is displayed when the scheduled synchronization sessions occur In the Sched Prompt drop down list specify whether the AirBEAM client prompts the user when updates are available in schedule mode The settings include Disable Updated packages are automatic...

Page 199: ... automatically when the client device is rebooted See Misc 1 on page 185 for instructions on enabling Auto Sync AirBEAM Staging The AirBEAM Smart staging support is intended to speed up and simplify the process of staging custom or updated operating software onto mobile devices directly from manufacturing The staging support is part of the AirBEAM Smart CE Client that is integrated into the vehicl...

Page 200: ...ar code capture status and provides features for resetting and exiting the application To open Rapid Deployment window Tap Programs RDClient The Rapid Deployment screen include the following parameters Please capture all of the bar codes Displays the status of a captured bar code Waiting indicates the MC35 is ready to capture a bar code OK indicates the MC35 successfully captured a bar code The In...

Page 201: ...ete the configuration and or download a A PDF417 bar code 2 D bar code can contain all download data in a single bar code In this case only one bar code may be required to capture b Multi part linear bar codes 1 D bar codes can require capturing several bar codes Bar codes can be captured in any order The text box under Bar codes left to scan shows the remaining bar codes to capture 4 After all ap...

Page 202: ...ates from the Internet to the MC35 EDA This program also provides information about the software download status from the Internet To open Download Agent Tap Programs Download Agent To install a software from the Internet 1 Connect to the Internet 2 Tap Programs Download Agent 3 On the Download Content list select a software then tap Install ...

Page 203: ...gs such as backlight auto power off timer system volume and processor speed from the factory default settings may decrease your standby time To access Settings Tap Settings The Settings window has three tabs Personal System and Connections each of which has its own set of options The following sections show the configuration page for each Settings option For detailed instructions on these pages ac...

Page 204: ...t to commonly used programs You can also adjust the on screen scrolling speed here Input Select an input method options for word completion and other related settings Lock Set a password to prevent unauthorized access to your device You also have the option to set a password hint to serve as a reminder in case you forget your password ...

Page 205: ...5 Menus Customize what appears on the menu MSN Options Set up the password and login settings in the MSN services It also provides instant access to the MSN Hotmail s Inbox MSN Messenger s Contact list and options for customizing your Pocket MSN experience ...

Page 206: ...usting system preferences 196 Owner Information Enter personal information and customize text display when device is turned on Phone Set up the phone function of your device See Phone preferences on page 136 for more information ...

Page 207: ...l for system sounds and select the types of action you want to hear sounds for You can also define how you want to be notified about different events Options for personalizing sound notifications are also available Today Customize the look and the information that is displayed on the Today screen ...

Page 208: ... Adjusting system preferences 198 System tab About Displays your device s version and copyright information includes an option to define a device ID Brightness Define settings for the display brightness and backlight control ...

Page 209: ...our MC35 Adjusting system preferences 199 Certificates View and manage the public key certificates available on your device Clock Alarms Change the time or set alarms Error reporting Enable or disable error reporting ...

Page 210: ...our MC35 Adjusting system preferences 200 GPS Adjust the GPS settings Memory Adjust allocation of storage and main memory Phone Profiles View and edit the Phone function s preset profiles for different operations mode ...

Page 211: ...wer View power level for both the main and backup battery To minimize power consumption you can define settings for the auto off function and the processor s operation speed Regional Settings Set default number and time display formats and other related options ...

Page 212: ...references 202 Remove Programs Remove programs from storage memory Screen Set the viewing orientation and text size setting You can also recalibrate screen and enable the ClearType feature SIM Manager Manage all contacts stored on your SIM card ...

Page 213: ...9 Customizing your MC35 Adjusting system preferences 203 System Information Displays your device s hardware and software information Connections tab Beam Define settings for the beam function ...

Page 214: ...references 204 Bluetooth Use this option to configure the device s Bluetooth settings Connections Adjust settings for connecting to your ISP or to a local network Express GPS Connect Enable and customize settings for the GPS connection utility ...

Page 215: ...e the enhanced network connectivity WiFi Network Cards Setup wireless network connection or customize settings for your device s network adapter WiFi Card Setting Allows you to enable the WiFi Wireless Fidelity networking To configure the wireless network connection settings tap WiFi ...

Page 216: ...ault mspx You can add programs to your device either by using ActiveSync or by downloading the program from the Internet To add programs using ActiveSync Before installing a program on your device you must first install the appropriate software for your device on your computer 1 Determine your device and processor type so that you know which version of the software to install a Tap Settings b On t...

Page 217: ...files for different device types and processors Be sure to select the program designed for a Pocket PC and your device s processor type NOTE Read any installation instructions Readme files or documentation that comes with the program Many programs provide special installation instructions 3 Tap the file such as a xip or exe file The installation wizard will begin 4 Follow the on screen instruction...

Page 218: ...hat come with your device cannot be removed To remove a program using Settings 1 Tap Settings 2 On the System tab tap Remove Programs 3 Tap the program you wish to remove 4 Tap Remove 5 Tap Yes If another confirmation message appears tap Yes again To remove a program using File Explorer on your device If the program does not appear in the list of installed programs in Remove Programs use File Expl...

Page 219: ...formation regarding your device For the latest information on the MC35 visit http www symbol com mc35 Technical assistance Go to http www symbol com contactsupport to contact the Symbol Global Interactive Center for your region If you purchased your Symbol product from a Symbol Business Partner contact that Business Partner for service Before contacting have the model number and serial number at h...

Page 220: ... your MC35 both from accidental key presses and from unauthorized access Locking the keypad Locking the touch screen Setting an access password lock Locking the keypad touch screen Tapping the Device unlocked icon on the Today screen prevents accidental data entry from both the keypad and the touch screen When the device is locked the command bar displays Unlock To unlock the keypad touch screen 1...

Page 221: ...word to serve as a password reminder in case you forget it tap the Hint tab 6 Tap ok Creating backup files Any additional programs or new data in your device are stored in the Random Access Memory RAM These items are lost if you have to perform a hard reset or your device loses all power for any other reason Because of this it is important that you regularly back up files to your computer via Acti...

Page 222: ... Using the SD MMC expansion slot on page 12 for more information 2 Tap Programs File Explorer 3 Perform one of the following Locate the file folder containing the files you want to back up Create a new folder and move copy the files you want to back up there 4 Tap and hold the file folder you want to backup then select Copy from the pop up menu 5 Tap the My Device icon tap the folder list labeled ...

Page 223: ... Your device uses both a detachable and rechargeable main battery pack and an embedded backup battery cell When the main battery pack is removed or is completely drained out your device shuts down The backup battery cell retains data for 30 minutes after which you risk losing all data on the internal memory of your device Tips on how to make battery charge last longer To make your battery charge t...

Page 224: ...n storage memory Move data to an SD or MMC storage card a Insert a storage card to your device s SD MMC expansion slot b Tap Programs File Explorer c Tap and hold the file you want to move then tap Cut from the pop up menu d Open the My Documents folder tap Menu Edit then Paste NOTE Files stored in folders other than My Documents or stored in folders within subfolders in My Documents may not show ...

Page 225: ...Press and hold the Power button for a full second If that doesn t work Remove the battery pack and check if the SIM card holder is closed properly If you are using the device on battery power shift the device to AC power Perform a soft reset on your device See To perform a soft reset on page 218 for more information Screen is dark Prolonged exposure to direct sunlight may cause your device screen ...

Page 226: ...rvice Provider Check if your device s wireless connection to your mobile service provider is switched on and the signal unobstructed NOTE When your device is connected to the USB sync cable while the GPRS function is on you will not be able to browse web pages Verify your user name and password with your device ISP Verify with your device s ISP that the network you are trying to connect is availab...

Page 227: ... of your device Additional troubleshooting information is available in Connections Help of your device and on the ActiveSync Help on your computer Recalibrating the screen When you first startup your MC35 you are asked to calibrate the screen by tapping the center of a cross with your stylus as it moves around the screen This process ensures that when you tap the screen with your stylus the item t...

Page 228: ...rams you have installed and restores the device s default factory settings Never perform a hard reset unless a soft reset does not correct your problem When you perform your next ActiveSync operation you can restore any data that you previously synchronized to your computer or you can restore data that you backed up to a storage card NOTE When you perform a hard reset the date and time settings ar...

Page 229: ...ther hazard Only use the battery for the system for which it is specified Only use the battery with a charging system that has been qualified with the system per this standard Use of an unqualified battery or charger may present a risk of fire explosion leakage or other hazard Do not short circuit a battery or allow metallic conductive objects to contact battery terminals Replace the battery only ...

Page 230: ...10 User Support Troubleshooting 220 ...

Page 231: ...d interface 17 command bar 20 navigation bar 18 notifications 20 pop up menus 20 Today screen 17 command bar 20 navigation bar 18 Start menu 18 status icons 18 companion programs 145 media related 164 phone management 145 product download related 181 wireless communication 148 conference call 123 connections settings 203 Beam 203 Bluetooth 204 Connections 204 Express GPS Connect 204 Network Cards ...

Page 232: ...72 create note 72 open 72 Tasks 70 Mobility Services Platform Console 190 MSP 190 My Text 29 N Notes 72 P package contents 1 personal settings 193 Buttons 194 Input 194 Lock 194 Menus 195 MSN Options 195 Owner Information 196 Phone 196 Sounds Notification 197 Today 197 phone 109 adjust volume 116 answer a call 116 end a call 116 erase number input 115 mute a call 117 reject a call 116 setup 109 sp...

Page 233: ... card install 109 SIM Manager 145 load 145 SIM Toolkit 147 speakerphone 116 storage card insert 12 remove 13 synchronize with PC using Bluetooth 32 using USB 31 system settings 198 About 198 Brightness 198 Certificates 199 Clock Alarms 199 Error reporting 199 GPS 200 Memory 200 Phone Profiles 200 Power 201 Regional Settings 201 Remove Programs 202 Screen 202 SIM Manager 202 System Information 203 ...

Page 234: ...224 ...

Page 235: ......

Page 236: ...72E 98506 01 Revision A March 2007 Motorola One Symbol Plaza Holtsville New York 11742 1300 http www symbol com ...

Reviews: