background image

23

Setting Up 

Your Phone

Entering Text on the Handset

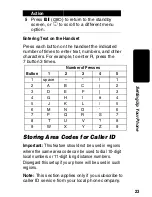
Press each button on the handset the indicated 
number of times to enter text, numbers, and other 
characters. For example, to enter R, press the 
7 button 3 times.

Storing Area Codes for Caller ID

Important: 

This feature should not be used in regions 

where the same area code can be used to dial 10-digit 
local numbers or 11-digit long distance numbers. 
Disregard this setup if your phone will be used in such 
regions.

Note: 

This section applies only if you subscribe to 

caller ID service from your local phone company.

5

Press 

EXIT

(

a

) to return to the standby 

screen, or 

c

 to scroll to a different menu 

option.

Button

Number of Presses

1

2

3

4

5

1

space

*

!

1

2

A

B

C

(

2

3

D

E

F

)

3

4

G

H

I

#

4

5

J

K

L

/

5

6

M

N

O

6

7

P

Q

R

S

7

8

T

U

V

?

8

9

W

X

Y

Z

9

Action

Summary of Contents for MD40 Series

Page 1: ...User sGuide MD40Series Digital 2 4GHz Expansion Handset Unit Guidedel utilisateur Socle d expansion pour combinés ...

Page 2: ......

Page 3: ... your Motorola product you will need to provide a copy of your dated sales receipt to confirm warranty status Registration is not required for warranty coverage For a large print English only version of this guide or for product related questions please call 1 800 353 2729 in the USA 1 800 461 4575 in Canada 1 888 390 6456 TTY Text Telephone On the Web www motorola com cordless MOTOROLA and the St...

Page 4: ...andset on to make a call Earphone jack Raise volume Redial Scroll up or down on display Left soft key Right soft key Turn handset off to hang up Use handset as intercom Talk handsfree using speakerphone Lower volume Microphone ...

Page 5: ...uct identifier in the form US AAAEQ TXXXX You must upon request provide this information to your telephone company The digits represented by in the product identifier indicate the Ringer Equivalency Number REN for this equipment The REN is useful in determining the number of devices you may connect to your telephone line and still have all of these devices ring when your telephone number is called...

Page 6: ...ervice may be required Where prior notice is not practical and the circumstances warrant such action the telephone company may temporarily disconnect service immediately In case of such temporary discontinuance the telephone company must 1 Promptly notify you of such temporary discontinuance 2 Afford you the opportunity to correct the situation 3 Inform you of your right to bring a complaint to th...

Page 7: ...wing measures Reorient or relocate the receiving antenna that is the antenna for the radio or television that is receiving the interference Reorient or relocate and increase the separation between the telecommunications equipment and the receiving antenna Connect the telecommunications equipment into an outlet on a circuit different from that to which the receiving antenna is connected If these me...

Page 8: ...6 Hearing Aid Compatibility This telephone system meets the FCC standards for hearing aid compatibility ...

Page 9: ...e and still have all of these devices ring when your telephone number is called The sum of the RENs of all devices connected to one line may not exceed 5 Before installing this cordless phone you should make sure that it is permissible to be connected to the facilities of the local telecommunications company The equipment must be installed using an acceptable method of connection In some cases the...

Page 10: ...o this equipment should be made by an authorized Canadian maintenance facility designated by Motorola Any repairs or alterations made by the consumer or any malfunctions of this equipment may give the telecommunications company cause to request that you disconnect the equipment and may void the limited warranty Privacy Privacy of communications may not be ensured when using this telephone Other de...

Page 11: ... radio or television reception which can be determined by turning the equipment on and off the user is encouraged to try to correct the interference with one or more of the following measures Reorient or relocate the receiving antenna that is the antenna for radio or television that is receiving the interference Reorient or relocate and increase the separation between the telecommunications equipm...

Page 12: ...nto the product slits as that may result in fire or shock 6 Unplug this product from the wall outlet before cleaning Do not use liquid cleaners or aerosol cleaners Use a damp cloth for cleaning 7 Do not disassemble this product If service or repair work is required contact the Motorola address found in the back of this user s guide 8 Do not overload wall outlets and extension cords 9 Avoid using d...

Page 13: ...nsult with your dealer or local power company 5 Do not place this product on an unstable cart stand or table This product may fall causing serious damage to the product 6 Adjust only those controls that are covered by the operating instructions Improper adjustment of other controls may result in damage and will often require extensive work to restore the product to normal operation 7 Clean this pr...

Page 14: ...y the battery that came with your phone or an authorized replacement recommended by the manufacturer Keep batteries out of the reach of children Remove batteries if storing over 30 days Do not dispose of batteries in fire which could result in explosion The rechargeable batteries that power this product must be disposed of properly and may need to be recycled Refer to your battery s label for batt...

Page 15: ...7 Using the Soft Keys 18 Using the Navigation Key 18 Setting Up Your Phone 19 Registering an Expansion Handset 19 Personalizing Your Handset 20 Setting the Ring Tone and Ring Volume 20 Setting Key Beeps On or Off 21 Naming a Handset 22 Entering Text on the Handset 23 Storing Area Codes for Caller ID 23 Setting the Date and Time 25 Setting the Language 26 Setting Touch Tone or Pulse Dialing 26 Usin...

Page 16: ...NiCd battery powers each handset Charge the battery for about 12 hours before initial use 4 Register expansion handsets to the base station page 19 5 Set the ring tone date time and other features of your handset page 20 Setting Up the Charging Bases Expansion handsets do not need to be plugged into a phone line Simply plug the power cord into the back of the charging base and into an outlet where...

Page 17: ...ing batteries read Battery Safety Instructions on page 12 1 Remove the battery cover by pressing on the recess and sliding it down and off the handset 2 Plug the connector into the receptacle 3 Insert the battery into the compartment 4 Slide and snap the battery cover back into place Black Red ...

Page 18: ...etting Started Charging the Handsets Place the handset in the charging base The charging LED is solid red when the handset is charging For the initial charge charge the battery for at least 12 hours charge ...

Page 19: ...ller ID information is supplied only if you subscribe to caller ID service from your local phone company When the handset speakerphone is on V displays 9 04 26 PM 09 26 Handset 1 PHONEBK MENU 6 Calls Time Ringer off Left soft key function Battery meter Date Handset name Number of Caller ID records Right soft key function ...

Page 20: ...mple CHANGE a Using the Navigation Key c is used to scroll up and down through menu items a list of settings caller ID and redial lists and the phonebook On the handset display points to the currently selected item and b indicates there are more items above and below the currently selected item Press c to scroll up or down on the display Left soft key Right soft key Left soft key function Right so...

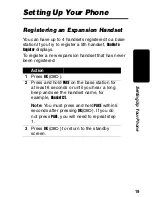
Page 21: ...ys To register a new expansion handset that has never been registered Action 1 Press OK a 2 Press and hold PAGE on the base station for at least 6 seconds or until you hear a long beep and see the handset name for example Handset 2 Note You must press and hold PAGE within 5 seconds after pressing OK a If you do not press PAGE you will need to repeat step 1 3 Press OK a to return to the standby scr...

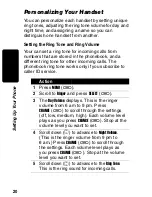
Page 22: ...e works only if you subscribe to caller ID service Action 1 Press MENU a 2 Scroll to Ringer and press SELECT a 3 The Day Volume displays This is the ringer volume from 6 am to 9 pm Press CHANGE a to scroll through the settings off low medium high Each volume level plays as you press CHANGE a Stop at the volume level you want to set 4 Scroll down c to advance to Night Volume This is the ringer volu...

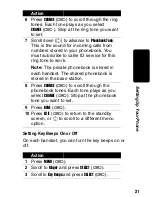
Page 23: ...n your phonebook You must subscribe to caller ID service for this ring tone to work Note The private phonebook is stored in each handset The shared phonebook is stored in the base station 8 Press CHANGE a to scroll through the phonebook tones Each tone plays as you select CHANGE a Stop at the phonebook tone you want to set 9 Press DONE a 10 Press EXIT a to return to the standby screen or c to scro...

Page 24: ...of the name for example Kitchen 2 4 Press CHANGE a to scroll through the selections When your choice ON OFF or LINKED to RINGER displays press SELECT a Note When set to LINKED to RINGER key beeps are on when the ringer is set to on and off when the ringer is set to off Action 1 Press MENU a 2 Scroll to Name handset and press SELECT a 3 Use the keypad to enter the handset name up to12 characters Th...

Page 25: ...ons where the same area code can be used to dial 10 digit local numbers or 11 digit long distance numbers Disregard this setup if your phone will be used in such regions Note This section applies only if you subscribe to caller ID service from your local phone company 5 Press EXIT a to return to the standby screen or c to scroll to a different menu option Button Number of Presses 1 2 3 4 5 1 space...

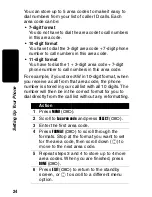
Page 26: ...store 954 in 10 digit format when you receive a call from that area code the phone number is stored in your call list with all 10 digits The number will then be in the correct format for you to dial directly from the call list without any reformatting Action 1 Press MENU a 2 Scroll to Loc area code and press SELECT a 3 Enter the first area code 4 Press FORMAT a to scroll through the formats Stop a...

Page 27: ...ng a 12 hour clock press AM PM a to switch between am and pm 5 Scroll down c to move the next field 6 Press CHANGE a to change the time format 12 or 24 hour clock Scroll down c to move to the next field 7 Press CHANGE a to select date format MM DD or DD MM 8 Scroll down c to move the next field 9 Enter the current date 10 Press DONE a 11 Press EXIT a to return to the standby screen or c to scroll ...

Page 28: ...Press MENU a 2 Scroll to Language and press SELECT a 3 Press c until points to the language you want to set 4 Press DONE a 5 Press EXIT a to return to the standby screen or c to scroll to a different menu option Action 1 Press MENU a 2 Scroll to Tone Pulse 3 Press c or CHANGE a to switch between Tone and Pulse 4 Press DONE a 5 Press EXIT a to return to the standby screen or c to scroll to a differ...

Page 29: ... the Handset Using the Handset Now that you have setup your handset you are ready to use it with your cordless telephone system Please refer to your original user s guide for handset and multihandset operation ...

Page 30: ...rranty is a consumer s exclusive remedy and applies as follows to new Motorola Products Accessories and Software purchased by consumers in the United States or Canada which are accompanied by this written warranty Products and Accessories Products Covered Length of Coverage Products and Accessories as defined above unless otherwise provided for below One 1 year from the date of purchase by the fir...

Page 31: ...t or the like extreme heat or food c use of the Products or Accessories for commercial purposes or subjecting the Product or Accessory to abnormal usage or conditions or d other acts which are not the fault of Motorola are excluded from coverage Use of Non Motorola Products and Accessories Defects or damage that result from the use of Non Motorola branded or certified Products Accessories Software...

Page 32: ...tion service or signal you may subscribe to or use with the Products Accessories or Software is excluded from coverage Software Exclusions Software Embodied in Physical Media No warranty is made that the software will meet your requirements or will work in combination with any hardware or software applications provided by third parties that the operation of the software products will be uninterrup...

Page 33: ...te a back up prior to requesting service How to Obtain Warranty Service or Other Information You will receive instructions on how to ship the Products Accessories or Software at your expense to a Motorola Authorized Repair Center To obtain service you must include a a copy of your receipt bill of sale or other comparable proof of purchase b a written description of the problem c the name of your s...

Page 34: ...R IN CONNECTION WITH THE ABILITY OR INABILITY TO USE THE PRODUCTS ACCESSORIES OR SOFTWARE TO THE FULL EXTENT THESE DAMAGES MAY BE DISCLAIMED BY LAW Some states and jurisdictions do not allow the limitation or exclusion of incidental or consequential damages or limitation on the length of an implied warranty so the above limitations or exclusions may not apply to you This warranty gives you specifi...

Page 35: ...rmer l état de la garantie L enregistrement n est cependant pas obligatoire pour être couvert par la garantie Pour toute question relative au produit veuillez communiquer avec Motorola de la manière suivante 1 800 353 2729 aux États Unis 1 800 461 4575 aux Canada 1 888 390 6456 ATS téléphone textuel MOTOROLA et le logo M stylisé sont des marques déposées au US Patent Trademark Office Tous les autr...

Page 36: ...gmenter le volume Recomposer Faire défiler l affichage vers le haut ou vers le bas Touche programmable de gauche Touche programmable de droite Pour raccrocher mettre le combiné hors tension Utiliser le combiné comme interphone Parler en mode mains libres grâce au haut parleur Diminuer le volume Microphone ...

Page 37: ...me des REN de tous les appareils connectés à une même ligne ne doit pas être supérieure à 5 Avant d installer ce téléphone sans fil vous devez vous assurer que votre compagnie de télécommunication locale en permet la connexion à son système Cet appareil doit être installé à l aide d une méthode de connexion acceptable Dans certains cas le câblage interne de la compagnie de télécommunications assoc...

Page 38: ...stallateur qualifié Réparations Toute réparation de cet appareil doit être effectuée dans un centre d entre tien canadien autorisé et désigné par Motorola Toute réparation ou modifi cation effectuée par le consommateur ou toute défectuosité de cet appareil peut donner droit à la compagnie de télécommunications d exiger la déconnexion de l appareil et peut également annuler la garantie limitée Conf...

Page 39: ...t ga rantir qu il n y aura pas d interférence dans un environnement donné Si cet équipement cause de l interférence nuisible aux radios ou téléviseurs ce qui peut être déterminé en mettant l appareil sous tension et hors tension nous vous conseillons d essayer de corriger la situation à l aide des mesures suivantes Rediriger ou déplacer l antenne réceptrice c est à dire l antenne de la radio ou du...

Page 40: ...n Placez lecâble d alimentationdefaçonà nepasmarcher dessus 5 n insérant jamais d objets quels qu ils soient dans les fentes du produit car cela pourrait entraîner un incendie ou un choc électrique 6 débranchant le produit de la prise de courant avant de le nettoyer N utilisez pas de nettoyant liquide ou en aérosol et utilisez un linge humide pour le nettoyage 7 ne démontant pas le produit Si des ...

Page 41: ...on 1 Assurez vous de lire et de bien comprendre toutes les directives et conservez les pour vous y référer au besoin 2 Respectez toutes les mises en garde et instructions indiquées sur le produit 3 N installez pas ce produit près d une baignoire d un évier ou d une douche 4 Utilisez ce téléphone uniquement à partir de la source d alimentation indiquée sur l étiquette Si vous n êtes pas certain du ...

Page 42: ...démonter de mutiler ou de percer la batterie La batterie contient des substances toxiques qui pourraient s en écouler et causer des blessures Attention Il y a risque d explosion si vous remplacez la batterie par un autre type que celui recommandé Utilisez seulement la batterie vendue avec votre téléphone ou une batterie de remplacement autorisée recommandée par le fabricant du téléphone Gardez les...

Page 43: ... Configuration du téléphone 47 Enregistrement d un combiné supplémentaire 47 Personnalisation du combiné 48 Réglage de la tonalité et du volume de sonnerie 48 Activation et désactivation des timbres des touches 50 Attribution d un nom à un combiné 51 Entrée du texte au combiné 52 Sauvegarde des indicatifs régionaux pour la fonction d identification de l appelant 52 Réglage de la date et de l heure...

Page 44: ... batterie au NiCd Chargez la batterie pendant 12 heures avant la première utilisation 4 Enregistrez chaque combiné supplémentaire auprès du socle page 47 5 Réglez la tonalité de sonnerie la date l heure et toutes les autres fonctions page 48 Préparation des socles de charge Vous n avez pas à connector les combinés supplémentaires à une ligne téléphonique Il suffit de connecter le cordon d alimenta...

Page 45: ...nes de sécurité relatives aux batteries à la page 40 1 Retirez le couvercle de batterie en appuyant sur le renfoncement et en faisant glisser le couvercle avant de le soulever du combiné 2 Branchez le connecteur dans la prise 3 Insérez la batterie dans son logement 4 Faites glisser le couvercle de batterie en place et enclenchez le Noir Rouge ...

Page 46: ... la batterie pendant au moins 12 heures Utilisation du visuel du combiné Lorsque le combiné n est pas utilisé le visuel affiche l écran de veille charge 9 04 26 PM 09 26 Handset 1 PHONEBK MENU 6 Calls Heure Sonnerie désactivée Fonction de la touche programmable de gauche Voltmètre Date Nom du combiné Nombre d en trées d identi fication de l appelant Fonction de la touche programmable de droite ...

Page 47: ...s Les deux touches programmables servent à sélectionner les fonctions qui s affichent juste au dessus de ces touches au visuel Les fonctions changent lorsque vous passez d un écran à un autre Dans ce guide les fonctions des touches programmables sont indiquées par le nom de la fonction suivi du symbole a par exemple CHANGE a Touche programmable de gauche Touche programmable de droite Fonction de l...

Page 48: ...entrées d identification de l appelant la liste de recomposition et l annuaire Au visuel du combiné le symbole indique l élément sélectionné et le symbole b indique qu il y a d autres éléments au dessus et en dessous de l élément sélectionné Appuyez sur c pour faire défiler l affichage vers le haut ou vers le bas Caller ID Log Set Ringer Loc Area Codes BACK SELECT ...

Page 49: ...mbiné qui n a pas encore été enregistré Action 1 Appuyez sur OK a 2 Tenez la touche PAGE enfoncée sur le socle de base pendant au moins 6 secondes ou jusqu à ce que vous entendiez une longue tonalité et que le nom du combiné s affiche par exemple Handset 2 Nota Vous devez appuyer sur la touche PAGE et la maintenir enforcée dans les 5 secondes suivant la pression sur le bouton OK a Sinon il faudra ...

Page 50: ...dés dans l annuaire et une tonalité de sonnerie différente pour tous les autres appels entrants La fonction de tonalité de sonnerie pour les appels sauvegardés dans l annuaire fonctionne seulement si vous êtes abonné au service d identification de l appelant Action 1 Appuyez sur MENU a 2 Faites défiler jusqu à Ringer puis appuyez sur SELECT a 3 Le volume de jour s affiche Il s agit du volume de la...

Page 51: ... les tonalités de sonnerie Chaque tonalité de sonnerie se fait entendre lorsque vous sélectionnez CHANGE a Arrêtez vous à la tonalité de sonnerie désirée 7 Faites défiler vers le bas c pour passer à PhonebookTone Il s agit de la tonalité de sonnerie pour les appels entrants dont le numéro est sauvegardé dans l annuaire Pour utiliser cette tonalité de sonnerie vous devez être abonné au service d id...

Page 52: ...la sonnerie du socle de base ou d un combiné est désactivée 9 Appuyez sur DONE a 10 Appuyez sur EXIT a pour retourner à l écran de veille ou c pour faire défiler jusqu à une autre option de menu Action 1 Appuyez sur MENU a 2 Faites défiler jusqu à Ringer puis appuyez sur SELECT a 3 Faites défiler jusqu à KEY BEEPS puis appuyez sur SELECT a 4 Appuyez sur CHANGE a pour faire défiler les timbres des ...

Page 53: ...e Lorsque vous attribuez un nom à un combiné le numéro du combiné reste accolé au nom par exemple Cuisine 2 Action 1 Appuyez sur MENU a 2 Faites défiler jusqu à Name handset et appuyez sur SELECT a 3 Utilisez le clavier pour entrer le nom du combiné jusqu à 12 caractères La barre de soulignement clignotante indique le curseur c est à dire la position d insertion Appuyez sur DELETE a pour reculer e...

Page 54: ...tion dans les régions où l indicatif régional peut à la fois servir pour les appels locaux nécessitant la composition de 10 chiffres et les appels interurbains avec composition de 11 chiffres On recommande de nes pas tenir compte de cette étape dans l installation de votre appareil téléphonique Nota Cette section s applique seulement si vous êtes abonné au service d identification de l appelant au...

Page 55: ...al à 3 chiffres ainsi que le numéro de téléphone à 7 chiffres pour acheminer un appel aux numéros de cet indicatif Par exemple si vous sauvegardez 954 en format 10 chiffres lorsque vous recevrez un appel provenant de cet indicatif régional le numéro de téléphone sera sauvegardé dans votre liste d appels avec tous les numéros à 10 chiffres Le numéro sera alors dans le bon format pour que vous puiss...

Page 56: ...yez sur SELECT a 3 Entrez l heure 2 chiffres sont requis pour l heure et 2 chiffres pour les minutes vous devez donc faire précéder les valeurs à un chiffre d un zéro 4 Appuyez sur AM PM a pour passer de am à pm et vice versa Nota Cela s applique seulement si vous utilisez le format 12 heures 5 Faites défiler vers le bas c pour passer au champ suivant 6 Appuyez sur CHANGE a pour changer le format ...

Page 57: ... retourner à l écran de veille ou c pour faire défiler jusqu à une autre option de menu Action 1 Appuyez sur MENU a 2 Faites défiler jusqu à Language puis appuyez sur SELECT a 3 Appuyez sur c jusqu à ce que pointe vers la langue à régler 4 Appuyez sur DONE a 5 Appuyez sur EXIT a pour retourner à l écran de veille ou c pour faire défiler jusqu à une autre option de menu Action ...

Page 58: ... pas ce réglage à moins que le service Touch Tone ne soit pas disponible dans votre localité Action 1 Appuyez sur MENU a 2 Faites défiler jusqu à Tone Pulse 3 Appuyez sur c or CHANGE a pour passer de Tone à Pulse et vice versa 4 Appuyez sur DONE a 5 Appuyez sur EXIT a pour retourner à l écran de veille ou c pour faire défiler jusqu à une autre option de menu ...

Page 59: ...u combiné Maintenant que vous avez programmé votre combiné vous pouvez utiliser votre système téléphonique sans fil Pour connaître le fonctionnement du système avec un ou plusieurs combinés veuillez consulter le guide d utilisateur original ...

Page 60: ...iés ou de marque Motorola vendus pour l usage avec les Produits ci après nommés Accessoires ainsi que les logiciels Motorola contenus sur les cédéroms ou tout autre support matériel vendus pour l usage avec les Produits ci après nommés Logiciels sont exempts de défauts de fabrication ou de main d œuvre dans des conditions d utilisation normales et pour la les période s mentionnée s ci dessous Cett...

Page 61: ...es décoratives boîtiers couvertures PhoneWrapMC et étuis Garantie limitée à vie pour la durée d appartenance au premier acheteur du Produit Écouteur monaural Les écouteurs et les écouteurs avec micro rail transmettant des sons monophoniques par connexion filaire Garantie limitée à vie pour la durée d appartenance au premier acheteur du Produit Accessoires pour radios bidirectionnelles personnelles...

Page 62: ...és ou dommages résultant de l utilisation de produits d accessoires de logiciels ou de tout autre périphérique non certifiés ou de marque autre que Motorola ne sont pas couverts par la garantie Réparations ou modifications non autorisées Les défectuosités ou dommages résultant de la réparation de l essai de l ajustement de l installation de l entretien de l altération ou de la modification de quel...

Page 63: ...e Motorola Motorola réparera remplacera ou remboursera à sa discrétion et sans frais le prix d achat de tout Produit Accessoire ou Logiciel non conforme à la présente garantie Des Produits Accessoires ou pièces remis à neuf reconstruits ou de seconde main fonctionnellement équivalents peuvent être utilisés Aucun logiciel données ou application ajouté à votre Produit Accessoire ou Logiciel incluant...

Page 64: ...ARTICULIER SE LIMITENT À LA DURÉE DE LA PRÉSENTE GARANTIE LIMITÉE SANS QUOI LES RÉPARATIONS REMPLACEMENTS OU REMBOURSEMENT PRÉVUS DANS CETTE GARANTIE LIMITÉE CONSTITUENT LE RECOURS EXCLUSIF DU CONSOMMATEUR ET SONT OFFERTS AU LIEU ET PLACE DE TOUTE AUTRE GARANTIE IMPLICITE OU EXPRESSE MOTOROLA NE PEUT EN AUCUN CAS ÊTRE TENUE RESPONSABLE QUE CE SOIT UNE RESPONSABILITÉ CONTRACTUELLE OU DÉLICTUELLE Y ...

Page 65: ... est possible que certaines limitations ou exclusions présentées ci dessus ne s appliquent pas à vous Cette garantie vous confère des droits légaux spécifiques il est possible que vous ayez d autres droits pouvant varier d une juridiction à une autre Les lois des États Unis et d autres pays confèrent à Motorola certains droits d exclusivité sur les logiciels protégés par droit d auteur dont des dr...

Page 66: ......

Page 67: ......

Page 68: ...6864110W31 A motorola com ...

Reviews: