1-4 Getting Started
Connecting to AC Power
The computer operates on either external AC power or internal battery power. We
recommend that you use AC power when you start up the com puter for the first time.
CAUTION:
Use only the AC adapter included with your computer. Use of any other AC adapters may
damage the computer.
NOTE:
Power Supply Cord:
For US territory:
Detachable, minimum 1.8m long. Listed, rated minimum 125V, 2.5A, having
a 3/18 AWG, flexible cord. One end terminates with a molded-on, attachments plug with a 10A,
125V (NEMA 5–15) configuration; other end terminates with a molded-on appliance coupler.
For UK territory:
Detachable, minimum 1.8m long. Listed, rated minimum 250V, 2.5A, having
a 3/0.75mm
2
, flexible cord. One end terminates with a molded-on, attachments plug with a 3A,
250V (BS1363), and 3 A fuse configuration; other end terminates with a molded-on appliance
coupler.
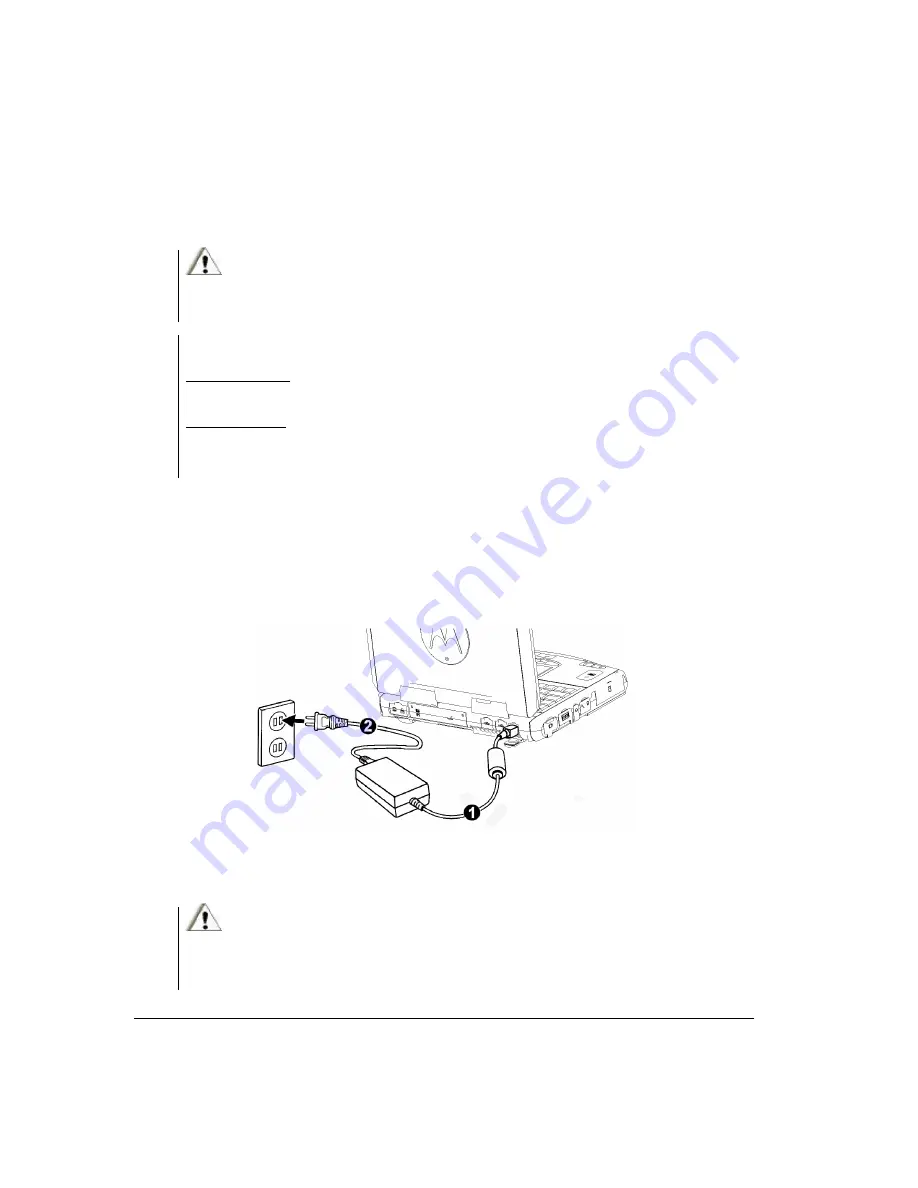
1. Make sure the computer is turned off.
2. Plug the DC cord of the AC adapter to the power connector on the rear side of the
computer (
Œ
).
3. Plug the female end of the AC power cord to the AC adapter and the male end to an
electrical outlet (
•
).
4. When the AC adapter is connected, the indicator on the AC adapter lights up,
indicating that power is being supplied from the electrical outlet to the AC adapter
and onto your computer. Now, you are ready to turn on the computer.
CAUTION:
1. When you disconnect the AC adapter, disconnect from the electrical outlet first and then
from the computer. A reverse procedure may damage the AC adapter or the computer.
2. When unplugging the connector, always hold the plug head. Never pull on the cord.
Summary of Contents for ML910
Page 2: ......
Page 28: ...xxvi This page intentionally left blank ...
Page 112: ...BIOS Setup Utility MLUA 5 17 This page intentionally left blank ...
Page 126: ...7 8 Caring for the Computer This page intentionally left blank ...
Page 148: ...8 22 Troubleshooting This page intentionally left blank ...
Page 153: ...Acronyms 10 3 This page intentionally left blank ...
Page 157: ...A 4 Specifications This page intentionally left blank ...
Page 161: ...B 4 Fingerprint Recognition This page intentionally left blank ...
Page 171: ...C 10 Self Install Internal Wireless Modems l Fix the M logo with a screw ...
Page 177: ...RoHS WEEE D 1 APPENDIX APPENDIX APPENDIX D RoHS WEEE ...
Page 178: ...D 2 RoHS WEEE ...
Page 179: ...RoHS WEEE D 3 ...
Page 180: ...D 4 RoHS WEEE ...
Page 181: ...RoHS WEEE D 5 ...
Page 182: ...D 6 RoHS WEEE ...


