Motorola Cellular Gateway NC800 User Guide Version 2.0
Page 18 of 110
Connecting the Motorola Cellular Gateway NC800 to your network
The Motorola Cellular Gateway NC800 has
three network interfaces,
namely the
WAN
,
LAN
and
WLAN
interfaces. This section describes how to connect your network devices to the Motorola Cellular Gateway
NC800 using these interfaces.
Connecting the Motorola Cellular Gateway NC800 to the CDMA Network
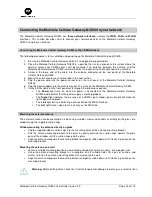
The following procedure is for assembling and powering up the Motorola Cellular Gateway NC800:
1. Be sure the Motorola Cellular Gateway NC800 is unplugged (not powered on).
2. Place the Motorola Cellular Gateway NC800 in a position that is close enough to the surface where the
external antenna for CDMA access will be mounted. The distance between the antenna and the
Motorola Cellular Gateway NC800 is determined by the length of the cable attached to the antenna.
3. Screw in the loose end of the cable into the antenna connector on the rear panel of the Motorola
Cellular Gateway NC800.
4. Mount the external antennas as described in the next section.
5. Plug the power cord into the power connector on the rear panel of the Motorola Cellular Gateway
NC800.
6. Plug the power adapter into the electrical outlet. This turns on the Motorola Cellular Gateway NC800.
7. Verify that the lights on the front panel cycle through the following sequence:
•
The
Power
light turns on when AC power is connected to the Motorola Cellular Gateway
NC800 and indicates that the power supply is working properly.
•
The
Signal
light indicates the presence of a CDMA signal. Good signal strength will make the
light appear solid green.
•
The
Link
light turns on indicating a connection on the WAN interface.
•
The
Act
light flashes when there is activity on the WAN link.
Mounting the external antenna
The external antenna can be mounted on a wall using suitable screws and anchors or directly on the glass of a
window using the supplied suction caps.
Window mounting the antenna directly on glass
•
Clip the supplied rubber suction caps into the mounting holes of the antenna mounting bracket.
•
Affix the antenna mounting bracket to the glass by gently pressing the suction cups against the glass
pane of the window until the suction cups grip the glass.
•
Align the antenna alongside the mounting bracket and gently slide it down until it locks in position on the
mounting bracket.
Mounting the antenna on a wall
•
Locate a suitable mounting position on a wall made of wood, concrete, masonry, or a wooden stud.
•
Using the antenna mounting bracket as a template, drill 2 suitable holes for a pair of anchors and
screws to fasten the antenna mounting bracket securely onto the wall.
•
Align the antenna alongside the mounting bracket and gently slide it down until it locks in position on the
mounting bracket.
Warning:
Before drilling holes, check the structure for potential damage to water, gas, or electric lines.


