IP Setup 7-3
•
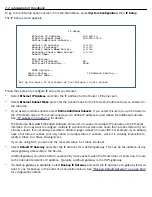
Select
Primary Domain Name Server
and enter the IP address for a domain name ser ver. The domain
name ser ver matches the alphabetic addresses favored by people (for example, robin.hood.com) to the IP
addresses actually used by IP gateways (for example, 163.7.8.202).
•
If a secondar y DNS ser ver is available, select
Secondary Domain Name Server
and enter its IP address.
The secondar y DNS ser ver is used by the Router when the primar y DNS ser ver is inaccessible. Entering a
secondar y DNS is useful but not necessar y.
•
Select
Domain Name
and enter your network’s domain name (for example, motorola.com). Motorola
strongly recommends that you enter a domain name.
•
Routing Information Protocol (RIP) is needed if there are IP routers on other segments of your Ethernet
network that the Router needs to recognize. If this is the case select
RIP Options
and press Return. This
will take you to the Ethernet LAN RIP options screen, where you can configure several parameters,
including RIP v2 MD5 Authentication. See
“RIP Options” on page 7-9
.
•
With Receive RIP set to v1, the Ethernet por t will accept routing information provided by RIP packets
from other routers that use the same subnet mask. Set to v2, the router will accept routing informa-
tion provided by RIP packets from other routers that use different subnet masks. Set to Both, the
router will accept information from either RIP v1 or v2 routers.
•
With Transmit RIP v1 selected, the router will generate RIP packets only to other RIP v1 routers. With
Transmit RIP v2 (broadcast) selected, the router will generate RIP packets to all other hosts on the net-
work. With Transmit RIP v2 (multicast) selected, the router will generate RIP packets only to other rout-
ers capable of recognizing RIP v2 packets.
•
If you want to enable Multicast For warding, select
Multicast Forwarding
and from the pop-up menu,
choose the type that you want to enable. See
“Multicast Forwarding” on page 7-32
for detailed
configuration.
To configure multiple IGMP options, go to the
IGMP Setup
menu. See
“IGMP (Internet Group Management
Protocol)” on page 3-52
.
•
If you want to create Vir tual Redundant Routers, select
VRRP Options
and press Return. You will be taken
to the Ethernet LAN VRRP Options screens. See
“Virtual Router Redundancy (VRRP)” on page 7-34
.
•
Select
Static Routes
to manually configure IP routes. See the section
“Static routes” on page 7-6
below.
•
If you select
IP Address Serving
you will be taken to the IP Address Ser ving screen (see
“IP Address
Serving” on page 7-17
). Since no two hosts can use the same IP address at the same time, make sure
that the addresses distributed by the Router and those that are manually configured are not the same.
Each method of distribution must have its own exclusive range of addresses to draw from.
•
If you select
Additional LANs
you will be taken to the Additional LAN Configuration screen (see
“Additional
LANs” on page 7-38
). Here you can create up to six additional local area networks that can be associated
with any IP routed inter face.
IP subnets
The IP Subnets screen allows you to configure up to eight Ethernet IP subnets on unlimited-user models, one
“primar y” subnet and up to seven secondar y subnets, by entering IP address/subnet mask pairs:
Summary of Contents for Netopia Embedded Software
Page 10: ...x Administrator s Handbook ...
Page 16: ...1 6 Administrator s Handbook ...
Page 44: ...2 28 Administrator s Handbook ...
Page 108: ...3 64 Administrator s Handbook ...
Page 176: ...5 34 Administrator s Handbook ...
Page 202: ...6 26 Administrator s Handbook ...
Page 244: ...7 42 Administrator s Handbook ...
Page 340: ...Index 6 ...


