background image

48

Chapter 6

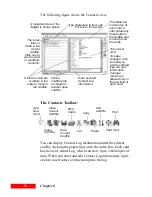
Shortcut menus

If you right-click certain TrueSync Desktop objects, such as a 
Contact card, Calendar entry, memo, or EarthTime city, a 
context-sensitive shortcut menu appears. These menus provide 
basic editing commands and other commands specific to that 
object or view.

Customizing the Toolbar

To customize the buttons on the Toolbar in the Calendar or 
Memos view, choose Tools | Preferences | Toolbar; in the 
Contacts view, choose Tools | Toolbar; or double-click any 
open space on the Toolbar. The following dialog box appears: 

‹

To return the Toolbar to its original view, click the Reset 
button.

‹

Any changes affect only the Toolbar for the current view. 
To customize a different Toolbar, select the desired view 
and make your changes there.

Setting preferences

You can customize TrueSync Desktop by setting its 
preferences. Choose Tools | General Preferences in the 
EarthTime and Contacts views or Tools | Preferences | General 

To add a button
1

Click the button you 
want to add in the 
Available buttons 
list.

2

Click the Toolbar 
button you want to 
add it before.

3

Click Add.

To remove a button, 
click it in the Toolbar 
buttons list, then click 
the Remove button.

To move a button, click 
its name in the Toolbar 
button list, then click 
Move Up to move the 
button to the left or 
Move Down to move it 
to the right.

Summary of Contents for Organizer

Page 1: ...User s Guide StarTAC clipOn Organizer Synchronization and TrueSync Desktop www starfish com www mot com ...

Page 2: ... device U S patent no 4 369 516 The furnishing of the Software Product any accompanying product or any related documentation or materials does not give you any license to any patents Motorola and StarTAC are trademarks of Motorola Inc Any other trademarks are the property of their respective owners Important This device complies with part 15 of the FCC rules Operation is subject to the following t...

Page 3: ... Wizard 4 Using the clipOn Home screen and views 7 Synchronizing with the clipOn 8 Chapter 2 Using the StarTAC clipOn Organizer 9 Calling with the StarTAC clipOn 9 Using Contacts 10 Using the Calendar 15 Using To Do Lists 18 Using Memos 21 Using Time Zones 23 Using Preferences 25 Chapter 3 Product care 27 Removing the clipOn from the phone 27 Installing new batteries 27 Resetting the clipOn 28 Cha...

Page 4: ...7 Changing the TrueSync setup 40 Changing your preferences 44 Using the TrueSync Log 45 Setting up multiple users 45 Staying up to date with TrueSync Central 46 Chapter 6 TrueSync Desktop 47 Using TrueSync Desktop s features 47 Customizing the Toolbar 48 Setting preferences 48 Chapter 7 TrueSync Desktop Calendar view 51 Using the Calendar view 51 Viewing your Calendar 52 The Weekly and Monthly vie...

Page 5: ...os view 61 Memo files folders and memos 62 Creating memos 63 Changing margins and tabs 63 Chapter 10 TrueSync Desktop EarthTime view 65 The EarthTime map 65 Selecting cities 66 Changing the Local Time 67 Changing the Home Clock 67 Chapter 11 TrueSync Desktop Printing 69 Using the Printing options 69 Calendar printing 69 Printing in Contacts view 70 Printing in the Memos view 72 Glossary 73 Index 7...

Page 6: ...iv Contents ...

Page 7: ...n the clipOn and press the button The clipOn promptly dials the number for you Customize the clipOn to work the way you do For example select right handed or left handed operation with one easy choice on the Preferences screen Add contacts names tasks and events on your clipOn and then synchronize to a personal information manager PIM such as TrueSync Desktop TrueSync Desktop is an easy to use per...

Page 8: ... protective plastic cover by turning over the clipOn and sliding the cover toward the spring clip Lift and detach the cover Turn off the StarTAC phone before attaching the clipOn 1 Insert the clipOn s spring clip into the slot on the back of the phone that is used to attach the phone s auxiliary battery 2 Slide the clipOn toward the opposite end of the phone 3 Insert the connector on the bottom of...

Page 9: ...At the Home screen turn off the clipOn by pressing and holding for one second View Press to see a menu of current options such as Daily Weekly and Monthly views in the Calendar Select Press to choose an option Edit Press to add or edit contacts tasks or events Call With the phone attached and turned on press select from the list of the last 10 numbers called and press to dial Or highlight a valid ...

Page 10: ... contact or task These lists will be updated as you enter new information The profile also determines which fields will be used for contact information Back Up Use and to scroll or move the highlight through a list or screen Next Down When adding or editing text use or to move from one letter or number to another Key Name Description Press to continue The status bar displays labeled icons that tel...

Page 11: ...rror select Erase If you want to enter numbers press To return to letters press again NOTE You can change your selected user profile later To change it open the TrueSync window see Starting TrueSync on page 37 for details choose Client StarTAC clipOn options click the QuickLists tab then click Reset and choose a new profile Press if you want to change your profile then press to continue When your ...

Page 12: ... correct date use and to select the month then press Then use and to select the correct day and press to enter your choice Follow this same procedure to enter the year After you have entered the year select the time then press when you have finished Note that the date and time on the clipOn are updated from your PC when you synchronize When your last name is spelled correctly press Press to contin...

Page 13: ...st of your calls to a different area code For information about placing calls with the clipOn see Calling with the StarTAC clipOn on page 9 Now press and you are ready to start using the StarTAC clipOn Using the clipOn Home screen and views When you have completed the Setup Wizard you will see the Home screen Using the Home screen Press or hold until the Home screen appears From the Home screen us...

Page 14: ...esktop on page 47 Getting connected for synchronization To set up your clipOn for TrueSync synchronization 1 Plug the 9 pin end of the clipOn s connector cable into your computer s serial port and the other end into the side of your clipOn 2 Turn on the clipOn before starting communications between the clipOn and the computer For details about system requirements on your computer please read Requi...

Page 15: ... on page 2 1 Turn on the StarTAC phone 2 To dial either highlight a valid telephone number in the Contacts Calendar or To Do views and press the clipOn s key once press the clipOn s key in any view to see a list of the ten most recently dialed telephone numbers To call one of those numbers highlight it and then press NOTE Telephone numbers that begin with 011 or are dialed as international calls A...

Page 16: ...he Contacts icon and press Changing views You will see either a category name or All Cards at the top right of the screen All Cards means that you are viewing all the categories in your clipOn If you have only one cardfile category or no categories All Cards will not appear Now you can Scroll through the alphabetical tabs with or Go to a specific lettered tab by pressing and then using or You can ...

Page 17: ... field if it is a number highlight the number and press If it is a text field use or to scroll Sorting cards You can sort cards in cardfiles alphabetically by last name first name or company To sort cards 1 In the Contacts module press The menu appears Highlight Sort Order then press 2 Use or to move the highlight to the field by which you want to sort Press to choose the sort order Changing the t...

Page 18: ... and select Select As Default This option appears only if there are multiple entries The selected item now appears after the name in the tabbed cardfiles view Editing your Contacts You can create edit and delete Contacts by selecting Edit mode and using the clipOn s Wizards In addition you can set up a meeting or a telephone call from within a contact in Edit mode To create a new Contact 1 Press i...

Page 19: ...ew Contact If there are no categories or only one category this Wizard screen will not be displayed 7 Confirm the contact name by pressing If you want to make a change press 8 Depending on your selections you may be asked to enter company information for the new Contact Choose how to specify the company then press If you choose Company in Contacts use or to scroll through the alphabetical tabs of ...

Page 20: ...e to move the highlight to Remove and press You will be asked to confirm the deletion of this contact Highlight Yes and press to complete the removal or highlight No and press to keep the Contact To set up a meeting or telephone call with a Contact 1 Highlight the Contact and then press 2 Choose Meet or Schedule Call from the menu and then press 3 If you are scheduling a call highlight High Medium...

Page 21: ...ange press Calls are listed in To Do lists and Events in the Calendar Using the Calendar Using the Calendar you can view modify delete and create appointments birthdays holidays and other events To enter the Calendar module from the Home screen highlight the Calendar icon and press Changing views Daily Weekly Monthly To move from the Daily to the Weekly to the Monthly areas of your Calendar press ...

Page 22: ... Press in the Calendar module or in the Home screen then choose New Event 2 Choose the new event type by highlighting it using or and then press 3 The next Wizard screen will vary based on the profile you chose during the StarTAC clipOn Setup It will show a pre set QuickList of event subjects Use or to choose from the list and then press To create an event that is not listed in the QuickList selec...

Page 23: ...e you will also need to select the start and end times 8 To confirm the date press 9 If you are creating a recurring event such as a weekly meeting choose the recurrence pattern The future occurrences of the event are automatically added to the Calendar based on the recurrence pattern you select Use or to scroll through the list and highlight a recurrence pattern Press to enter your choice If you ...

Page 24: ...out an event participant 1 Highlight the event in your Calendar 2 Press 3 Select Find in Contacts if the participant no longer exists in Contacts this option will not be displayed Using To Do Lists Using the To Do lists you can view tasks calls and deliverables You can also create reschedule delete and check off To Do items In addition you can make calls using phone numbers in To Do lists To view ...

Page 25: ...s 2 Press to check off the item or press again to remove the completion check 3 If the item that you check off was overdue it will be removed from the Overdue Tasks List Creating To Do items You can create To Do items using the clipOn including tasks calls and deliverables To create a To Do item 1 Press highlight New To Do and then press 2 Highlight the type of To Do from the menu and press 3 If y...

Page 26: ...o to the card for the participant whom you want to add Press to enter your choice to choose a new person or company as the To Do participant specify the name and category as described in steps 4 6 on page 13 6 To confirm the participant press 7 Select a priority for the To Do and then press 8 Select a due date if desired If you chose Specific Date choose the month date and year Use or to scroll th...

Page 27: ...To Do lists 2 Press 3 Select Find in Contacts if the participant no longer exists in Contacts this option will not be displayed 4 The card for the Contact included in that Call appears Using Memos Use the clipOn to read or create Memos including short single line memos called QuickNotes that you can use as reminders You can add to a Memo at any time Using the clipOn you can append to your Memos bu...

Page 28: ...ters You can also choose to Erase a letter or number and to add a Space or a period Press when you are finished 4 Select the Filing Category from the list using or to move from category to category When the desired category is highlighted press 5 The Confirmation screen appears Press to accept your selection or press to revise it 6 If you have entered too many letters to view the truncated Memo wi...

Page 29: ...ts Understanding time zones and travel When you travel to a different time zone change the time zone of the currently selected clock and your calendar events will automatically change to reflect the new time zone For example an appointment scheduled for 2 p m in New York changes to 11 a m when you select Los Angeles Changing cities and time zones You can change both the Home and World clocks to sh...

Page 30: ...ency that you desire Then press If you select Daily an alarm will sound every day at the time you specify in Alarm Time If you select Once an alarm will sound only at the next occurrence of the specified time To specify the time the alarm will sound highlight Alarm Time and then press Use or to change the hours minutes and or PM or AM entries Press to move from field to field Highlight Alarm Sound...

Page 31: ...ntly adapts itself to either right handed or left handed use To change your preferences 1 From the Home screen highlight the Preferences icon then press In the Preferences screen use or to move from one field to the next 2 Highlight the field that you want to change then press Use or to scroll through the list Highlight your choice then press To change your password 1 Press in the Preferences modu...

Page 32: ...ou can choose any order or combination of keys that you desire When you have pressed five keys you will return to the Set Password Screen When you set a password the Password Lock option changes to Always To view the device information 1 Press in the Preferences module 2 Highlight Device Information and then press 3 View details about your clipOn NOTE When the clipOn is password protected you cann...

Page 33: ...e the old batteries and install new batteries 1 If the clipOn is attached to the phone detach it 2 Turn the clipOn over 3 If the clipOn s plastic cover is attached remove it by sliding the cover toward the spring clip When the opposite end slides free swing up the cover 4 Slide the battery compartment door open 5 Remove the old batteries 6 Wait at least 5 seconds before inserting the new batteries...

Page 34: ...to confirm each choice Resetting the clipOn If the clipOn does not respond after you change batteries or does not function properly you may need to reset it To do so insert the end of a paperclip into the reset button hole next to the battery compartment door Press gently When the clipOn resets you will hear a confirmation tone NOTE When you synchronize the clipOn time and date are updated to the ...

Page 35: ...e clipOn connected When the clipOn is connected to your phone charge your StarTAC by plugging the charger cable into the accessory connector on the bottom of the clipOn the cable s release tab should face up toward the phone s keypad Screen care If the screen of the clipOn becomes smudged or dusty gently wipe it clean with a soft dry cloth NOTE The clipOn will not function without batteries even i...

Page 36: ...30 Chapter 3 ...

Page 37: ... synchronize your information so you keep it current and accessible anywhere TrueSync supports the most popular desktop applications devices and services referred to as accessors Starfish continually provides free software updates such as accessors for the most recent versions of popular desktop applications To check the Starfish Web site for software updates click the Windows Start button Choose ...

Page 38: ... An MPC 2 Compatible CD ROM drive A pointing device compatible with Windows 95 Windows 98 or Windows NT 4 0 A sound card and speakers required to play sounds WAV files for appointment alarms A printer supported by Windows 95 Windows 98 or Windows NT 4 0 required to print from TrueSync Desktop Microsoft Internet Explorer 3 01 or greater or Netscape Navigator 3 0 or greater required to view TrueSync...

Page 39: ...rowse button 3 Browse to locate the program SETUP EXE on the CD ROM 4 To begin the installation double click SETUP EXE The Readme file Any last minute changes or additions to TrueSync Desktop or TrueSync Plus are documented in a Readme file View the TrueSync Desktop Readme file by clicking the Windows Start button and choosing Programs TrueSync Desktop Readme To see the TrueSync Plus Readme file c...

Page 40: ...ications 4 Click the Add Remove button 5 Choose the components you want to uninstall 6 Back up any data you want to keep and then delete the TrueSync folder usually Program Files Starfish TrueSync 7 Restart Windows Starting TrueSync Desktop After you complete the installation TrueSync Desktop starts automatically The first time TrueSync Desktop starts the Setup Wizard prompts you for information a...

Page 41: ...om the TrueSync Desktop menu or click Start in the Windows Taskbar and choose Programs TrueSync Plus Troubleshooter The Troubleshooter is an HTML document and starts in your Internet browser Using online help Both TrueSync Desktop and TrueSync Plus include detailed online help systems To open Help press F1 or choose Help Topics from within either program For more information For technical support ...

Page 42: ...36 Chapter 4 ...

Page 43: ...ization Starting TrueSync TrueSync Desktop users Open TrueSync Desktop and then click the TrueSync icon on the Deskpad or select View TrueSync TrueSync Plus users Right click the TrueSync icon in the Windows taskbar and click Configure Setting up TrueSync The first time you start TrueSync a Setup Wizard assists you in specifying the clients you will synchronize a client is any device service or de...

Page 44: ...a service you may be asked whether you want to synchronize with that service 7 Depending on the service you may need to enter your user ID for the service password and connection method 8 You are prompted to connect your device to your computer After the device is connected and turned on if required click Next TrueSync reads the data from the clients you have chosen No data transfers or changes ta...

Page 45: ...hange your setup at any time as described in Changing the TrueSync setup on page 40 Click the plus signs to expand the TrueSync Log entries Select an error message and press F1 for help Click the TrueSync icon to synchronize The TrueSync Log shows you the results of your synchronizations Select View TrueSync Central to display TrueSync Central which provides free TrueSync services and synchronizat...

Page 46: ...n See Using the TrueSync Log on page 45 Changing the TrueSync setup At any time after you have completed the TrueSync Setup Wizard you can add or remove clients change the synchronization options for each client select the data types to synchronize data types are Calendar Contacts Memos and To Do items change the files folders or categories to synchronize specify which Contacts fields to synchroni...

Page 47: ...Page Use this page to specify how the client s data will be synchronized For details about the synchronization options click the Help button on the Options Page NOTE If you do not see the client you want to add check for availability by clicking the Windows Start button and choosing either Programs TrueSync Desktop Product Updates or Programs TrueSync Plus Product Updates After installing a new ac...

Page 48: ...mit the range of Calendar event dates that will be synchronized to a device choose Data Calendar and click the Options tab Limiting the range of dates speeds up synchronization and saves space on your device Selecting files folders or categories Select a data type by choosing Data datatype To select items to synchronize between clients 1 Find the row for the item that you want to synchronize 2 Cli...

Page 49: ...ent s field For example you might map a field called Home Phone on TrueSync Desktop with a field called Personal Phone on your device To map your Contacts fields 1 Select Data Contacts and click the Fields tab 2 Highlight the files or categories containing the fields that you want to map If you align not mapped in one column with an item in another column it means that item will not be synchronize...

Page 50: ...es for any client choose Client clientname options or click on the client s icon in the TrueSync window This displays the client s Options Page described in Changing synchronization options on page 41 Depending on the client there may be additional client preferences click the additional tab s and change the options as desired For assistance click the Help button on each page Using QuickLists Depe...

Page 51: ...one synchronization configuration or if more than one person uses the same computer to synchronize set up an additional user to define each configuration To create an additional user 1 Select Synchronize Options and then click the Users tab 2 Click the New button and use the Setup Wizard to specify the synchronization preferences for the new user 3 Select client preferences for the new user by cho...

Page 52: ...d To register for a TrueSync Central account 1 Go to TrueSync Central and register your product electronically 2 Choose a user name and password for secure access to TrueSync Central and the Internet Synchronization service TrueSync com 3 A setup wizard will help you add the TrueSync com accessor to your synchronization setup To use Internet Synchronization after registering 1 Go to TrueSync Centr...

Page 53: ... Desktop view The Status bar displays information about the current view Choose View Status Bar Highlight any command on the menu bar and press F1 for help To change how the Deskpad appears and set other display options choose Tools Preferences General To delete a card memo or calendar activity drag it to the Delete icon Click buttons on the Toolbar to perform tasks quickly without using the menus...

Page 54: ...ar to its original view click the Reset button Any changes affect only the Toolbar for the current view To customize a different Toolbar select the desired view and make your changes there Setting preferences You can customize TrueSync Desktop by setting its preferences Choose Tools General Preferences in the EarthTime and Contacts views or Tools Preferences General To add a button 1 Click the but...

Page 55: ...view you want for the default or check the box to return to the last view used before exiting Choose where you want the Deskpad icons Change the display fonts for the Contacts and Memos views Click Password at Start Up and set a Start up password so that only someone with the password can open TrueSync Desktop ...

Page 56: ...50 Chapter 6 ...

Page 57: ...w The Calendar view is a powerful tool for helping you organize your appointments and other events Use the Calendar to schedule events set reminders and maintain a list of To Do items and phone calls To change to the Calendar view click the Calendar icon on the Deskpad press F6 or choose View Calendar ...

Page 58: ...at the top of the Events pane Change the Local Time with the Time Zone drop down list Click a tab to select the view of the Calendar you want The Calls pane shows the calls you need to make The To Do pane shows the tasks you need to accomplish including any you did not complete yesterday A magnified view of the Toolbar is shown below Recurring Event Special Day Event Save Calendar Find Schedule An...

Page 59: ...alendar The Weekly and Monthly views The Weekly and Monthly views display scheduled activities in standard calendar formats Change to a view by clicking its view tab Click a date in the mini calendar to go directly to that day Change to the previous or next month by clicking the left and right arrows Change to the previous or next week or month using the left and right arrows Double click a day in...

Page 60: ... by clicking its View tab Scheduling events Enter your appointments and scheduled events on the Events list You can have a maximum of 288 events scheduled Click a day to go to that day in the Daily view Drag the mouse over a range of dates to schedule multi day events Change to the previous or next year using the left and right arrows ...

Page 61: ...er each appointment for a trip to New York select the USA Eastern time zone When you arrive in New York change the Local Time to New York time Your events adjust to display in New York time whether those events are in New York or elsewhere Thus an event you need to attend in New York at 10 a m will appear at 10 a m on your Double click an event or right click an event and choose Edit to edit its d...

Page 62: ...typing When you begin typing TrueSync Desktop places an icon in front of the text Click the left column to check off items when completed Click any blank line and begin typing to create a new item Click the right column to add or change the details for an item Right click an item to modify it NOTE You can open calendars from previous versions of TrueSync Desktop and Sidekick in TrueSync Desktop 2 ...

Page 63: ...ts Once you have updated your cardfiles you can use the TrueSync window to transfer them to your device To open the Contacts view click its Deskpad icon choose View Contacts or press F5 Cardfile basics In the left pane of the Contacts view is the card list your visual index to the cards in the active cardfile the cardfile whose tab is selected In the right pane is the current card in the cardfile ...

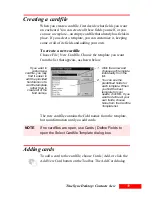
Page 64: ...riage returns are allowed only in the last field of each card The index lines of cards in the current cardfile Click one to see the card or modify its contents The index line is at the top of each card It can contain any three fields in the cardfile and is used to sort the cards Type characters in the Look For box to find a card A magnified view of the Toolbar is shown below Click the scroll bar o...

Page 65: ... from the template but no information until you add cards Adding cards To add a card to the cardfile choose Cards Add or click the Add New Card button on the Toolbar The Add Card dialog 1 Click the arrow and choose each template individually from the list 2 You can see the predefined fields for each template When you find the best template for your needs click OK If you want to define all your own...

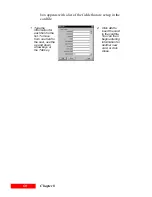
Page 66: ...in the cardfile 1 Type the information for each field in the list To move from one field to the next use the up and down arrow keys or the Tab key 2 Click Add to insert the card in the cardfile You can then begin entering information for another new card or click Close ...

Page 67: ... Memos view The Memos view lets you create memos organize them in folders and save them as files You can apply formatting to your memos and you can even create memos to merge with names from a cardfile To open the Memos view click the Memos Deskpad icon press F7 or choose View Memos ...

Page 68: ...f the Toolbar is shown below The date the memo was created appears here Click to change between Index View and full screen Memo View Click the tab of the folder you want The Memos list displays the subject lines of all memos in the current folder Click a subject to display that memo The currently selected memo appears here Use the Ruler to set margins and tabs To make changes or additions type dir...

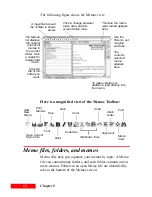
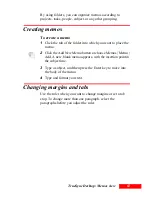
Page 69: ... place the memo 2 Click the Add New Memo button or choose Memos Memo Add A new blank memo appears with the insertion point in the subject line 3 Type a subject and then press the Enter key to move into the body of the memo 4 Type and format your text Changing margins and tabs Use the ruler when you want to change margins or set a tab stop To change more than one paragraph select the paragraphs bef...

Page 70: ...Tab stop To add a tab stop click on the ruler where you want it To move a tab stop drag it along the ruler To delete a tab stop click it and drag downward away from the ruler Drag to move both left margin markers together Drag to change the right margin If you create a new paragraph by pressing Enter at the end of an existing paragraph the new paragraph retains the margins and tabs of the existing...

Page 71: ...nfigure it to show both your home location and the local time as you travel To open EarthTime click the EarthTime icon in the Deskpad or choose View EarthTime The Deskpad icon shows the current time Depending on the device your EarthTime settings such as the Home clock Local time and the other world clock settings may be transferred to your device when you synchronize The EarthTime map When you cl...

Page 72: ...cities Double click on the map to center it at that location NOTE Complete your first synchronization before changing the displayed EarthTime cities If you change an EarthTime city before that initial synchronization your device s city selections may overwrite your EarthTime city choices EarthTime has a database of over 540 cities from which you can select world city clocks to display 1 Click the ...

Page 73: ...e local city 2 Click the panel containing the local city and click Set as Local Time from the shortcut menu An icon appears to indicate the Local Time city Changing the Home Clock Your Home Clock indicates the time where you live It should be set automatically when you first start TrueSync Desktop To change your Home Clock 1 Set one of the eight city panels to display your home city 2 Click the pa...

Page 74: ...68 Chapter 10 ...

Page 75: ...s to a variety of formats using either preprinted or customized forms Preview your output before you print it to save time and materials Calendar printing Select from a variety of formats for printing calendar activities including TrueSync Desktop s daily weekly monthly and yearly views You can also print to paper forms for several popular organizers ...

Page 76: ... or several cards in the Contacts view To print one or more cards choose File Print Cards or click the Print button on the Contacts Toolbar You can specify how many cards to print per page Click to display the options panel Click to change the fonts used in the calendar Click to change your Windows print settings Click to preview the printed pages Click to change margins Select the dates to print ...

Page 77: ...nge it within the print area available The procedures for using all three dialog boxes are the same but involve different templates and content arrangements Once you have specified the information in the four steps click Preview to see the result Click Print when you are ready to print Click to preview the results of your choices You can see the overall layout here as you work In Step 4 you specif...

Page 78: ... Print from the Memos view or click the Print button on the Memos Toolbar The Print Memos dialog box appears You can print a single memo all of the memos filed in specific folders selected memos marked memos or after a search operation memos listed in the Found window ...

Page 79: ... s accessor installed on your PC D data type In this guide any of the information types you can synchronize including Calendar Contacts Memos and To Do items device A handheld information manager such as a Palm Organizer REX PRO and StarTAC clipOn Organizer M map The process of matching one client s contact fields or categories with another client s fields or categories for synchronization For exa...

Page 80: ...o or more TrueSync clients If you make changes in one place and then synchronize those changes are reflected in all your other clients T TrueSync The technology that provides simultaneous one step synchronization among popular devices applications and services TrueSync Central The Internet site that you access from the TrueSync window where you can register your product get the latest TrueSync acc...

Page 81: ... TrueSync Plus The TrueSync interface used for setting up and starting synchronizations among client applications devices and services without opening TrueSync Desktop TrueSync Service A free web based information manager http www truesync com that also provides synchronization services over the Internet with any TrueSync clients Also called TrueSync Server TrueSync window The window that displays...

Page 82: ...76 Glossary ...

Page 83: ...e 52 56 views 53 views clipOn 15 call memory 9 calls ending 10 making 9 Calls pane Calendar 52 56 canceling events 17 card list Contacts 57 card views 10 cardfiles 57 creating 59 selecting 11 cards adding 59 changing Calendar dates 53 cities 23 client preferences 44 clipOn password 25 Contact cards 58 EarthTime clocks 67 EarthTime locations 66 fonts TrueSync Desktop 49 memo margins 63 print settin...

Page 84: ...4 dates changing 53 default directories 49 views 49 deleting Contacts clipOn 14 Delete icon 47 To Do items clipOn 21 Deskpad 47 device information clipOn 26 dialing numbers 9 directories default 49 displaying telephone numbers 11 Down key 4 E EarthTime resetting clocks 67 selecting cities 66 Edit key 3 editing 5 Calls 56 contacts 58 events 55 text clipOn 5 To Do items 56 e mail addresses 11 ending...

Page 85: ...ers 61 Local Time 23 67 changing 55 M mailing labels 71 making a call 9 map EarthTime 65 margins 63 meetings scheduling 14 51 Memos 61 creating memos 63 creating on clipOn 22 formatting memos 63 memo files 61 62 printing 72 removing on clipOn 21 synchronizing 42 viewing on clipOn 21 menu bar TrueSync Desktop 47 menus shortcut 48 mini calendar 53 Monthly view Calendar 53 clipOn 15 multi day events ...

Page 86: ...gistering products 33 reminder alarms 16 removing 21 27 clipOn from phone 27 Contacts 14 rescheduling events 17 To Do items 21 resetting clipOn 28 EarthTime clocks 67 re sorting cards 11 ruler memos 63 S scheduling calls 14 events 54 screen cleaning 29 Select key 3 selecting profiles 4 setting alarms 16 clock display 24 default directories 49 default views 49 margins 63 preferences 48 setting up c...

Page 87: ...h clipOn 9 icon 10 number display 11 templates Contacts 59 text entering on clipOn 5 margins 63 tabs 63 time display clipOn 24 time zones 23 65 changing 23 55 67 To Do items 18 21 checking off 19 creating 19 removing 21 rescheduling 21 synchronizing 42 To Do pane Calendar 52 56 Toolbars 47 Calendar view 52 changing buttons 48 Contacts view 58 customizing 48 removing buttons 48 TrueSync window 39 t...

Page 88: ...lendar 53 Contacts 58 customizing 48 EarthTime 65 Memos 62 printing Calendar 70 setting default 49 TrueSync Desktop 47 W Web site addresses 11 Weekly view Calendar 53 clipOn 15 Wizard clipOn Setup 4 TrueSync Desktop Setup 34 TrueSync Setup 37 World clock 23 world map 65 Y Yearly view Calendar 54 Z zones changing time 23 ...

Page 89: ...ftwareProduct in source code form remains a confidential trade secret of Starfish You agree not to modify or attempt to reverse engineer decompile or disassemble the Software Product except and only to the extent that such activity is expressly permitted by applicable law notwithstanding this limitation C Disclaimer of Warranties YOU EXPRESSLY AGREE THAT USE OF THE SOFTWARE PRODUCT IS AT YOUR SOLE...

Page 90: ...84 ...

Reviews: