background image

27

English

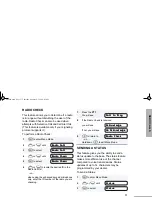
SCAN

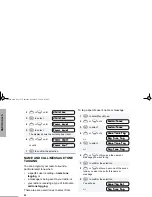
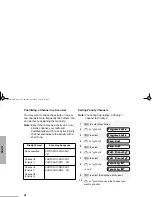
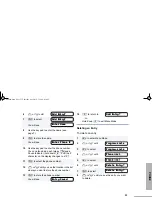
Adding or Deleting Channels in a Scan List

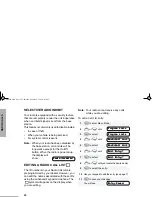
To add or delete channels in a scan list:

1

)


to enter Menu Mode.

2

y


or


z

 until

3

)


to select

4

y


or


z

 until

5

)


to select

6

y


or


z

 until


or until

7

)

 to confirm your selection.

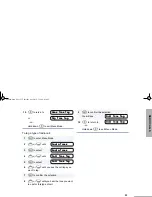
8

y


or


z

 until you see the channel you 

want to add or delete.

Note: You cannot delete the last remaining 

channel in a scan list.

9

)

 to confirm your selection.

P

P

P

Pr

r

r

ro

o

o

og

g

g

gr

r

r

ra

a

a

am

m

m


 L

L

L

Li

i

i

is

s

s

st

t

t

ts

s

s

s

P

P

P

Pr

r

r

ro

o

o

og

g

g

gr

r

r

ra

a

a

am

m

m


 L

L

L

Li

i

i

is

s

s

st

t

t

ts

s

s

s

S

S

S

Sc

c

c

ca

a

a

an

n

n


 L

L

L

Li

i

i

is

s

s

st

t

t

t

S

S

S

Sc

c

c

ca

a

a

an

n

n


 L

L

L

Li

i

i

is

s

s

st

t

t

t

A

A

A

Ad

d

d

dd

d

d


 E

E

E

En

n

n

nt

t

t

tr

r

r

ry

y

y

y?

?

?

?

D

D

D

De

e

e

el

l

l

le

e

e

et

t

t

te

e

e


 E

E

E

En

n

n

nt

t

t

tr

r

r

ry

y

y

y?

?

?

?

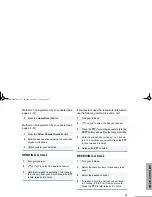
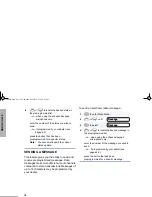
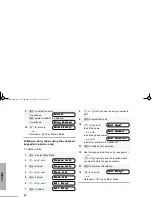
10 If you added a channel,

you will see 


or


If you deleted a channel,

you will see

)

 to confirm the deletion.

You will see

11

(


to return to


or to return to 


or

Hold down 

(


to exit Menu Mode.

E

E

E

En

n

n

nt

t

t

tr

r

r

ry

y

y


 S

S

S

Sa

a

a

av

v

v

ve

e

e

ed

d

d

d

D

D

D

De

e

e

el

l

l

le

e

e

et

t

t

te

e

e

e?

?

?

?

E

E

E

En

n

n

nt

t

t

tr

r

r

ry

y

y


 D

D

D

De

e

e

el

l

l

le

e

e

et

t

t

te

e

e

ed

d

d

d

A

A

A

Ad

d

d

dd

d

d


 E

E

E

En

n

n

nt

t

t

tr

r

r

ry

y

y

y?

?

?

?

D

D

D

De

e

e

el

l

l

le

e

e

et

t

t

te

e

e


 E

E

E

En

n

n

nt

t

t

tr

r

r

ry

y

y

y?

?

?

?

English.book  Page 27  Thursday, August 12, 1999  9:03 AM

Summary of Contents for pro7100

Page 1: ...PRO7100 Radio Móvil Rádio Móvel Mobile Radio Guía del usuario Manual do usuário User Guide contacto control Radios Profesionales Tan Dedicado Como Lo Es Usted PRO7100 ...

Page 2: ... 12 Sending a Call 13 Receiving a Call 13 Radio Calls 15 Making a Selective Call 15 Receiving a Selective Call 15 Sending a Call Alert Page 16 Receiving a Call Alert Page 16 Radio Check 17 Sending a Status 17 Sending a Message 18 Receiving a Message 19 Sending an Emergency Alert 19 Selective Radio Inhibit 20 Editing a Radio Call List 20 Repeater or Talkaround Mode 21 Setting the Power Level 21 Nam...

Page 3: ...1 Displaying the Time 42 Selecting the Display Language 42 Safety and Warranty 43 Safe and Efficient Operation of Motorola Two Way Radios 43 Exposure to Radio Frequency Energy 43 Electromagnetic Interference Compatibility 44 Operational Warnings 44 Vehicles with an Air Bag 44 Potentially Explosive Atmospheres 44 Blasting Caps and Blasting Areas 45 Mobile Radio Operation and EME Exposure 45 Mobile ...

Page 4: ...ogram Accordingly any copyrighted Motorola computer programs contained in the Motorola products described in this manual may not be copied reproduced modified reverse engineered or distributed in any manner without the express written permission of Motorola Furthermore the purchase of Motorola products shall not be deemed to grant either directly or by implication estoppel or otherwise any license...

Page 5: ...iv CONTENTS Notes English book Page iv Thursday August 12 1999 9 03 AM ...

Page 6: ...nterchangeable Programmable Button 4 P4 Interchangeable Programmable Button 3 P3 LCD Screen Red Yellow Green LED Indicators Menu Exit Escape Button Interchangeable Programmable Button 1 P1 Left Right Microphone Jack Knob On Off Volume Channel Selector Menu Navigation Buttons Up Down English book Page 1 Thursday August 12 1999 9 03 AM ...

Page 7: ...Multi Frequency microphone that has a direct entry keypad This enhanced keypad microphone has three buttons A B C below the keypad that can be programmed to conveniently activate select radio features FL0830328O Keypad Push to Talk PTT button Programmable Buttons A B C English book Page 2 Thursday August 12 1999 9 03 AM ...

Page 8: ... the type of button press short press quickly pressing and releasing the programmable buttons long press pressing and holding the programmable buttons for a period of time default 1 1 2 seconds or programmed value hold down pressing and holding down the programmable buttons while checking status or making adjustments A summary of programmable radio features and corresponding page references appear...

Page 9: ...required 13 PRTT Priority Request to Talk Sends a priority access request to the dispatcher 13 Emergency E Initiate Emergency Alert Cancel Emergency status 19 Power Level B Toggle transmit power level between High and Low 21 Repeater Talkaround J Toggle between using a repeater or transmitting directly to another radio 21 Scan Nuisance Channel Delete G Toggle scan on and off Delete a nuisance chan...

Page 10: ...med high Auxiliary Control 1 2 Activates or deactivates a pin on the accessory connector See your dealer Status Direct entry to the status menu One Touch Status Immediately sends a preprogrammed status Message Direct entry to the message menu One Touch Message Immediately sends a preprogrammed message Horn and Lights Toggles external alarm feature or cancels a triggered alarm This function is acti...

Page 11: ...ed to make menu selections Exit Key t Used to move to the previous Menu level short press or to exit Menu Mode long press Up Key y and Down Key z Used for channel scrolling When in Menu Mode used for menu navigation Right Key w Moves the cursor right or inserts a space when editing or Zone scrolling Left Key v Moves the cursor left or used as a backspace key when editing or Zone scrolling Left Up ...

Page 12: ...er Make a radio call Enter information when programming radio lists Directly access preprogrammed features Each key can generate several different characters For example to enter the character C press the 2 key three times Refer to the following table English book Page 7 Thursday August 12 1999 9 03 AM ...

Page 13: ...12 13 14 15 16 17 0 0 1 1 2 A B C 2 a b c 2 À Á Â Ç à á â ç 3 D E F 3 d e f 3 È É Ê è é ê ë 4 G H I 4 g h i 4 Ì Í ì í î ï 5 J K L 5 j k l 5 6 M N O 6 m n o 6 Ñ Ò Ó Ô ñ ò ó ô ö 7 P Q R S 7 p q r s 7 8 T U V 8 t u v 8 Ù Ú Û ù ú 9 W X Y Z 9 w x y z 9 Y y Blank Space English book Page 8 Thursday August 12 1999 9 03 AM ...

Page 14: ...tor is active or the microphone is off hook D Phone Phone Mode is selected E Emergency An Emergency Alert is being sent F Call Received A Selective Call or Call Alert has been received G Scan The Scan feature is active Flashes when Scan is suspended Priority 1 Scan flashing During Scan indicates that the scan has locked on to a priority 1 channel H Priority 2 Scan steady During Scan indicates that...

Page 15: ...List editing mode M Signal Strength Indicates signal strength The more bars the stronger the signal N Option Board Option board is enabled Q Not currently assigned L Not currently assigned Symbol Indication Low High Tone High Low Tone Button Low HighTone High LowTone Scan Start scan Stop scan Power Level High power selected Low power selected Option Board Enabled Disabled Repeater Talkaround Does ...

Page 16: ...ear a click If power up is successful you will hear the Self Test Pass Tone If the radio fails to power up you will hear the Self Test Fail Tone Push the On Off Volume Control knob until you hear a click and the display clears 1 Hold down the Volume Set button see page 4 You will hear a continuous tone 2 Turn the On Off Volume Control knob to the desired volume level 3 Release the Volume Set butto...

Page 17: ...o enter Menu Mode 2 y or z until 3 u to select 4 y or z until you see the desired zone name 5 u to select the zone 1 Press the Direct Zone Access button 2 y or z until you reach the desired zone 3 u to select the zone Z Z Z Zo o o on n n ne e e e Z Z Z Zo o o on n n ne e e e Press v to select the previous zone If pressed while the first zone is selected the radio will wrap around to the last zone ...

Page 18: ...phone vertically 1 to 2 inches 2 5 to 5 cm from your mouth Press the PTT to talk release it to listen 1 Turn your radio on 2 y or z to select the desired channel 3 Press the PTT for priority requests to talk the PRTT button and wait for the talk permit tone 4 Hold the microphone vertically 1 to 2 inches 2 5 to 5 cm from your mouth Press the PTT to talk release it to listen 5 Release the PTT to lis...

Page 19: ...14 GETTING STARTED Notes English book Page 14 Thursday August 12 1999 9 03 AM ...

Page 20: ...r when using the enhanced keypad microphone only enter the ID number of the radio you want to call R R R Ra a a ad d d di i i io o o o C C C Ca a a al l l ll l l l R R R Ra a a ad d d di i i io o o o C C C Ca a a al l l ll l l l S S S Se e e el l l le e e ec c c ct t t ti i i iv v v ve e e e C C C Ca a a al l l ll l l l S S S Se e e el l l le e e ec c c ct t t ti i i iv v v ve e e e C C C Ca a a a...

Page 21: ...io Call List or when using the enhanced keypad microphone only enter the ID number of the radio you want to page 7 Press the PTT to send the page You will see R R R Ra a a ad d d di i i io o o o C C C Ca a a al l l ll l l l R R R Ra a a ad d d di i i io o o o C C C Ca a a al l l ll l l l C C C Ca a a al l l ll l l l A A A Al l l le e e er r r rt t t t C C C Ca a a al l l ll l l l A A A Al l l le e...

Page 22: ...hecking R R R Ra a a ad d d di i i io o o o C C C Ca a a al l l ll l l l R R R Ra a a ad d d di i i io o o o C C C Ca a a al l l ll l l l R R R Ra a a ad d d di i i io o o o C C C Ch h h he e e ec c c ck k k k R R R Ra a a ad d d di i i io o o o C C C Ch h h he e e ec c c ck k k k 7 Press the PTT You will see 8 If the Radio Check is received you will see If not you will see 9 t to return to or Hol...

Page 23: ...end or if programmed by your dealer see pages 4 5 press the button that has been preprogrammed for a specific status Note You cannot retransmit the current status update 1 u to enter Menu Mode 2 y or z until 3 u to select 4 y or z to locate the desired message in the preprogrammed list or when using the enhanced keypad microphone only enter the number of the message you wish to send or if programm...

Page 24: ...pushbutton accessory Emergency Alerts have priority over all other calls The E symbol will appear on the display when your radio is in the Emergency Alert state An Emergency Alert can be programmed to Show E and sound a tone or Show E Silent Emergency or Activate the microphone so that all activity can be transmitted for a predetermined amount of time See your dealer for more information To cancel...

Page 25: ...iting To edit a Call List entry R R R Ra a a ad d d di i i io o o o D D D Di i i is s s sa a a ab b b bl l l le e e ed d d d 1 u to enter Menu Mode 2 y or z until 3 u to select 4 y or z until 5 u to select 6 y or z until 7 u to select 8 y or z until you locate the desired entry 9 u to select the entry 10 Use your keypad to edit the entry see page 7 11 u to save your changes You will see P P P Pr r...

Page 26: ...r S Low power R You can set the power level in two ways Method 1 Press the preprogrammed Power Level button see page 4 to toggle between low and high or Method 2 12 t to return to or Hold down t to exit Menu Mode 1 u to enter Menu Mode E E E Ed d d di i i it t t t E E E En n n nt t t tr r r ry y y y 2 y or z until 3 u to select 4 y or z until or until 5 u to confirm your selection 1 u to enter Men...

Page 27: ... g g gh h h h P P P Po o o ow w w we e e er r r r L L L Lo o o ow w w w 1 u to enter Menu Mode 2 y or z until 3 u to select 4 y or z until or 5 u to select or 6 y or z until you see the name or message you want to tag 7 u to confirm the selection 8 y or z until you hear one of the seven tones you want to use for this name or message 9 u to confirm the selection You will see or A A A Au u u ud d d ...

Page 28: ...on n n ne e e e T T T Ta a a ag g g g A A A Au u u ud d d di i i io o o o T T T To o o on n n ne e e es s s s A A A Au u u ud d d di i i io o o o T T T To o o on n n ne e e es s s s C C C Ca a a al l l ll l l l T T T To o o on n n ne e e e T T T Ta a a ag g g g C C C Ca a a al l l ll l l l T T T To o o on n n ne e e e T T T Ta a a ag g g g 9 u to confirm the selection You will see 10 t to return t...

Page 29: ...24 RADIO CALLS Notes English book Page 24 Thursday August 12 1999 9 03 AM ...

Page 30: ...ops blinking when the radio switches to a channel Note If you enter Menu Mode while the radio is scanning scanning will stop It will resume when you exit Menu Mode You can start or stop a scan operation either by pressing the preprogrammed Scan button see page 4 to start or stop scanning or 1 to enter Menu Mode 2 y or z until 3 to select 4 y or z until or 5 to confirm your selection S S S Sy y y y...

Page 31: ... remaining channel in a scan list Restoring a Channel to the Scan List To restore a previously deleted channel to the scan list restart the scan operation or turn your radio off and on again EDITING A SCAN LIST A scan list is a group of up to 16 channels Each channel can have a scan list assigned to it The same channel can be included in several scan lists and the same scan list can be assigned to...

Page 32: ...i i is s s st t t t S S S Sc c c ca a a an n n n L L L Li i i is s s st t t t A A A Ad d d dd d d d E E E En n n nt t t tr r r ry y y y D D D De e e el l l le e e et t t te e e e E E E En n n nt t t tr r r ry y y y 10 If you added a channel you will see or If you deleted a channel you will see to confirm the deletion You will see 11 to return to or to return to or Hold down to exit Menu Mode E E E...

Page 33: ... Mode 2 y or z until 3 to select 4 y or z until 5 to select 6 y or z until 7 to select 8 y or z until or until 9 to select the desired priority level 10 y or z until you see the channel you want to prioritize P P P Pr r r ro o o og g g gr r r ra a a am m m m L L L Li i i is s s st t t ts s s s P P P Pr r r ro o o og g g gr r r ra a a am m m m L L L Li i i is s s st t t ts s s s S S S Sc c c ca a a...

Page 34: ...each priority channel from the scan list and then add it back 11 to prioritize that channel 12 to return to or Hold down to exit Menu Mode E E E Ed d d di i i it t t t P P P Pr r r ri i i io o o or r r ri i i it t t ty y y y English book Page 29 Thursday August 12 1999 9 03 AM ...

Page 35: ...30 SCAN Notes English book Page 30 Thursday August 12 1999 9 03 AM ...

Page 36: ...P P P Ph h h ho o o on n n ne e e e 4 to select 5 You will hear a series of tones indicating that an access code is being sent automatically You will also see your access code displayed or when using the keypad microphone only enter your access code using the keypad 6 When you hear a dial tone enter or select a phone number when using the keypad microphone only enter the phone number using the key...

Page 37: ...access the last number dialed then press and release the PTT 7 To end a phone call do one of the following If your radio has the deaccess code preprogrammed proceed to step 8 or Enter the deaccess code using the keypad 8 Press the Phone button to exit Phone Mode or to exit Phone Mode and return to or Hold down to exit Menu Mode P P P Ph h h ho o o on n n ne e e e 1 to enter Menu Mode 2 y or z unti...

Page 38: ... e er r r r P P P Ph h h ho o o on n n ne e e e E E E En n n nt t t tr r r ry y y y S S S Sa a a av v v ve e e ed d d d 14 to return to or Hold down to exit Menu Mode 1 to enter Menu Mode 2 y or z until 3 to select 4 y or z until 5 to select 6 y or z until 7 to select 8 y or z until you see the entry you want to delete A A A Ad d d dd d d d E E E En n n nt t t tr r r ry y y y P P P Pr r r ro o o o...

Page 39: ... st t t t P P P Ph h h ho o o on n n ne e e e L L L Li i i is s s st t t t E E E Ed d d di i i it t t t E E E En n n nt t t tr r r ry y y y E E E Ed d d di i i it t t t E E E En n n nt t t tr r r ry y y y 8 y or z until you see the entry you want to edit 9 to select the entry 10 y or z until to edit the name or until to edit the phone number or until to edit the location in the phone list 11 to co...

Page 40: ...g g gr r r ra a a am m m m L L L Li i i is s s st t t ts s s s E E E Ed d d di i i it t t t C C C Co o o od d d de e e es s s s E E E Ed d d di i i it t t t C C C Co o o od d d de e e es s s s A A A Ac c c cc c c ce e e es s s ss s s s C C C Co o o od d d de e e e D D D De e e ea a a ac c c cc c c ce e e es s s ss s s s C C C Co o o od d d de e e e A A A Ac c c cc c c ce e e es s s ss s s s C C C ...

Page 41: ...36 PHONE Notes English book Page 36 Thursday August 12 1999 9 03 AM ...

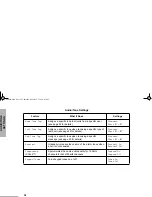
Page 42: ...u u ud d d di i i io o o o T T T To o o on n n ne e e es s s s 5 to select the feature You will see the feature s current setting 6 y or z for available settings Refer to the table below 7 to select the desired setting Audio Tone Settings Feature What it Does Settings Alert Vol Lvl Allows the volume level of the audio and the volume level of the alert tones to be set independently Ind Alert Off In...

Page 43: ...specific tone when receiving a specific message see page 22 for details Standard Alert 1 7 Escalert Gradually increases the volume of the alarm tones when a call is not answered Escalert On Escalert Off Companding XPand Approximates the same audio quality for 12 5kHz channels to that of 25kHz channels Compand On Compand Off Keypad Tones Turns keypad tones on or off Tones On Tones Off Audio Tone Se...

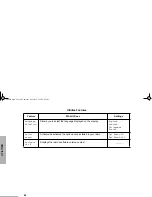
Page 44: ...hange see table below 5 to select the feature You will see the feature s current setting 6 y or z for available settings 7 to select the desired setting Utilities Features Feature What it Does Settings Power Level Changes the power level of the radio to high or low see page 21 Power High Power Low Clock Sets the time see page 41 Set Time Display Clock Reminder Alarm Sets the alarm and turns it on ...

Page 45: ...glish Spanish Portuguese French Option board Activates deactivates the option board installed in your radio Opt Board On Opt Board Off Software Ver Displays the radio s software version number Utilities Features Feature What it Does Settings English book Page 40 Thursday August 12 1999 9 03 AM ...

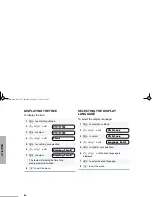
Page 46: ...in n n nd d d de e e er r r r A A A Al l l la a a ar r r rm m m m C C C Cl l l lo o o oc c c ck k k k S S S Se e e et t t t T T T Ti i i im m m me e e e S S S Se e e et t t t T T T Ti i i im m m me e e e 8 When a setting e g hour is blinking you can change it with y or z 9 w to proceed to the next setting e g from hour to minutes 10 to save your changes 11 to return to or to return to or Hold down...

Page 47: ...l lo o o oc c c ck k k k D D D Di i i is s s sp p p pl l l la a a ay y y y C C C Cl l l lo o o oc c c ck k k k D D D Di i i is s s sp p p pl l l la a a ay y y y C C C Cl l l lo o o oc c c ck k k k 1 to enter Menu Mode 2 y or z until 3 to select 4 y or z until 5 to confirm your selection 6 y or z until desired language is displayed 7 to select desired language 8 to exit the menu U U U Ut t t ti i i...

Page 48: ...Radiation Protection and Measurements NCRP 1986 International Commission on Non Ionizing Radiation Protection ICNRP 1986 European Committee for Electrotechnical Standardisation CENELEC To assure optimal radio performance and that human exposure to radio frequency electromagnetic energy is within the guidelines set forth in the above standards always adhere to the following procedures ENV 50166 1 1...

Page 49: ...th airline regulations or crew instructions OPERATIONAL WARNINGS Vehicles with an Air Bag Do not place a radio in the area over an air bag or in the air bag deployment area Air bags inflate with great force If a radio is placed in the air bag deployment area and the air bag inflates the radio may be propelled with great force and cause serious injury to occupants of the vehicle Potentially Explosi...

Page 50: ...cle engine Areas with potentially explosive atmospheres are often but not always posted Mobile Radio Operation and EME Exposure To assure optimal radio performance and that human exposure to radio frequency electromagnetic energy is within the guidelines referenced earlier in this document transmit only when people inside and outside the vehicle are at least the minimum distance away from a proper...

Page 51: ... FOR HOW LONG MOTOROLA INC MOTOROLA warrants the MOTOROLA manufactured Communication Products listed below Product against defects in material and workmanship under normal use and service for a period of time from the date of purchase as scheduled below PRO7100 Mobile Units Two 2 Years Product Accessories One 1 Year Motorola at its option will at no charge either repair the Product with new or rec...

Page 52: ...ed from this warranty Because each system which may use the Product is unique MOTOROLA disclaims liability for range coverage or operation of the system as a whole under this warranty II GENERAL PROVISIONS This warranty sets forth the full extent of MOTOROLA s responsibilities regarding the Product Repair replacement or refund of the purchase price at MOTOROLA s option is the exclusive remedy THIS...

Page 53: ...dification or adjustment D Breakage or damage to antennas unless caused directly by defects in material workmanship E A Product subjected to unauthorized Product modifications disassemblies or repairs including without limitation the addition to the Product of non Motorola supplied equipment which adversely affect performance of the Product or interfere with Motorola s normal warranty inspection a...

Page 54: ...depreciation will be an equal amount per year over the lifetime of the Product or parts as established by MOTOROLA MOTOROLA will have no liability with respect to any claim of patent infringement which is based upon the combination of the Product or parts furnished hereunder with software apparatus or devices not furnished by MOTOROLA nor will MOTOROLA have any liability for the use of ancillary e...

Page 55: ...se is granted by implication estoppel or otherwise under MOTOROLA patent rights or copyrights VI GOVERNING LAW This Warranty is governed by the laws of the State of Illinois USA English book Page 50 Thursday August 12 1999 9 03 AM ...
Page 56: ...ct Remote Speaker Microphone RMN4026 Enhanced Keypad Microphone RMN4038 Heavy Duty Microphone RSN4001 External Speaker 13W HSN8145 External Speaker 7 5W GLN7324 Low Profile Trunnion RLN4780 High Profile Trunnion HLN8097 Removable Slide Mount RLN4779 Key Lock Mount RLN4782 DIN Mounting Kit in dash RKN4077 Remote Mount Cable 3 m RKN4078 Remote Mount Cable 5 m RKN4079 Remote Mount Cable 7 m English b...

Page 57: ...3 430 MHz 1 4 Wave Roof Mount HAE4003A UHF 450 470 MHz 1 4 Wave Roof Mount HAE4010A UHF 406 420 MHz 3 5dB Gain Roof Mount HAE4011A UHF 450 470 MHz 3 5dB Gain Roof Mount HAE4019A UHF 450 470 MHz 5dB Gain Roof Mount HAE4004A UHF 470 512 MHz 1 4 Wave Roof Mount HAE4012A UHF 470 494 MHz 3 5dB Gain Roof Mount 09 02105F01 BNC Connector GPN6145 Desktop Power Supply 1 25W EMC HPN4002 Desktop Power Supply ...

Page 58: ... to access first nine numbers in your phone list Press PTT if buffered dial or when using an enhanced keypad microphone only enter phone number using the keypad Press PTT if buffered dial 4 Press PTT hold the microphone 1 to 2 inches 2 5 to 5 cm from your mouth and speak clearly into it Ending a Phone Call 1 Send deaccess code if required 2 Press preprogrammed Phone button or press Sending and Can...

Page 59: ...t enter ID Audio Tones p 37 Rptr Talkarnd p 21 Utilities p 39 Status Message Zone p 12 Radio Call p 15 Phone p 31 Program Lists y z Scan List p 26 Phone List p 32 y z y z y z y z Call Alert Radio Check select enter ID select enter ID Power Level display set time Clock on off set time Reminder Alarm select Language Select on off Option Board on off Light Disable Software Ver on off Alert Vol Lvl on...

Page 60: ... Motorola R dios Profissionais SŽrie PRO PRO7100 T o Dedicado Quanto ƒ Voc e Call Alert s o marcas da Motorola Inc 1999 Motorola Inc Todos os direitos reservados Impresso nos EUA A Motorola Professional Radio PRO Series PRO7100 As Dedicated As You Are and Call Alert are trademarks of Motorola Inc 1999 Motorola Inc All rights reserved Printed in U S A 6881091C59 68P81091C59 0 contacto control ...

Reviews: