5 - 25
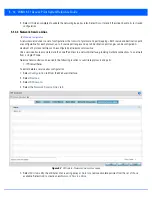
8. Define the following
Cisco Discovery Protocol
(CDP) and LLDP parameters to apply to the Ethernet port configuration:
9. Define the following
Switching Mode
parameters to apply to the Ethernet port configuration:
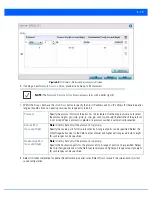
10. Optionally select the
Port Channel
option and define a setting using the spinner control. This sets the channel group for
the port.
11. Select
Enforce Captive Portal
to apply captive portal access permission rules to data transmitted over this specific
Ethernet port. Use the drop-down list to select the appropriate event when to enforce captive portal. Select from
Never
,
Authentication Failure
or
Always.
Cisco Discover Protocol
Receive
Select this option to allow the Cisco discovery protocol for receiving data on this port. If
enabled, the port sends out periodic interface updates to a multicast address to advertise
its presence to neighbors. This option is enabled by default.
Cisco Discover Protocol
Transmit
Select this option to allow the Cisco discovery protocol for transmitting data on this port.
If enabled, the port sends out periodic interface updates to a multicast address to
advertise its presence to neighbors. This option is enabled by default.
Link Layer Discovery
Protocol Receive
Select this option to snoop LLDP on this port. If enabled, the port sends out periodic
interface updates to a multicast address to advertise its presence to neighbors. This
option is enabled by default.
Link Layer Discovery
Protocol Transmit
Select this option to transmit LLDP PDUs on this port. If enabled, the port sends out
periodic interface updates to a multicast address to advertise its presence to neighbors.
Mode
Select either the
Access
or
Trunk
radio button to set the VLAN switching mode over the
port. If
Access
is selected, the port accepts packets only form the native VLANs. Frames
are forwarded out the port untagged with no 802.1Q header. All frames received on the
port are expected as untagged and are mapped to the native VLAN. If the mode is set to
Trunk
, the port allows packets from a list of VLANs you add to the trunk. A port configured
as Trunk supports multiple 802.1Q tagged VLANs and one Native VLAN which can be
tagged or untagged. Access is the default mode.
Native VLAN
Use the spinner control to define a numerical Native VLAN ID from 1 - 4094. The native
VLAN allows the access point to associate untagged frames to a VLAN when no 802.1Q
frame is included in the frame. Additionally, the native VLAN is the VLAN which untagged
traffic will be directed over when using a port in trunk mode. The default VLAN is 1.
Tag Native VLAN
Select this option to tag the native VLAN. The IEEE 802.1Q specification is supported for
tagging frames and coordinating VLANs between devices. IEEE 802.1Q adds four bytes to
each frame identifying the VLAN ID for upstream devices that the frame belongs. If the
upstream Ethernet device does not support IEEE 802.1Q tagging, it does not interpret the
tagged frames. When VLAN tagging is required between devices, both devices must
support tagging and be configured to accept tagged VLANs. When a frame is tagged, the
12 bit frame VLAN ID is added to the 802.1Q header so upstream Ethernet devices know
which VLAN ID the frame belongs to. The device reads the 12 bit VLAN ID and forwards
the frame to the appropriate VLAN. When a frame is received with no 802.1Q header, the
upstream device classifies the frame using the default or native VLAN assigned to the
Trunk port. The native VLAN allows an Ethernet device to associate untagged frames to a
VLAN when no 802.1Q frame is included in the frame. This feature is disabled by default.
Allowed VLANs
Selecting
Trunk
as the mode enables the Allowed VLANs parameter. Add VLANs that
exclusively send packets over the listed port.
Summary of Contents for WiNG 5.7.1
Page 1: ...WiNG 5 7 1 ACCESS POINT SYSTEM REFERENCE GUIDE ...
Page 2: ......
Page 3: ...WING 5 7 1 ACCESS POINT SYSTEM REFERENCE GUIDE MN001977A01 Revision A April 2015 ...
Page 4: ...ii WiNG 5 7 1 Access Point System Reference Guide ...
Page 24: ...1 4 WiNG 5 7 1 Access Point System Reference Guide ...
Page 36: ...2 12 WiNG 5 7 1 Access Point System Reference Guide ...
Page 72: ...3 36 WiNG 5 7 1 Access Point System Reference Guide ...
Page 470: ...5 386 WiNG 5 7 1 Access Point System Reference Guide ...
Page 472: ...6 2 WiNG 5 7 1 Access Point System Reference Guide Figure 6 1 Configuration Wireless menu ...
Page 624: ...7 46 WiNG 5 7 1 Access Point System Reference Guide ...
Page 724: ...9 56 WiNG 5 7 1 Access Point System Reference Guide ...
Page 783: ...12 35 Figure 12 46 Device Summary screen 4 Click File Management ...
Page 816: ...12 68 WiNG 5 7 1 Access Point System Reference Guide ...
Page 1006: ...13 190 WiNG 5 7 1 Access Point System Reference Guide ...
Page 1026: ...14 20 WiNG 5 7 1 Access Point System Reference Guide ...
Page 1028: ...A 2 WiNG 5 7 1 Access Point System Reference Guide ...
Page 1089: ......
Page 1090: ...MN001977A01 Revision A April 2015 ...


