Accessories 2 - 25
Connector Shroud
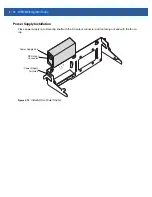
Assembly
1.
Remove cable from wearable terminal, if required.
2.
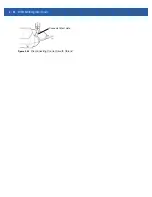
Align the cable connector with the connector shroud bottom housing. Ensure that the disconnect button on
the connector faces up.
Figure 2-26
Installing Bottom Housing
3.
Place the cable connector into the shroud bottom housing as shown.
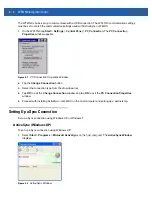
Figure 2-27
Installing Top Housing
4.
Press the top housing into the bottom housing. The housings will snap together.
5.
Plug the cable connector into the wearable terminal connector.
Disconnecting the Cable from the Wearable Terminal
1.
Turn the wearable terminal over to expose the top housing of the shroud.
2.
Push the tip of a ball-point pen through the hole in the connector shroud top housing. The connector
disengages from the wearable terminal.
NOTE
Use only on the RS409 or RS419 with extended cable.
Disconnect Button
Bottom Housing
NOTE
Follow the instructions below when disconnecting the cable connector and shroud from the wearable terminal.
Once the shroud is installed on the connector, do not disassemble the shroud by prying it apart.
Summary of Contents for WT41N0
Page 1: ...WT41N0 WEARABLE TERMINAL INTEGRATOR GUIDE ...
Page 2: ......
Page 3: ...WT41N0 INTERGRATOR GUIDE 72E 160600 01 Rev A December 2012 ...
Page 6: ...iv WT41N0 Integrator Guide ...
Page 18: ...xvi WT41N0 Integrator Guide ...
Page 60: ...3 6 WT41N0 Integrator Guide ...
Page 64: ...4 4 WT41N0 Integrator Guide ...
Page 118: ...7 16 WT41N0 Integrator Guide ...
Page 122: ...8 4 WT41N0 Integrator Guide ...
Page 154: ...A 20 WT41N0 Integrator Guide ...
Page 156: ...B 2 WT41N0 User Guide ...
Page 170: ...Index 4 WT41N0 Integrator Guide ...
Page 171: ......

