background image

9

1

2

1

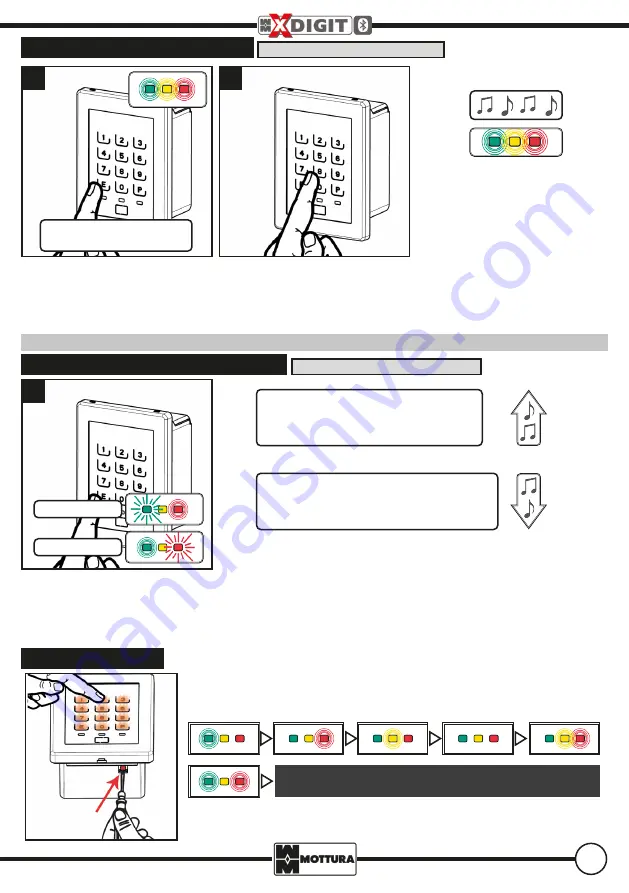
Deleting all CODES / TAGS

Activate the unit. Press 

E

, digit the ma-

ster code confirming with 

E

 or show 

a master TAG. Press 

E

 3 times to enter 

the menu.

Digit the code 987P to delete ALL 

NUMERIC CODES.

Digit the code 789P to delete 

ALL TAGS.

Deletion needs time, a continuous 

SOUNDS will warn about deletion and 

LEDs are switched on to delete the co-

des.  

Automatic exit from programming

Enable/Disable the service credentials

Activate the unit. Press 

E

, digit the ma-

ster code confirming with 

E

 or show 

a master TAG. Press 

E

 4 times to enter 

the menu.

DISABLED

ENABLED

! FACTORY RESET !

Keep pressed 

the programming button with a dedicated tool (screwdriver)  and 

activate the unit pressing any other key.

The following LED will switch on in sequence:

Release the programming button, the Green and Red LED will 

flash, press the button to confirm.

The operation of deletion of all the codes can take until 10 seconds. At the end of the 

operation all LED will switch off.

N.B. If during the operation all master credential are deleted, also the service credential will be deleted

Digit the code 123P to

 ENABLE

Digit the code 321P to

 DISABLE

To exit wait for timeout (10 sec.) or press 

E

.

! Press any key to activate the unit !

Steady Green, Yellow and 

Red LED

! Press any key to activate the unit !

Summary of Contents for XDIGIT 99.779

Page 1: ...on the date of purchase indicated on the sales receipt The warranty is in force if the sales receipt showing details identifying the product is exhibited to customer service personnel The warranty cov...

Page 2: ...able batteries due to the reduced battery runtime It is recommended to replace ALL the batteries together at least once per year or when the charge status is low MAINS POWER connect to Mottura power a...

Page 3: ...3 B B CONFIGURATION OF X TECHNOLOGY PRODUCTS Mottura App designed to easily manage all your electromechanical devices Internal Unit XNova 99785...

Page 4: ...GIT BLE INSTALLATION In wall Recessed in the panel Fixing to wall Use the fixing plates supplied to be inserted inside the panel 99 790 Windshield fixing to wall 99 789 Recessed box 107 x 75 x 50mm an...

Page 5: ...airing with device 3 6 Red Software Reset BLE 6 9 Yellow Factory reset BLE 9 10 None Wait 11 14 Red Yellow Software Reset MCU x 14 17 Green Red Factory reset MCU e BLE x Programming Button SEE WARNING...

Page 6: ...sconnect the master key from the cable and connect to the unit on the USB C connector Within 20 seconds press the program ming button on the unit until the led is not steady GREEN Release the but ton...

Page 7: ...exiting from programming Uscita automatica da programmazione N B From this moment the unit has its first master credential which allows the next access to pro gramming the warning of credential failu...

Page 8: ...aster TAG Press E twice to enter the menu Digit the code to be deleted and press P a sound and GREEN flash indicates the cancellation of the code RED indi cates that the operation has failed Show the...

Page 9: ...enter the menu DISABLED ENABLED FACTORY RESET Keep pressed the programming button with a dedicated tool screwdriver and activate the unit pressing any other key The following LED will switch on in seq...

Page 10: ...ery 12 hours with XMOTO Select a device Access to B B settings Activate B B mode Connect the master key to the lock or escutcheon 99 785 N B To activate B B mode it is always necessary to connect the...

Page 11: ...r the device USINGTHE ACCESS CODE It is possible to activate an access code valid for a limited time in the following way THE MANAGER OF THE LOCK WILL SEND A 12 DIGIT CODE BY EMAIL SMS OR OTHER Code f...

Page 12: ...www mottura it 99366GB 06 20 a_024445...

Reviews: