background image

- 4 - 

Module Installation (Power-Off) 

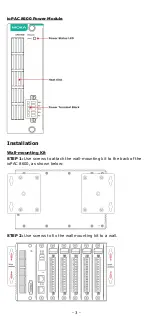
The module’s PCB should align with the edge of the 
frame. Push the module into the slot and make sure 
the module is plugged into the backplane. Fasten the 
two screws using 3.5±0.5 kgf-cm of torque. 


Module Installation (Power-On) 

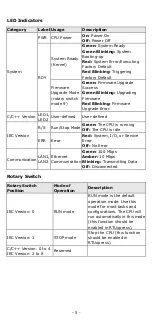
The module’s PCB should align with the edge of the frame. Push the 
module into the slot and make sure the module is plugged in to the 
backplane. Fasten the two screws using 3.5±0.5 kgf-cm of torque. It 
could take about ten seconds for the system to recognize and activate the 
module, at which point the module’s LED will turn green. 


ATTENTION 

When the system is powered on, do not install more than one 
module at a time. If you need to install multiple modules, wait 
until the most recently installed module’s LED turns GREEN 
before installing the next module. 


Connecting the Power 


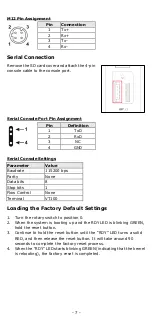
A 24 to 110 VDC input power is applied to the positive 
(V1+ and V2+) and negative (V1- and V2-) terminals on 
the connector. 

SD Card Installation 

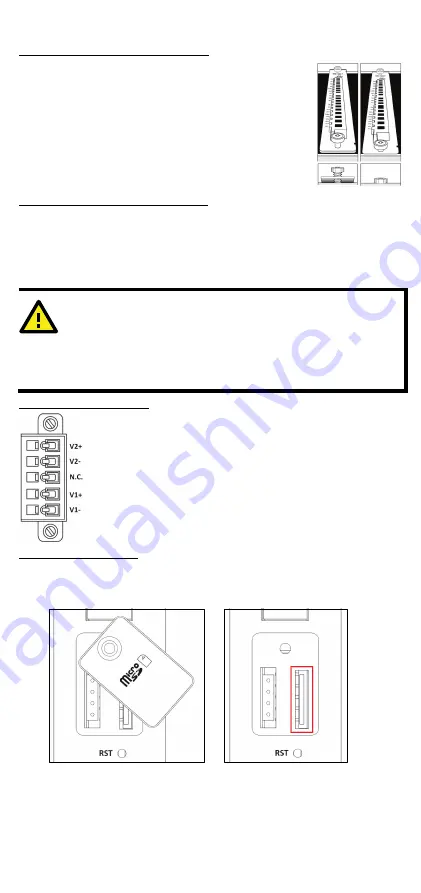
1.


Remove the screw holding the microSD card cover in place. 

2.


Insert the microSD card into the microSD card slot. 

3.


Use the holding screw to fasten the cover in place. 


Summary of Contents for ioPAC 8600 Series

Page 1: ... Americas Toll free 1 888 669 2872 Tel 1 714 528 6777 Fax 1 714 528 6778 Moxa China Shanghai office Toll free 800 820 5036 Tel 86 21 5258 9955 Fax 86 21 5258 5505 Moxa Europe Tel 49 89 3 70 03 99 0 Fax 49 89 3 70 03 99 99 Moxa Asia Pacific Tel 886 2 8919 1230 Fax 886 2 8919 1231 Moxa India Tel 91 80 4172 9088 Fax 91 80 4132 1045 2020 Moxa Inc All rights reserved ...

Page 2: ... swappability of modules as well as two 10 100 Mbps Ethernet ports with two MACs Port Trunking ready or Ethernet bypass function with one MAC With Moxa s MX AOPC UA Suite the ioPAC 8600 series provides a comprehensive solution for data acquisition and control applications in harsh environments ATTENTION If the equipment is used in a manner not specified by the manufacturer the protection provided ...

Page 3: ...oPAC 8600 Power Module Installation Wall mounting Kit STEP 1 Use screws to attach the wall mounting kit to the back of the ioPAC 8600 as shown below STEP 2 Use screws to fix the wall mounting kit to a wall ...

Page 4: ...ke about ten seconds for the system to recognize and activate the module at which point the module s LED will turn green ATTENTION When the system is powered on do not install more than one module at a time If you need to install multiple modules wait until the most recently installed module s LED turns GREEN before installing the next module Connecting the Power A 24 to 110 VDC input power is app...

Page 5: ...ed IEC Version R S Run Stop Mode Green The CPU is running Off The CPU is idle ERR Error Red System I O or Service Error Off No Error Communication LAN1 LAN2 Ethernet Communication Green 100 Mbps Amber 10 Mbps Blinking Transmitting Data Off Disconnected Rotary Switch Rotary Switch Position Mode of Operation Description IEC Version 0 RUN mode RUN mode is the default operation mode Use this mode for ...

Page 6: ...up the ioPAC 4 When the upgrade is complete turn the rotary switch to 0 and reboot the ioPAC Note The microSD card should be FAT32 format Connecting to the ioPAC 8600 Series Controller Use the following configuration information to log in to the ioThinx 4530 Series controller Port Default IP Subnet Mask LAN1 192 168 127 254 255 255 255 0 LAN2 192 168 126 254 255 255 255 0 Username moxa Password mo...

Page 7: ...a bits 8 Stop bits 1 Flow Control None Terminal VT100 Loading the Factory Default Settings 1 Turn the rotary switch to position 0 2 When the system is booting up and the RDY LED is blinking GREEN hold the reset button 3 Continue to hold the reset button until the RDY LED turns a solid RED and then release the reset button It will take around 90 seconds to complete the factory reset process 4 When ...

Page 8: ... name in the search box In the following screenshot the ioLogik E1200 Series is used to illustrate Step 3 Go to the Software Documentation page to download the latest software for the product Specifications Input Current 223 mA 24 VDC Input Voltage 24 to 110 VDC Operating Temperature 40 to 75 C 40 to 167 F Storage Temperature 40 to 85 C 40 to 185 F Moxa Inc Fl 4 No 135 Lane 235 Baoqiao Rd Xindian ...

Reviews: