background image

NPort 5200 Series User’s Manual 

Web Console Configuration 


5-9

Auto report period 

Setting 

Factory Default 

Necessity 

Time interval (in seconds) 

10 

Optional 


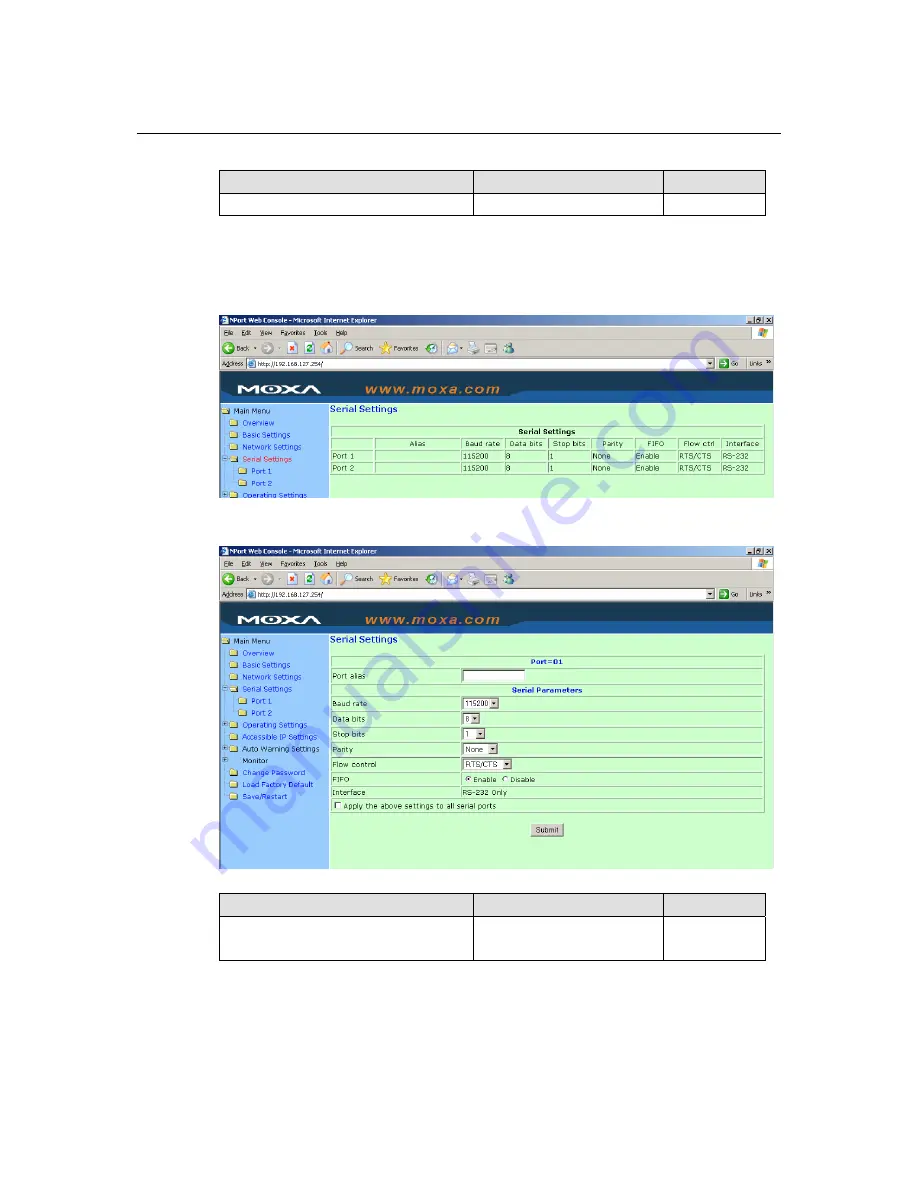
Serial Settings 

Click on 

Serial Settings

,


located under 

Main Menu

, to display serial port settings for ports 1 

and 2. 


To modify serial settings for a particular port, click on either 

Port 1

 or 

Port 2

 under 

Serial 

Settings

, located under 

Main Menu

 on the left side of the browser window. 


Port alias 

Setting 

Factory Default 

Necessity 

1 to 15 characters 
(E.g., PLC-No.1) 

blank

 Optional 

“Port alias” is included to allow easy identification of the serial devices that are connected to 
NPort 5200’s serial port. 


Summary of Contents for NPort 5210

Page 1: ... s Manual Fifth Edition September 2005 www moxa com product Moxa Technologies Co Ltd Tel 886 2 8919 1230 Fax 886 2 8919 1231 Web www moxa com MOXA Technical Support Worldwide support moxa com tw The Americas support moxa com ...

Page 2: ...ommitment on the part of Moxa Moxa provides this document as is without warranty of any kind either expressed or implied including but not limited to its particular purpose Moxa reserves the right to make improvements and or changes to this manual or to the products and or the programs described in this manual at any time Information provided in this manual is intended to be accurate and reliable ...

Page 3: ...ult IP Address 3 2 NPort 5200 Administration Suite 3 2 ARP 3 2 Telnet Console 3 3 Serial Console 19200 n 8 1 3 6 Chapter 4 Choosing the Proper Operation Mode 4 1 Overview 4 2 Real COM Mode 4 2 TCP Server Mode 4 3 TCP Client Mode 4 4 UDP Mode 4 4 Pair Connection Mode 4 4 Reverse Telnet Mode 4 5 Disabled Mode 4 5 Chapter 5 Web Console Configuration 5 1 Opening Your Browser 5 2 Basic Settings 5 4 Net...

Page 4: ... 6 12 Monitor 6 13 Port Monitor 6 19 COM Mapping 6 20 On line COM Mapping 6 20 Off line COM Mapping 6 25 IP Location 6 26 Chapter 7 IP Serial LIB 7 1 Overview 7 2 IP Serial LIB Function Groups 7 3 Example Program 7 3 Appendix A Pinouts and Cable Wiring A 1 Port Pinout Diagrams A 2 Ethernet Port Pinouts A 2 Serial Port Pinouts A 2 Cable Wiring Diagrams A 3 Ethernet Cables A 3 Serial Cables A 3 Appe...

Page 5: ...orts for RS 232 NPort 5230 5230 T 1 port for RS 232 1 port for RS 422 485 NPort 5232 5232 T 2 ports for RS 422 485 and NPort 5232I 5232I T 2 ports for RS 422 485 with isolation protection In this manual we refer to the four products collectively as NPort 5200 or NPort 5200 Series The following topics are covered in this chapter Overview Package Checklist Product Features Product Specifications ...

Page 6: ...e quick and effective installation And with NPort 5200 s Windows Utility installation is very straightforward since all system parameters can be stored and then copied to other device servers simultaneously Package Checklist NPort 5200 Series products are shipped with the following items Standard Accessories y 1 NPort 5200 2 port serial device server y Documentation Software CD y NPort 5200 Series...

Page 7: ...S GND RS 422 Tx Tx Rx Rx GND RS 485 2 wire Data Data GND RS 485 4 wire Tx Tx Rx Rx GND Serial Line Protection 15 KV ESD for all signals RS 485 Data Direction ADDC Automatic Data Direction Control Serial Interface NPort 5232 5232I 5232 T 5232I T Interface RS 422 485 No of Ports 2 for RS 422 485 Port Type Terminal Block 5 pins per port Signals RS 422 Tx Tx Rx Rx GND RS 485 2 wire Data Data GND RS 48...

Page 8: ...I T Web Browser Telnet Console or Windows Utility Power Requirements Power Input 12 to 48 VDC Power Consumption NPort 5210 305 mA at 12V max NPort 5230 347 1 mA at 12V max NPort 5232 359 6 mA at 12V max NPort 5232I 509 4 mA at 12V max Mechanical Casing IP30 protection aluminum case 1 mm NPort 5210 5230 5232 5210 T 5230 T 5232 T including ears 90 100 4 22 mm 3 54 3 95 0 87 in Dimensions W H D NPort...

Page 9: ...ction 1 5 Environmental Operating Temperature 0 to 55 C 32 to 131 F 5 to 95 RH 40 to 75 C for T versions Storage Temperature 20 to 85 C 4 to 185 F 5 to 95 RH Regulatory Approvals EMC FCC Class A CE Class A Safety UL CUL TÜV WARRANTY 5 years ...

Page 10: ... 5200 device servers Software installation is covered in subsequent chapters The following topics are covered in this chapter Panel Layout Connecting the Hardware Wiring Requirements Connecting the Power Grounding NPort 5200 Connecting to the Network Connecting to a Serial Device LED Indicators ...

Page 11: ...ameplate View DIN Rail screw hole Wallmount screw hole 10 100M Ethernet V V P1 RS 232 P2 RS 232 Ready Link P1 P2 Industrial RS 232 Device Server 5210 RESET 12 30V 5210 Nameplate View DIN Rail screw hole Wallmount screw hole 5210 Industrial RS 232 422 485 Device Server 5230 10 100M Ethernet V V Ready Link P1 P2 P1 RS 232 Tx Rx RTS CTS GND T T R D R D GND P2 RS 485 422 RESET 12 30V RJ45 8 pin serial...

Page 12: ... Wallmount screw hole 5210 Industrial 422 485 Device Server 5232 10 100M Ethernet V V Ready Link P1 P2 T T R D R D GND P2 RS 422 485 T T R D R D GND P1 RS 422 485 RESET 12 30V Nameplate View DIN Rail screw hole Wallmount screw hole 5210 Isolated Industrial 422 485 Device Server 5232I 10 100M Ethernet V V Ready Link P1 P2 T T R D R D GND P2 RS 422 485 T T R D R D GND P1 RS 422 485 RESET 12 30V RS 2...

Page 13: ...eparate paths to route wiring for power and devices If power wiring and device wiring paths must cross make sure the wires are perpendicular at the intersection point NOTE Do not run signal or communication wiring and power wiring in the same wire conduit To avoid interference wires with different signal characteristics should be routed separately y You can use the type of signal transmitted throu...

Page 14: ... when Ethernet packets are being transmitted or received Connecting to a Serial Device Connect the serial data cable between NPort 5200 and the serial device Serial data cables are optional accessories for NPort 5210 Refer to Chapter 1 under Optional Accessories for information about the RJ45 to DB25 and RJ45 to DB9 cables LED Indicators The top panels of all NPort 5200 device servers have four LE...

Page 15: ...P address Select one of the initial IP Address configuration methods to configure NPort 5200 s IP Address For more details about network settings see the Network Settings section from Chapter 5 Web Console Configuration The following topics are covered in this chapter Initializing NPort 5200 s IP Address Factory Default IP Address NPort 5200 Administration Suite Å recommended configuration method ...

Page 16: ...ress directly from a public network For example you would not be able to ping such a device from an outside Internet connection NPort 5200 applications that require sending data over a public network such as the Internet require setting up the server with a valid public IP address which can be leased from a local ISP NPort 5200 Administration Suite NPort 5200 Administration Suite consists of usefu...

Page 17: ...xt execute a special Telnet command by typing telnet 192 168 200 100 6000 After issuing this command a Connect failed message will appear as shown here After the NPort 5200 reboots its IP address will be updated to the new address and you can reconnect using either Telnet Web or Administrator to check that the update was successful Telnet Console Depending on how your computer and network are conf...

Page 18: ... window opens if you are prompted to input the Console password input the password and then press Enter Note that this page will only appear if the NPort 5200 is password protected 4 Type 2 to select Network settings and then press Enter 5 Type 1 to select IP address and then press Enter ...

Page 19: ...NPort 5200 Series User s Manual Initial IP Address Configuration 3 5 6 Use the Backspace key to erase the current IP address type in the new IP address and then press Enter 7 Press any key to continue ...

Page 20: ... to save the new IP address and restart the NPort 5200 Serial Console 19200 n 8 1 You may use the RS 232 console port to set up the IP address for NPort 5200 We suggest using PComm Terminal Emulator which is available free of charge as part of the PComm Lite program suite found on the Software CD that comes with the product to carry out the installation procedure although other similar utilities m...

Page 21: ... s male RS 232 serial port 2 From the Windows desktop click on Start Æ Programs Æ PComm Lite Æ Terminal Emulator 3 When the PComm Terminal Emulator window opens first click on the Port Manager menu item and select Open or simply click on the Open icon 4 The Property window opens automatically From the Communication Parameter page select the appropriate COM port for the connection COM1 in this exam...

Page 22: ...de to console mode as it receives a continuous string 8 Input the password when prompted Note that this page will only appear when the NPort 5200 has been set up for password protection 9 Start configuring the IP address under Network Settings Refer to step 4 in the Telnet Console section for the rest of the IP settings ...

Page 23: ...modes that rely on TCP IP socket programming concepts After reading this chapter choose the operation mode most suitable for your application and then refer to Chapter 5 for detailed instructions on how to configure the operation mode s parameters The following topics are covered in this chapter Overview Real COM Mode TCP Server Mode TCP Client Mode UDP Mode Pair Connection Mode Reverse Telnet Mod...

Page 24: ... or lack of drivers for various operating systems In addition to providing socket access NPort 5200 also comes with a Real COM TTY driver that transmits all serial signals intact This means that you can continue using your existing COM TTY based software without needing to invest in additional software Three different Socket Modes are available TCP Server TCP Client and UDP Server Client The main ...

Page 25: ...200 controls host access to attached serial devices by checking the host s IP address Refer to the Accessible IP Settings section of Chapter 5 for more details TCP Server Mode In TCP Server Mode NPort 5200 is configured with a unique IP Port combination on a TCP IP network In this case NPort 5200 waits passively to be contacted by the host computer After the host computer establishes a connection ...

Page 26: ...e efficient In UDP mode you can unicast or multicast data from the serial device to one or multiple host computers and the serial device can also receive data from one or multiple host computers making this mode ideal for message display applications UDP Mode Directly proceed with data transmission no connection required TCP IP Ethernet RS 232 Device 10 10 0M Et he rn et V V P1 RS 2 32 P2 RS 2 32 ...

Page 27: ... booting up and wait for the host on the network to initiate the connection The difference is that the RAW mode does not provide conversion function of telnet protocol If the connected devices need to use CR LF conversion function when controlling then users have to choose Rtelnet mode Disabled Mode When Operation mode is set to Disabled that particular port will be disabled Check the Apply the ab...

Page 28: ...ing topics are covered in this chapter Opening Your Browser Basic Settings Network Settings Serial Settings Operating Settings Real COM Mode TCP Server Mode TCP Client Mode UDP Mode Pair Connection Mode Reverse Telnet Mode Disabled Mode Accessible IP Settings Auto warning Settings Auto warning E mail and SNMP trap Event Type Monitor Monitor Line Monitor Async Monitor Async Settings Change Password...

Page 29: ...2 168 127 254 in the Address input box use the correct IP address if different from the default and then press Enter 3 Input the password if prompted The password is transmitted with MD5 encryption over the Ethernet Note that you will not be prompted to enter the password if the NPort 5200 is not password protected ATTENTION If you use web browsers other than Explorer remember to Enable the functi...

Page 30: ...o load factory defaults by using the Reset button located near the NPort 5200 s RJ45 Ethernet port Remember to use NPort Administrator to export the configuration file when you have finished the configuration After using the Reset button to load factory defaults your configuration can be easily reloaded into NPort 5200 by using the NPort Administrator Import function Refer to Chapter 6 for more de...

Page 31: ... Trap messages ATTENTION First time users should select the time zone first The Console will display the real time according to the time zone compared to GMT If you would like to modify the real time clock select Local time NPort 5200 s firmware will modify the GMT time according to the Time Zone Time zone Setting Factory Default Necessity User selectable time zone GMT Greenwich Mean Time Required...

Page 32: ... console utilities as an extra precaution to prevent unauthorized users from accessing your NPort 5200 The factory default for both Web console and Telnet console is Enable Web console Setting Factory Default Necessity Enable or Disable Enable Required Telnet console Setting Factory Default Necessity Enable or Disable Enable Required ATTENTION If you disable both the Web console and Telnet console...

Page 33: ... web console screen s IP configuration drop down box Method Function Definition Static User defined IP address Netmask Gateway DHCP DHCP Server assigned IP address Netmask Gateway DNS and Time Server DHCP BOOTP DHCP Server assigned IP address Netmask Gateway DNS and Time Server or BOOTP Server assigned IP address if the DHCP Server does not respond BOOTP BOOTP Server assigns IP address IP Address ...

Page 34: ...OTP server The Timeout for each try increases from 1 second to 3 seconds to 5 seconds If the DHCP BOOTP Server is unavailable the firmware will use the default IP address 192 168 127 254 Netmask and Gateway for IP settings DNS server 1 DNS server 2 Setting Factory Default Necessity E g 192 168 1 1 IP addresses of the form x x x 0 and x x x 255 are invalid DNS server settings blank Optional When th...

Page 35: ...0 is set up as a server TCP or UDP then the host which acts as a client must know the IP address of the server If the DHCP server assigns a new IP address to NPort 5200 the host must have some way of determining NPort 5200 s new IP address NPort 5200 device servers help out by reporting their IP address periodically to the IP location server in case the dynamic IP has changed The parameters shown ...

Page 36: ...splay serial port settings for ports 1 and 2 To modify serial settings for a particular port click on either Port 1 or Port 2 under Serial Settings located under Main Menu on the left side of the browser window Port alias Setting Factory Default Necessity 1 to 15 characters E g PLC No 1 blank Optional Port alias is included to allow easy identification of the serial devices that are connected to N...

Page 37: ...2 1 Required Stop bits will be set to 1 5 when Data bits is set to 5 bits Parity Setting Factory Default Necessity None Even Odd Space Mark None Required Flow control Setting Factory Default Necessity None RTS CTS DTR DSR Xon Xoff RTS CTS Required FIFO Setting Factory Default Necessity Enable Disable Enable Required NPort 5200 s serial ports provide a 16 byte FIFO both in the Tx and Rx directions ...

Page 38: ... check time Setting Factory Default Necessity 0 to 99 min 7 min Required 0 min TCP connection is not closed due to an idle TCP connection 1 to 99 min NPort 5200 automatically closes the TCP connection if there is no TCP activity for the given time After the connection is closed NPort 5200 starts listening for another Real COM driver connection from another host Max connection Setting Factory Defau...

Page 39: ...rt 5200 will use the serial communication parameters set in the console All of the hosts connected to that port must use the same serial settings If one of the hosts opens the COM port with parameters that are different from NPort 5200 s console setting data communication may not work properly Ignore jammed IP Setting Factory Default Necessity No or Yes No Required For previous versions of NPort 5...

Page 40: ...ived the Delimiter is deleted i e stripped and the remaining data is transmitted When Do nothing is selected the data will be transmitted when the Delimiter is received Force transmit Setting Factory Default Necessity 0 to 65535 ms 0 ms Required 0 Disable the force transmit timeout 1 to 65535 Forces the NPort 5200 s TCP IP protocol software to try to pack serial data received during the specified ...

Page 41: ...no TCP activity for the given time After the connection is closed NPort 5200 starts listening for another host s TCP connection Inactivity time Setting Factory Default Necessity 0 to 65535 ms 0 ms Optional 0 ms TCP connection is not closed due to an idle serial line 1 65535 ms NPort 5200 automatically closes the TCP connection if there is no serial data activity for the given time After the connec...

Page 42: ... hosts Ethernet data is sent on a first in first out basis to the serial port when data comes into NPort 5200 from the Ethernet interface Ignore jammed IP Setting Factory Default Necessity No or Yes No Required For previous versions of NPort 5200 when Max connections 1 and the serial device is transmitting data if any one of the connected hosts was not responding NPort 5200 would wait until the da...

Page 43: ...iter When Strip Delimiter is selected when the Delimiter is received the Delimiter is deleted i e stripped and the remaining data is transmitted When Do nothing is selected the data will be transmitted when the Delimiter is received Force transmit Setting Factory Default Necessity 0 to 65535 ms 0 ms Optional 0 Disable the force transmit timeout 1 to 65535 Forces the NPort 5200 s TCP IP protocol so...

Page 44: ...size for NPort 5200 is 1 KB per port Local TCP port Setting Factory Default Necessity 1 to 65535 4001 Required The Local TCP port is the TCP port that NPort 5200 uses to listen to connections and that other devices must use to contact NPort 5200 To avoid conflicts with commonly used TCP port numbers the default is set to 4001 Command port Setting Factory Default Necessity 1 to 65535 966 Optional T...

Page 45: ...ection was closed down unintentionally NPort 5200 will then force the existing TCP connection to close ATTENTION The Inactivity time should at least be set larger than that of Force transmit timeout To prevent the unintended loss of data due to the session being disconnected it is highly recommended that this value is set large enough so that the intended data transfer is completed ATTENTION Inact...

Page 46: ...s received the Delimiter is deleted i e stripped and the remaining data is transmitted When Do nothing is selected the data will be transmitted when the Delimiter is received Force transmit Setting Factory Default Necessity 0 to 65535 ms 0 ms Required 0 Disable force transmit timeout 1 to 65535 Forces the NPort 5200 s TCP IP protocol software to try to pack serial data received during the specifie...

Page 47: ...llows NPort 5200 to connect actively to the remote host whose IP address is set by this parameter ATTENTION Up to 4 connections can be established between NPort 5200 and hosts The connection speed or throughput may be low if one of the four connections is slow since the 1 slow connection will slow down the other 3 connections ATTENTION The Destination IP address parameter can use both IP address a...

Page 48: ... is received and will be disconnected when a DSR Off signal is received DSR On None A TCP connection will be established when a DSR On signal is received and will remain active indefinitely DCD On DCD Off A TCP connection will be established when a DCD On signal is received and will be disconnected when a DCD Off signal is received DCD On None A TCP connection will be established when a DCD On sig...

Page 49: ... Delimiter is deleted i e stripped and the remaining data is transmitted Do nothing The data will be transmitted when the Delimiter is received Force transmit Setting Factory Default Necessity 0 to 65535 ms 0 ms Required 0 Disable the force transmit timeout 1 to 65535 Forces the NPort 5200 s TCP IP protocol software to try to pack serial data received during the specified time into the same data f...

Page 50: ...ices must use to contact NPort 5200 To avoid conflicts with common UDP ports the default is set to 4001 Pair Connection Mode Pair Connection Mode employs two NPort 5200 device servers in tandem and can be used to remove the 15 meter distance limitation imposed by the RS 232 interface One NPort 5200 is connected from its RS 232 port to the COM port of a PC or other type of computer such as hand hel...

Page 51: ...o 4001 by default Note that you must configure the same TCP port No for the device server acting as the Pair Connection Slave Pair Connection Slave Mode When using Pair Connection Mode you must select Pair Connection Slave Mode for the Operation mode of one of the NPort 5200 device servers In effect this NPort 5200 will be acting as a TCP server TCP alive check time Setting Factory Default Necessi...

Page 52: ...1 Required Each of NPort 5200 s serial ports is mapped to a TCP port To avoid conflicts with common TCP port numbers set port numbers to 4001 for port 1 4002 for port 2 etc Map CR LF Setting Factory Default Necessity CR LF CR LF CR LF Required If data received through NPort 5200 s Ethernet port is sent using the enter command the data will be transmitted out the serial port with an added 1 carriag...

Page 53: ...ws you to add or block remote host IP addresses to prevent unauthorized access Access to NPort 5200 is controlled by IP address That is if a host s IP address is in the accessible IP table then the host will be allowed to access the NPort 5200 You can use one of the following types of access y Only one host with a specified IP address can access the NPort 5200 Use Netmask 255 255 255 255 for one o...

Page 54: ...put format Any host Disable 192 168 1 120 192 168 1 120 255 255 255 255 192 168 1 1 to 192 168 1 254 192 168 1 0 255 255 255 0 192 168 0 1 to 192 168 255 254 192 168 0 0 255 255 0 0 192 168 1 1 to 192 168 1 126 192 168 1 0 255 255 255 128 192 168 1 129 to 192 168 1 254 192 168 1 128 255 255 255 128 Auto Warning Settings Auto warning Email and SNMP trap Mail Server Mail server Setting Factory Defau...

Page 55: ...me Setting Factory Default Necessity IP address or Domain Name blank Optional Event Type Cold start This refers to starting the system from power off contrast this with warm start When performing a cold start NPort 5200 will issue an Auto warning message automatically by e mail or send an SNMP trap after booting up Warm start This refers to restarting the computer without turning the power off Whe...

Page 56: ... trap DSR changed The DSR Data Set Ready signal has changed also indicating that the data communication equipment s power is off For example a DSR change to high also means that the DCE is powered ON If the DSR signal changes to low it also means that the DCE is powered off When the DSR changes NPort 5210 5230 will immediately send an e mail or send an SNMP trap Mail Setting Factory Default Necess...

Page 57: ... show the operation mode and status of each connection IPx for each of the two serial ports Monitor Async Click on Async under Monitor to show the current status of each of the two serial ports Monitor Async Settings Click on Async Setting under Monitor to show the run time settings for each of the two serial ports ...

Page 58: ...e NPort 5200 is by using the Reset button on NPort 5200 s casing to Load Factory Default Remember to export the configuration file using NPort Administrator when you finish the configuration By using the Import function of NPort Administrator your configuration can be re loaded into NPort 5200 after using Load Factory Default Refer to Chapter 6 for more details about the Export and Import function...

Page 59: ...this chapter Overview Installing NPort Administrator Configuration Broadcast Search Unlock Password Protection Configuring NPort 5200 Upgrading the Firmware Export Configuration Import Configuration Monitor Port Monitor COM Mapping On line COM Mapping Off line COM Mapping IP Location ...

Page 60: ... and IP location server functions Device Server Administrator is an integrated software suite that bundles Device Server Administrator and the IP Serial Library and provides everything you need to manage monitor and modify your NPort 5200 from a remote location Installing NPort Administrator 1 Once the Setup program starts running click on Next when the Welcome window opens to proceed with the ins...

Page 61: ...200 Series User s Manual Configuring NPort Administrator 6 3 3 Click on Next to install the program using the default program name or select a different name 4 Click on Install to proceed with the installation ...

Page 62: ...NPort 5200 Series User s Manual Configuring NPort Administrator 6 4 5 The Installing window reports the progress of the installation 6 Click on Next to proceed with the installation ...

Page 63: ...e top section contains the function list and online help area Windows NT does not support this chm file format y The five Administrator function groups are listed in the left section y A list of NPort 5200 serial device servers each of which can be selected to process user requirements is displayed in the right section y The activity Log which displays messages that record the user s processing hi...

Page 64: ...ator window and then click the right mouse button 2 The Broadcast Search window will open and display the Model IP Address MAC Address and Progress of the search for that particular device 3 When the search is complete the Broadcast Search window will close and the NPort 5200s that were located will be displayed in the right pane of the Administrator window If you found more than one server connec...

Page 65: ... for Status you will receive the following error and you will not be able to use the right click method to open the configuration page In this case proceed as follows to Unlock the device server 1 Select the NPort 5200 with Lock status click the right mouse button and then select Unlock 2 Input the password and then click on OK 3 the Administrator will display an Unlock ok message 4 The Lock statu...

Page 66: ...ed and Broadcast Search was used to locate it Fixed The NPort 5200 is not password protected and Search by IP address was used to locate it Lock Fixed The NPort 5200 is password protected Specify by IP address was used to locate it and the password has not yet been entered from within the current Administrator session Unlock Fixed The NPort 5200 is password protected Specify by IP address was used...

Page 67: ...0 and select Configure to start the configuration 3 The progress bar shows that Administrator is retrieving configuration information from the specific NPort 5200 4 Refer to Chapter 5 for each parameter s function definition To modify the configuration you must first click in the modify box to activate the parameter setting box For example click on the middle modify box ...

Page 68: ...onfigurations of multiple NPort 5200s that are of the same model To select multiple NPort 5200s hold down the Ctrl key when selecting additional NPort 5200s or hold down the Shift key to select a group of NPort 5200s Upgrading the Firmware Follow these steps to upgrade the firmware of an NPort 5200 1 To start NPort Administrator click on Start Æ NPort Administration Suite Æ NPort Administrator ...

Page 69: ...Firmware function to start upgrading the firmware 3 Select the correct ROM file to download 4 Wait while the Upgrade Firmware action is processed ATTENTION You can simultaneously upgrade the firmware of multiple NPort 5200s that are of the same model To select multiple NPort 5200s hold down the Ctrl key when selecting an additional NPort 5200 or hold down the Shift key to select a block of NPort 5...

Page 70: ...l that can be used to produce a text file containing the current configuration of a particular NPort 5200 Import Configuration The Import Configuration function is used to import an NPort 5200 configuration from a file into one or more of the same model NPort 5200 To import a configuration first select the target servers click the right mouse button and then select Import Configuration Follow the ...

Page 71: ...d down the Ctrl key when selecting an additional NPort 5200 or hold down the Shift key to select a block of NPort 5200s Monitor Use one of the following two methods to start the Monitor function Broadcast Search Æ Monitor Æ Add Target 1 With Configuration selected under Function use Broadcast Search to locate all NPorts on your LAN 2 Next click on Monitor Æ Add Target select your targets from the ...

Page 72: ...anual Configuring NPort Administrator 6 14 Monitor Æ Add Target Æ Rescan 1 Click on Monitor under Function 2 Click on Monitor Æ Add Target from the menu bar or click the right mouse button and select Add Target 3 Click on Rescan ...

Page 73: ...l Configuring NPort Administrator 6 15 4 Select your targets from the list and then click on OK Once the Monitor function is running 1 The NPort 5200 list will appear on the Monitor screen 2 Right click the panel and select Settings ...

Page 74: ... Select or de select Monitor Items Use the single arrowhead buttons to move highlighted items from one box to the other Use the double arrowhead buttons to move all items in one box to the other 4 Select a Refresh Rate the default is 3 seconds on the General Settings page ...

Page 75: ...ent In the second case you must enter the path to the WAV file that you want to be played New event means that one of the NPort 5200s in the monitor is Alive or Not Alive or has lost connection with the Monitor program 6 Right click in the NPort 5200 list section and select Go to start Monitoring the NPort 5200 7 For this example the NPort 5200s shown in the list will be monitored ...

Page 76: ... Monitor program a warning alert will display automatically The warning music will be played at the same time 9 In the Monitor screen you can see that the NPort 5200s that are Not Alive are shown in red color 10 If the NPort 5200 gets reconnected a warning will be displayed to remind the user that the NPort 5200 is now Alive ...

Page 77: ...nitor The process described here is the same as in the previous Monitor section The only difference is that you can select more items under Port Monitor than under Monitor Select or de select Monitor Items Use the single arrowhead buttons to move highlighted items from one box to the other Use the double arrowhead buttons to move all items in one box to the other ...

Page 78: ...M Installation without first connecting the NPort 5200 to the network Off line COM Mapping can decrease the system integrator s effort by solving different field problems Via off line installation users can first process software installation for the host and then install the NPort 5200 to different fields Use the following procedure to map COM ports 1 On line COM Mapping Connect NPort 5200 to the...

Page 79: ... 3 Add the target to which you would like to map COM ports 4 The NPort 5200 list that appears is the list generated by the previous Broadcast Search Select the NPort 5200 to which you would like to map COM ports 5 Select COM Settings to modify COM No default setting etc ...

Page 80: ... Fast Flush function to Moxa s new NPort Real COM driver NPort Administrator Suite for 2G NPort adds it after version 1 2 For some applications the user s program will use the Win32 PurgeComm function before it reads or writes data With our design after the program uses this Purge Comm function the NPort driver will keep querying NPort s firmware several times to make sure there is really no data ...

Page 81: ...k on the COM ports that are mapped to the NPort and then select the Fast Flush checkbox You should find that when Fast Flush is enabled the NPort driver will work faster with PurgeComm 8 The Serial Parameter settings shown here are the default settings when the NPort 5200 is powered on However the program can redefine the serial parameters to different values after the program opens the port via W...

Page 82: ...M Mapping remember to select Apply Change to save the information in the host system registry The host computer will not have the ability to use the COM port until after Apply Change is selected 10 Select Discard Change to tell Administrator NOT to save the COM Mapping information to the host ...

Page 83: ...ile select Export COM Mapping You will then be able to import this configuration file to another host and use the same COM Mapping settings in the other host Off line COM Mapping 1 Add a target by inputting the IP address and selecting the Model Name without physically connecting the NPort 5200 to the network ...

Page 84: ...t click in the NPort list section and select Apply Change IP Location When NPort 5200 is used in a dynamic IP environment users must spend more time with IP management tasks NPort 5200 Series products help out by periodically reporting their IP address to the IP location server in case the dynamic IP has changed ...

Page 85: ...ith Dynamic IP settings DHCP BOOTP or DHCP BOOTP Assign the remote Auto IP report server s IP address and UDP port 2 Select IP Location Report and click the right mouse button to select Settings 3 Configure the Local Listen Port to be the same as the NPort 5200 s Auto report to UDP port setting ...

Page 86: ...NPort 5200 Series User s Manual Configuring NPort Administrator 6 28 4 Click Go to start receiving the Auto IP address report from the NPort 5200 ...

Page 87: ...7 7 Chapter 7 IP Serial LIB The following topics are covered in this chapter Overview IP Serial LIB Function Groups Example Program ...

Page 88: ...erstand By including it in your VB C or Delphi programming environment you can program your own TCP IP application with the ability to control serial communication parameters NPort 5200 uses 2 TCP ports for communication between the NPort 5200 and host computer s Real COM driver NPort 5200 uses a data port and command port to provide pure data transfer without decode and encode Compared to using o...

Page 89: ...SetWriteTimeouts nsio_lstatus nsio_data_status nsio_break nsio_break_on nsio_break_off nsio_breakcount Example Program char NPort 5200 Nip 192 168 1 10 char buffer 255 int port 1 int portid nsio_init portid nsio_open NPort 5200ip port nsio_ioctl portid B9600 BIT_8 STOP_1 P_NONE sleep 1000 nsio_read port buffer 200 nsio_close portid nsio_end data buffer 255 chars 1st port port handle initial IP Ser...

Page 90: ... A Appendix A Pinouts and Cable Wiring The following topics are covered in this appendix Port Pinout Diagrams Ethernet Port Pinouts Serial Port Pinouts Cable Wiring Diagrams Ethernet Cables Serial Cables ...

Page 91: ...erial Port Pinouts 8 pin RJ45 RS 232 Port Pinouts for NPort 5210 5210 T Pin RS 232 1 DSR 2 RTS 3 GND 4 TxD 5 RxD 6 DCD 7 CTS 8 DTR 1 8 Terminal Block RS 232 RS 422 485 Pinouts for NPort 5230 5230 T Rx CTS RTS GND GND Rx RxD Serial Device Signals NPort 5230 Signals Tx Data TxD Tx Data P1 RS 232 Tx Rx RTS CTS GND T T R D R D GND P2 RS 485 422 ...

Page 92: ... 6 1 1 2 2 Cross Over Cable RJ45 Plug Pin 1 Cable Wiring 3 1 6 2 1 3 2 6 Serial Cables 8 pin RJ45 to DB25 Female for NPort 5210 5210 T Cable Name CBL RJ45F25 150 NPort 5210 DSR RTS GND TxD RxD DCD CTS DTR RS 232 Device DTR CTS GND RxD TxD DCD RTS DSR Cable Wiring 1 2 3 4 5 6 7 8 20 5 7 3 2 8 4 6 Male DB25 Female DB25 RJ45 Connector RJ45 Port 25 pins 8 pins ...

Page 93: ...s 8 pin RJ45 to DB9 Female for NPort 5210 5210 T Cable Name CBL RJ45F9 150 NPort 5210 DSR RTS GND TxD RxD DCD CTS DTR RS 232 Device DTR CTS GND RxD TxD DCD RTS DSR Cable Wiring 1 2 3 4 5 6 7 8 4 8 5 2 3 1 7 6 Male DB9 Female DB9 RJ45 Connector RJ45 Port 9 pins 8 pins 8 pin RJ45 to DB9 Male for NPort 5210 5210 T Cable Name CBL RJ45M9 150 NPort 5210 DSR RTS GND TxD RxD DCD CTS DTR RS 232 Device DTR ...

Page 94: ...om 1024 through 49151 The Dynamic and or Private Ports range from 49152 through 65535 The Well Known Ports are assigned by the IANA and on most systems can only be used by system processes or by programs executed by privileged users The following table shows famous port numbers among the well known port numbers For more details please visit the IANA website at http www iana org assignments port nu...

Page 95: ...Management Utility 7 Echo 9 Discard 11 Active Users systat 13 Daytime 35 Any private printer server 39 Resource Location Protocol 42 Host name server names server 43 Whois nickname 49 Login Host Protocol Login 53 Domain Name Server domain 69 Trivial Transfer Protocol TETP 70 Gopler Protocol 79 Finger Protocol 80 World Wide Web HTTP 107 Remote Telnet Service 111 Sun Remote Procedure Call Sunrpc 119...

Page 96: ...s SysObjectID ifIndex ipDefaultTTL IcmpInErrors SysUpTime ifDescr ipInreceives IcmpInDestUnreachs SysContact ifType ipInHdrErrors IcmpInTimeExcds SysName ifMtu ipInAddrErrors IcmpInParmProbs SysLocation ifSpeed ipForwDatagrams IcmpInSrcQuenchs SysServices ifPhysAddress ipInUnknownProtos IcmpInRedirects ifAdminStatus ipInDiscards IcmpInEchos ifOperStatus ipInDelivers IcmpInEchoReps ifLastChange ipO...

Page 97: ...mpReps ipAdEntReasmMaxSize IcmpOutAddrMasks IpNetToMediaIfIndex IcmpOutAddrMaskReps IpNetToMediaPhysAddress IpNetToMediaNetAddress IpNetToMediaType IpRoutingDiscards UDP MIB TCP MIB SNMP MIB UdpInDatagrams tcpRtoAlgorithm snmpInPkts UdpNoPorts tcpRtoMin snmpOutPkts UdpInErrors tcpRtoMax snmpInBadVersions UdpOutDatagrams tcpMaxConn snmpInBadCommunityNames UdpLocalAddress tcpActiveOpens snmpInASNPar...

Page 98: ...mpOutNoSuchNames snmpOutBadValues snmpOutGenErrs snmpOutGetRequests snmpOutGetNexts snmpOutSetRequests snmpOutGetResponses snmpOutTraps snmpEnableAuthenTraps RFC1317 RS 232 MIB objects Generic RS 232 like Group RS 232 like General Port Table RS 232 like Asynchronous Port Group rs232Number rs232PortTable rs232AsyncPortTable rs232PortEntry rs232AsyncPortEntry rs232PortIndex rs232AsyncPortIndex rs232...

Page 99: ...ice Information C 4 The Input Signal Table The Output Signal Table rs232InSigTable rs232OutSigTable rs232InSigEntry rs232OutSigEntry rs232InSigPortIndex rs232OutSigPortIndex rs232InSigName rs232OutSigName rs232InSigState rs232OutSigState ...

Page 100: ...ime after receiving it but the NPort will send a DHCP request again to the DHCP Server Once the DHCP Server realizes that this IP address is to be released to other DHCP Clients the NPort then will receive a different IP address For this reason users sometimes find that the NPort will use different IP addresses not a fixed IP address In order to know which IP address the NPort is using you need to...

Page 101: ... on 4 Serial Number 4 DWORD Little endian 5 IP Address 4 DWORD Little endian 6 Netmask 4 DWORD Little endian 7 Default Gateway 4 DWORD Little endian 8 Firmware Version 4 DWORD Little endian Ver1 3 4 0x0103040 9 AP ID 4 DWORD Little endian AP ID Hardware ID Mapping Table AP ID Hardware ID Product 0x80005000 0x0504 NPort 5410 0x80005000 0x0534 NPort 5430 0x80005000 0x1534 NPort 5430I 0x80000312 0x03...

Page 102: ...on This appendix shows you how to contact Moxa for information about this and other products and how to report problems In this appendix we cover the following topics MOXA Internet Services Problem Report Form Product Return Procedure ...

Page 103: ...tomers receive the full benefit of our products Moxa Internet Services has been set up to provide technical support driver updates product information and user s manual updates The following services are provided E mail for technical support support moxa com tw World Wide Web WWW Site for product information http www moxa com or http www moxa com tw ...

Page 104: ...1 Moxa Product NPort 5210 NPort 5230 NPort 5232 NPort 5232I 2 Serial Number _________________ Problem Description Please describe the symptoms of the problem as clearly as possible including any error messages you see A clearly written description of the problem will allow us to reproduce the symptoms and expedite the repair of your product ...

Page 105: ... PRA from the sales representative or dealer Fill out the Problem Report Form PRF Include as much detail as possible for a shorter product repair time Carefully pack the product in an anti static package and send it pre paid to the dealer The PRA should be visible on the outside of the package and include a description of the problem along with the return address and telephone number of a technica...

Reviews: