background image

Engine

SHOP MANUAL MT26-31 - 06.2005

Tier-3  710655-

Ch 1 

page

 47

1. 
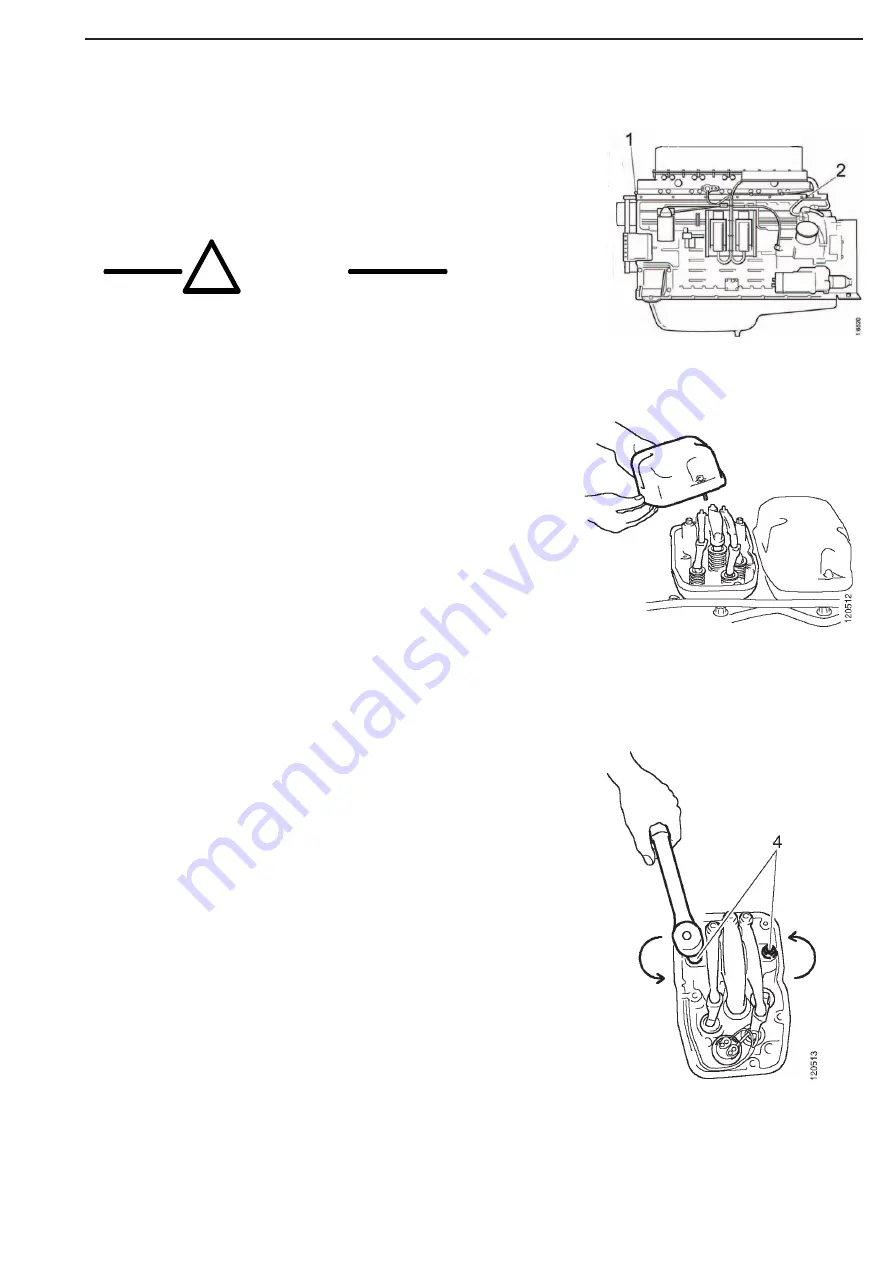
Open the bleeder nipple and drain the fuel
system by undoing the banjo screw on the
back of the fuel manifold.

The fuel system must be empty or fuel

may run down into the cylinders, which

will result in a great risk of liquid

hammering. If fuel runs into the

combustion chamber, it must be removed

immediately using a pump.


Clean the rocker cover and the surrounding
area.

3. 
Remove the top part of the rocker cover.

4. 
Relieve the pressure on the valves by
undoing the bolts on the rocker arm shaft
alternately.

WARNING!

!

1. Bleeder nipple
. Banjo screw

Summary of Contents for MT 26

Page 1: ...Engine SHOP MANUAL MT26 31 06 2005 Tier 3 710655 Ch 1 page Chapter 1 Engine...

Page 2: ...ead fault codes from the ECU control unit 33 Flash codes tables 35 Overview of flash codes for coordinator 37 Renewing the control unit 39 Removing the ECU wiring 40 Cylinder head 44 Special tools 44...

Page 3: ...ng the flywheel 91 Renewing the rear crankshaft seal 93 Removing the flywheel housing 93 Fitting flywheel housing 94 Fitting the flywheel 96 Timing gears 97 Gear drive 97 Belt drive collant pump gener...

Page 4: ...48 Blue smoke 148 Fuel in the oil 148 Oil in coolant 149 Coolant water in oil 150 Low oil pressure 151 High oil pressure Engine warmed up 153 Abnormal wear liner piston rings etc 153 Vibration no driv...

Page 5: ...tery case Raise the dump body and lock it with the safety support Raise the tiltable cab and lock it with the safety support Drain engine coolant Look in OPERATION MAINTENANCE MANUAL chapter 2 for ins...

Page 6: ...er stand bracket Right side 1 Unscrew the hose clamps and remove the pipe bend filter turbo 2 Disconnect the oil hose from engine brake cylinder and bracket disassemble the other end at left side on t...

Page 7: ...OP MANUAL MT26 31 06 2005 Tier 3 710655 Ch 1 page Disconnect the exhaust pipe from the turbo pipe bend Disasssemble the cable to the Air filter sensor Disassemble the clamps for the wiring on the filt...

Page 8: ...mpressor on the left while the engine is dismount Disconnect the hose from the termostathousing the pipe between the air cooler and the engine air inlet Disconnect bracket for the air pipe and bracket...

Page 9: ...6 31 06 2005 Tier 3 710655 Ch 1 page Disconnect the contact on the dynamo Remove the cover and disconnect the electrical contact from the engine ECU S6 control unit Disconnect the cables between start...

Page 10: ...cable 2 pcs 2 Left and right hand side disassemble 3 screws on the engine mounting bracket 2 1 1 2 1 Disassemble the hose clamp bracket 2 Unscrew the engine bracket bolt left and right hand side 1 2 D...

Page 11: ...the front lifting eye With attention lift the engine out from the frame Note The lifting eyes are sized to cope with a maximum angle of 30 Lifting the engine Note The engine lifting eyes are designed...

Page 12: ...ement in whole dm3 Performance and certification code Indicates together with the application code the normal gross engine output The actual output setting of the engine is indicated on the engine car...

Page 13: ...of the overflow valve is to limit the pressure in the fuel system and continuously vent it The overflow valve ensures that the fuel circu lates round the system and that there is always fuel in the i...

Page 14: ...on the functioning and the service life of the engine and the injection system The engine output and exhaust emissions are also dependent on the fuel quality The diesel fuel must meet European standar...

Page 15: ...by undoing plug 4 in the free inlet passage Function Fuel is pumped into the inlet by the fuel pump It then continues through passages in the filter retainer to the upper part of the fil ter down thro...

Page 16: ...e properties we recommend that an electric fuel heater is installed as a preventative measure The low temperature properties of diesel fuel may be improved by adding kerosene as a preventative measure...

Page 17: ...el tank The fuel rail distributes the fuel to the unit injectors in each cylinder head The ECU control unit determines when the unit injectors must inject fuel into the cylinders Feed pump renewal 1 C...

Page 18: ...ng unit Moxy No 513376 1 Switch on the laptop 2 Connect the cabel end 1 to the CT1 unit 3 Connect the USB plug 2 to the Laptop 4 Put in the USB key 5 Switch on the ignition key If read the setting par...

Page 19: ...N bus devices on the truck Contains two independent CANbus interfaces and han dles data transfers between these buses Connection point for engine diagnosis Handle WDB monitoring and alarm Handle histo...

Page 20: ...HOP MANUAL MT26 31 06 2005 Engine Tier 3 710655 Ch 1 page 20 S6 Diagnostic Fault Codes Measurement ECU Info ID Data Logs E2 Engine Test Read out fault codes Measuring of valves Adjusting of parameters...

Page 21: ...re filtered value 1 2 6 5 4 3 Boost pressure filtered value 1 Move text line from the A section to B 2 Start the logging by the start button 3 Select Viev the list to watch the values or 4 Move text l...

Page 22: ...SHOP MANUAL MT26 31 06 2005 Engine Tier 3 710655 Ch 1 page 22 DTC Counter Status YYYY MM DD SS Description 2000 1 Active 001 1 1 1 1 Engine temp sensor sensor signal 4 90 VI 40 C...

Page 23: ...xample to change temp alarm and warning Go to S6 E2 Program E2 parameter Read values Go to the column for values find the line for engine temp and change the value Then go to the button write values a...

Page 24: ...CC buttons FE65 Oil temperature sensor on EMS available 0 1 0 1 0 Not available 1 Available FE63 Use safety switch on accelrator pedal 0 1 1 1 0 Not available 1 Available FE67 Diesel fuel density use...

Page 25: ...ff limit 0 150 105 C 105 FCF3 Engine coolant temperature torque limitation limit 0 150 95 C 102 FCB5 Reaction on CAN or accelrator pedal error 0 1 2 3 4 8 0 1 0 No action low level 1 Increased low idl...

Page 26: ...age breakpoints for 0 and 100 for redundant Accelrator pedal connected to input AUX_AN on EMS 100 4900 Array x 2 485 2693 mV 485 2693 FD73 Engine speed dependent friction torque Breakpoints in flash 5...

Page 27: ...mps in the instrument panel The coordinator also has monitoring functions When the ECU control unit detects a fault the control unit diagnostics lamp comes on left hand lamp on the instrument panel an...

Page 28: ...microswitches for throttle activation idle safety switch and full throttle kick down switch The idle safety switch tells the control unit whether the accelerator is released or activated This is prima...

Page 29: ...mperature sensor 4 Engine speed sensor 2 Positions of sensors for ECU 2005 11 1 Scania Industrial Marine Engines 13 Positions of sensors for EMS with S6 on DC9 1 Coolant temperature sensor 2 Oil press...

Page 30: ...SHOP MANUAL MT26 31 06 2005 Engine Tier 3 710655 Ch 1 page 30...

Page 31: ...he diagnostics switch consists of a double switch for to select and read either the ECU or the Coordi nator Push the upper side and read the blink code for the ECU Push the lower side and read the bli...

Page 32: ...ights up The diagnostics lamp will remain permanently lit for as long as a fault is active Even if the lamp has gone off and the fault is no longer active the code can generally be read off in accorda...

Page 33: ...t 1 second long and short flashes 0 3 seconds long Long flashes are equivalent to tens and short flashes to units Example long long short short short short short fault code 25 See the example on the r...

Page 34: ...n the engine is delivered to the customer How to erase fault codes using the diagnostics switch How to erase fault codes that are flashed on the diagnostic lamp is described below The fault codes are...

Page 35: ...or charging incorrectly 23 Fault code internally in the coordinator 69 Starter motor function interrupted or not activated 24 Accelerator brake If the accelerator and brake have been operated simultan...

Page 36: ...Even if the lamp has gone off and the fault is no longer active the code can generally be read off in accordance with the instruction below How to read fault codes for the coordinator 1 Switch on the...

Page 37: ...nge Renew the coordinator See also fault codes for the ECU control unit The signal is not always required Check with Moxy service 16 The signals from the brake pedal switches do not agree The flash co...

Page 38: ...The supply voltage is less than 18 volts for more than 2 seconds Check the battery and alternator Certain inputs and outputs become inactive 25 Check value from End of line EOL is incorrect 26 Road sp...

Page 39: ...ning lamp to go out 1 Remove the covers over the connectors on the control unit and then unplug the connectors 2 Remove the control unit fixing screws and lift off the control unit 3 Fit the new contr...

Page 40: ...ted on the left hand cable duct 5 Unplug the connectors from the control unit 6 Remove the rocker covers On the 12 litre engine the crankcase ventilation must be removed before the rocker cover on cyl...

Page 41: ...Tightening torques Unit injector solenoid valves screws 2 0 0 2 Nm 512562 Torque screwdriver IMPORTANT If the screws are tightened too tight there is a risk that they may break If this happens the ent...

Page 42: ...n below 3 Run the cables to the unit injectors Check that you have run the right cable to each unit injector by testing the cables with a multimeter as shown in the tables Cylinder Connector Pin 1 B2...

Page 43: ...he oil pressure sensor and its clamps 10 Fit the coolant temperature sensor and its clamps 11 Fit the charge air sensor and its clamps Note Handle the engine speed sensors with care They are magnetic...

Page 44: ...386 Sleeve for injectors 8405 Tool for turning flywheel 8387 Socket 8406 Press drift 8407 Assembly drift 512260 Drift 512261 Handle 512257 Drift 512266 Pilot tap 512259 Drift 512258 Drift 512262 Guide...

Page 45: ...Shaft 17 Bearing bracket 18 Rocker arm for unit injector 19 Adjusting screw 20 Hexagon nut 21 Rocker arm 22 Spacing sleeve injection pump 23 Adjusting screw 24 Hexagon nut 25 Rocker arm 26 Core plug 2...

Page 46: ...ushrod so that the tappet follows the cam shaft at all times The correct clearance can be set with the adjusting screw to ensure that the valve will close properly during combustion The valves seal ag...

Page 47: ...or fuel may run down into the cylinders which will result in a great risk of liquid hammering If fuel runs into the combustion chamber it must be removed immediately using a pump 2 Clean the rocker co...

Page 48: ...causing personal injury Note If the spring comes loose from the unit injector the unit injector must be renewed 5 Remove the rocker arm shaft 6 Remove the bearing bracket 7 Remove the pushrods Note Th...

Page 49: ...lift the unit injector by the spring The spring can come loose 12 Turn the unit injector anti clockwise until it stops Place the slide hammer 87 596 between the solenoid valve and the edge of the low...

Page 50: ...et on the solenoid valve housing Important The unit injector is not to be dismantled Renew the entire unit 15 Remove the sealing washer from the bottom of the injector seat if it was left behind when...

Page 51: ...removed 2 Mark and place the valves in a rack so that they can be refitted in the same position in the cylinder head 3 Mark the cylinder heads if more than one is removed at the same time 1 Remove the...

Page 52: ...nd with the underside downwards when tapping out the valve seat ring Otherwise there is a risk of loose splinters causing personal injury 3 Press in new valve seat inserts Use drift 512260 and handle...

Page 53: ...37 9 0 5 mm setting value for machining tool Work description The following description applies to valve seat cutter 512265 Machining values and over sized valve seat inserts see Specifications and a...

Page 54: ...ing a valve 6 Adjust the cutter Diameter 37 9 mm or 39 8 mm see Machining values 7 Disconnect the magnetic base position 2 Insert the guide spindle into the valve bushing Adjust the pivot plate so tha...

Page 55: ...of the valve seat is completed reduce the cutting pressure by turning the crank 23 turns without feeding Then continue to turn the crank while turning the feed screw anti clockwise The valve seat cut...

Page 56: ...512266 and guide 512262 512560 2 Knock out the pilot tap and sleeve from underneath Use a 100 mm metal rod with a 9 mm diameter 3 Degrease and check the contact surfaces of the sleeve and cylinder hea...

Page 57: ...nder head and ensure that the guide pins fit into the holes 4 The cylinder head bolts can be reused up to 3 times Therefore make sure the bolts have no more than 2 punch marks on top of the bolt head...

Page 58: ...nagement System is the electronic system that controls both how much fuel each unit injector should inject into the cylinder and also when the unit injector should inject the fuel This control of the...

Page 59: ...n the control unit after the work has been completed 1 Make sure that the old seal is not at the bottom of the injector seat Clean the sealing surfaces in the injector seat IMPORTANT Always renew the...

Page 60: ...e dry and free of oil 4 Place the fork clamp with screw in position on the unit injector and insert it into the cylinder head Press down the unit injector by hand as far as possible 5 Torque tighten t...

Page 61: ...e adjustment commences 6 Refit the rocker arm shaft Screw in the bolts alternately so that they are tightened in parallel or one of the bolts may bend Tighten the bolts to 105 Nm 7 Check and adjust th...

Page 62: ...Bleeding the fuel system Adjusting unit injectors Important The PDE31 unit injector is adjusted using setting tool 512264 or a digital sliding caliper This adjustment is important because an incorrect...

Page 63: ...r spring 2 Finely adjust dimension A by simultaneously using a finger to sense that the small piston 2 is level with the flat upper surface of the tool It is possible to sense differences of less than...

Page 64: ...alves should be 0 45 mm and the clearance for exhaust valves should be 0 70 mm when the engine is cold The intake valves are actuated by the short rocker arms and the exhaust valves by the long rocker...

Page 65: ...YWHEEL Cylinder numbering Turn the flywheel with tool 8405 to valve overlap on cylinder 1 which corresponds to TDC Up 0 in the opening Then turn the flywheel anti clockwise 144 at a time and observe t...

Page 66: ...mm Placing of the tool 512264 Check the clearanse using a finger to sense that the small piston is level with the flat upper surface of the tool It is a good idea to mark the rocker arm with a pen aft...

Page 67: ...in a bear ing housing between the compressor and turbine Higher power output from the engine gives more exhaust fumes and the increased exhaust means that the turbine wheel and therefore the compres s...

Page 68: ...ce may occur when it is refit ted Note Whenever working on the turbo charger observe utmost cleanli ness The oil intake and outlet con nections must never be left open A foreign body in the bearing ho...

Page 69: ...88 Filter wrench 8389 Deflection gauge 8391 Stand 8014 8388 8389 8391 1 Lubrication oil pipe 2 Ferrule 3 Union nut 4 Straight union 5 Seal 6 Straight union 7 Gasket 8 Lubrication oil return pipe 9 Hos...

Page 70: ...d holding the dial gauge Radial clearance Take readings on both turbine wheel and com pressor wheel 1 Place the tip of the deflektion gauge against the turbine wheel and compressor wheel 2 Pull both e...

Page 71: ...tween the air cleaner and turbocharger 2 Check that there are no loose particles in the exhaust manifold or intake manifold 3 Check that all valves are intact 4 Check the lubrication oil return pipe f...

Page 72: ...on the exhaust manifold to ensure that there are no remnants of the old gasket 2 Fit a new gasket and bolt on a new turbocharger Lubricate the exhaust manifold bolts with high temperature resistant lu...

Page 73: ...cylinder liners 1 O ring 3 Cylinder liner for steel piston 5 O ring 6 Compression ring 7 Compression ring 8 Oil scraper ring 9 Circlip 10 Steel piston 12 Gudgeon pin 13 Circlip 14 Bearing bushing 15 C...

Page 74: ...8036 8409 8390 8395 8004 Rule for dial gauge 8005 Drift 8014 Dial gauge 8224 Piston ring compressor 8028 Pressing tool 8036 Hydraulic cylinder 8215 Puller for cylinder liner 8049 Impact drift 8401 Di...

Page 75: ...machined together to ensure a precise and accurate fit The parts are also marked so that they can always be fitted in the same position The connecting rod and big end cap are split obliquely partly s...

Page 76: ...d connecting rod before removing them They must be refitted in the same place and in the same way 5 Lift out the piston and connecting rod 6 Place the connecting rod in a vice with soft jaws Remove th...

Page 77: ...cator studs on the gudgeon pin Check whether the connecting rod is twisted with the indicator studs horizontal Check whether the connecting rod is bent with the indicator studs vertical The distance b...

Page 78: ...ore carrying out this procedure the connecting rod should be checked for straightness in accordance with Checking connecting rods Work description 1 Fit the correct support on the pressplate and place...

Page 79: ...005 Tier 3 710655 Ch 1 page 79 3 After pressing in a new bearing bushing it must be finish turned This requires special equipment Refer to illustration for the dimensions required Diameter d 54 030 54...

Page 80: ...temperature prevailing in the com bustion chamber the material is thicker at the piston crown and piston ring grooves than in the remainder of the piston One of the advantages of articulated pistons...

Page 81: ...groove and also to reduce wear a reinforcement of cast iron is incorpo rated in the piston The bottom piston ring the oil scraper ring pre vents oil from the crankcase from finding its way up to the c...

Page 82: ...measure the gap using a feeler gauge For permitted gap see section entitled Specifications piston rings 3 Fit the piston rings using tool 8395 The oil scraper ring has an expander Pistons rings marke...

Page 83: ...k and cylinder head consists of a steel elastomer gasket Seals are bonded in place at the oil and coolant passages Cylinderblock Cylinder liner The cylinder liners are of the wet type i e they are sur...

Page 84: ...all of the liner The design of the pattern is of major importance for ensuring low oil consumption in the engine Two sealing rings one in the block and one in the liner seal off the coolant jacket The...

Page 85: ...so that the liners can be refitted in the same place and position as previously Note The mark must be made only on the surface indicated in the illustration Other surfaces are for sealing 2 Withdraw t...

Page 86: ...lock and the cylinder liner shelf 4 Insert the cylinder liner without O rings and twist it down into position again by hand 5 Place straight edge 87 198 with dial gauge 98 075 on the liner and zero th...

Page 87: ...d cylinder number facing forward and carefully tap it down with a rubber mallet 9 Fit the scraper ring in place after the piston has been fitted 1 Check cylinder liner height as described in the secti...

Page 88: ...r ring in the liner Fit assembly tool 8409 instead of the scraper ring in the liner 6 Carefully insert the connecting rod and piston so that the arrow mark on the piston points forward 7 Clamp piston...

Page 89: ...s nozzles are in perfect condition and fully open If necessary blow clean with compressed air 13 Fit the piston cooling nozzle and tighten the banjo bolts to 23 Nm Note The piston cooling nozzle must...

Page 90: ...14 Washer 15 Stud 16 Rotation speed sensor 17 Contact housing 18 Flange bolt 19 Clamp 20 Clamp 21 Bolt 22 Timing gear plate engines with injection pump 23 Timing gear plate engines with PDE unit injec...

Page 91: ...410 8412 8432 8432 Assembly tool 512556 Assembly tool 512555 Assembly tool Not illustrated 512559 Air powered sprayer 512557 Cartridge adapter 512558 Nozzle 1 Remove the engine speed sensor s in the f...

Page 92: ...ge 1 Grind a groove as deep as possible in the ring gear and crack it open with a chisel Remove the ring gear from the flywheel Use protective goggles due to the risk of metal shivers 2 Clean the cont...

Page 93: ...The sleeve in the seal should be left in place until the seal is fitted The crankshaft should be degreased before the new seal is fitted 2 Fit the new crankshaft seal using tool 512555 Place the crank...

Page 94: ...air powered sprayer 512559 cartridge adapter 512565 and nozzle 512558 The width of the bead should be between 0 8 and 1 2 mm Follow the pattern as illustrated Important Ensure that you apply sealing a...

Page 95: ...Engine SHOP MANUAL MT26 31 06 2005 Tier 3 710655 Ch 1 page 95...

Page 96: ...shaft flange 2 Fit the flywheel on the crankshaft NOTE Always use new bolts and washer 3 Lock the flywheel using tool 512563 for engines with unit injector 4 Torque tighten the bolts alternately to 13...

Page 97: ...il pump gear One of the intermediate gears drives the camshaft The cam shaft gear in its turn drives the injection pump gear The other intermediate gear meshes with the gear for the air compressor 1 O...

Page 98: ...ide The pulleys are of corresponding design and the belt therefore has an extremely large contact surface for its width A large contact surface re duces the risk of belt slippage Included in the belt...

Page 99: ...ted The sleeve in the seal should be left in place until the seal is fitted 6 Place the new seal on tool 8421 and press it in place by tightening the diametrically opposite bolts alternately The seal...

Page 100: ...e amplitude of the oscillation a crankshaft damper is attached to the front end of the crankshaft underneath a cover A ring of steel is incorporated in the circular and completely enclosed housing of...

Page 101: ...lange bolt 12 Flange bolt 13 Flange bolt 14 Flange bolt 15 Flange bolt 16 Crankshaft seal 17 Cover 18 O ring 19 Lifting eye 20 Cover 21 Gasket 22 Flange bolt 23 Crankshaft gear 24 Injection pump gear...

Page 102: ...710655 Ch 1 page 102 Special tools Special tools gear 87 509 Drift 87 596 Slide hammer 87 663 Support drift 87 665 Puller 87 932 Drift 98 133 Washer 98 721 Assembly tool 99 059 Slogging wrench 99 088...

Page 103: ...lt pulley if fitted Take care to avoid damaging the crankshaft damper 3 Remove the crankshaft bolt in front of the damper hub Use slogging wrench 99 059 4 Fit support drift 87 663 in the end of the cr...

Page 104: ...cillation damper hub in contact with the seal and drive on the hub using drift 87 509 4 Fit the crankshaft bolt with washer 98 133 but without the cone in the hub Tighten the crankshaft bolt to 300 Nm...

Page 105: ...he crankshaft damper 4 Remove the crankshaft bolt in front of the damper hub Use slogging wrench 99 059 5 Fit support drift 87 663 in the end of the crankshaft 6 Screw on puller 87 665 with all six bo...

Page 106: ...aft seal See Crankshaft seal Fitting 4 Drive on the oscillation damper hub using drift 87 509 5 Fit the crankshaft bolt with washer 98 133 but without the cone in the hub Tighten the crankshaft bolt t...

Page 107: ...the intermediate gear 4 Remove the intermediate gear Note After the intermediate gear has been removed the camshaft and crank shaft must not be moved Pistons and valves could then strike each other an...

Page 108: ...9 088 and support drift 99 093 with or with out the aid of the hydraulic tool as shown in the figure Note After the intermediate gear has been removed the camshaft and crank shaft must not be moved Pi...

Page 109: ...e After the intermediate gear has been removed the camshaft and crank shaft must not be moved Pistons and valves could then strike each other and sustain damage Fitting 1 Lubricate the end of the cams...

Page 110: ...e camshaft gear retaining nut The camshaft gear can now be pulled off the cam shaft using puller 587 315 or can be left in place when the camshaft is extracted 5 Remove the intermediate gear and the g...

Page 111: ...Fit new bearings so that the lubricating holes are opposite the oilways in the block Checking camshaft setting 1 Set the crankshaft at TDC for No 1 cylin der s compression stroke valves closed 2 Set u...

Page 112: ...on the 7th main bearing Checking and grinding 1 Measure the crankshaft pivot pins Use a micrometer to take measurements at two points 90 degrees apart If either of these diameters is below the spec i...

Page 113: ...lift in the crankshaft Fit the thrust washers and place the caps as marked 4 Lubricate the bolt threads and start by tight ening the cap bolts to 90 Nm The tighten the bolts to 290 Nm Check that the...

Page 114: ...ough the oil cleaner and oil cooler The lubricating oil is sucked from the sump through a strainer in the oil pump The oil pressure must be so high as to ensure that each lubrication point receives th...

Page 115: ...ylinder block to reach the camshaft bearings and the crankshaft main bearing Channels in the crankshaft feed the oil on to the connecting rod bearings Lubrication oil for the rocker arms is led via a...

Page 116: ...of 3 6 bar Min oil pressure warm engine running at a speed of 1000 rpm 1 0 bar The control system has the following alarm levels at a speed of less than 1000 rpm and an oil pressure of less than 1 0 b...

Page 117: ...assages in the block to the oil cooler located inside the front side cover on the right hand side of the block The oil cooler is a plate heat exchanger All the oil flows through the cooler where it is...

Page 118: ...6 2005 Engine Tier 3 710655 Ch 1 page 118 Oil cooler view 1 Gasket 2 Flange bolt 3 O ring 4 O ring 5 Oil cooler 6 Oil cooler cover 7 Flange bolt 8 Core plug 9 Gasket 10 Cover 11 Bolt 12 Piston 13 Spri...

Page 119: ...Remove the side cover and oil cooler from the block 2 Remove the 4 bolts securing the oil cooler to the side cover 3 Remove the oil cooler 4 Renew the 4 O rings 5 Fit the oil cooler insert and bolt s...

Page 120: ...ooler the oil passes through a large capacity full flow filter of paper This filter also cleans the oil to the turbocharger The oil filter has an overflow valve which opens if the filter be comes clog...

Page 121: ...irts out through two nozzles at the bottom of the rotor Dirt particles are slung against the wall of the rotor by centrifugal force and fasten there as a coating The rotor should be dismantled and cle...

Page 122: ...r bowl should be cleaned more often 1 Undo the nut holding the outer cover and remove the nut 2 Drain out the oil from the rotor 3 Lift out the rotor Wipe off the outside Undo the rotor nut and unscre...

Page 123: ...6 Remove the rotor nut and bowl from the rotor 7 Remove the strainer located on the rotor If the strainer has fastened prise carefully with a knife or screwdriver at the bottom between the rotor and t...

Page 124: ...with to weld nut M20 without threads on the square end See the figure The socket spanner 8023 is still usable for the old type of the cen trifugalfilter after this modification 14 F r att kunna dra f...

Page 125: ...using screw locking compound First clean thoroughly using a suitable solvent 15 Tighten the rotor shaft using socket 8023 Tightening torque 34 Nm 16 Refit the rotor and spin it by hand to make sure i...

Page 126: ...SHOP MANUAL MT26 31 06 2005 Engine Tier 3 710655 Ch 1 page 126 Cooling fan The fan is driven by the hydraulic system and is moved to the hydraulic chapter Look in the chapter 5...

Page 127: ...Ch 1 page 127 Cooling water sirculates in the engine cooling system Charge air cooler View of the cooling system Cooling system To the cab heater From the cab heater Inlet from filter Exhaust Transmi...

Page 128: ...e engine through the transmission cooler The coolant which needs to be cooled are going through the open thermostat and to the radiator cooler system through the transmission cooler and back to the en...

Page 129: ...smission 1 2 Disassemble the horn unit remove the fastening wiring strips and clamps from the brackets 3 Disconnect the cooling hoses from the thermostat housing and the outlet hose from the transmiss...

Page 130: ...he engine NOTE Do not disassemble the Air Condition hoses from the condenser filter or the compressor 7 Fastening the lifting device to the radiator unit Check that all cooling pipes and hoses are dis...

Page 131: ...pass channel is closed and all coolant flows through the thermostats and on to the radia tor If temperature equilibrium occurs within the oper ating range of the thermostats i e between the temperatur...

Page 132: ...ver and remove the thermostat double thermostat 1 Clean the thermostat housing and check that nothing obstructs the function of the thermo stat 2 Insert the thermostat in the housing Fit new gaskets a...

Page 133: ...of centrifugal type and consists of a spiral shaped pump housing with an impeller directly mounted on the driveshaft The shaft is mounted in the housing and by means of two per manently lubricated bal...

Page 134: ...the fan 3 Remove the fan 4 Turn the automatic belt tensioner and prise the poly V belt off the coolant pump pulley 5 Remove the coolant pump assembly Fitting the pump 1 Clean old gasket debris from th...

Page 135: ...r 501348 and drift 501349 2 Press the pulley on until it is flush with the shaft end face Changing the sealing ring If coolant has leaked out inside the housing behind the pulley the sealing ring can...

Page 136: ...d together 6 Press in the new sealing ring with drift 501351 until the edge of the brass sleeve abuts against the pump housing Keep it under pressure for about 10 seconds Note It is very important tha...

Page 137: ...ater mixed with a commercially available radiator cleaner based on sulphamic acid and containing dispersing agents Follow the manufacturer s instructions for mixing proportions and cleaning times Run...

Page 138: ...ection of rotation viewed from front Clockwise Cooling Liquid Valve clearances cold engine intake valve mm exhaust valve mm 0 45 0 70 Weight without coolant or oil kg With charge air cooler radiator e...

Page 139: ...thermostat Thermostat opening temperature C 8 3 Coolant temperature system at atmospheric pressure C system at overpressure C 83 95 83 approx 100 Volume including radiator engine and expansion tank w...

Page 140: ...he valve head 0 66 1 8 mm Check dimension A for each valve Grind the valves in a valve grinding machine Intake valve seat Seat angle 20 0 20 5 Width of contact surface A 1 9 2 6 mm Valve seat insert o...

Page 141: ...bracket 115 Nm Nut for adjusting screw on rocker arm 40 Nm Bolt for rocker cover 26 Nm Bolts for exhaust manifold 50 5 Nm 60 Bolts for turbocharger 50 Nm Valve clearances and unit injectors Valve clea...

Page 142: ...for cylinder liner thickness 0 20 0 25 0 30 0 40 0 50 0 75 mm Height of cylinder liner above cylinder block 0 20 0 30 mm Maximum permitted height difference on one liner between dimensions measured a...

Page 143: ...tted with marking in Tightening torques Oil sump bolts 30 Nm Connecting rod bolts 20 Nm 90 Flywheel and flywheel housing Flywheel Maximum machining allowance for disc pressure surface 2 0 mm Ring gear...

Page 144: ...ax axial clearance 0 238 mm Camshaft Axial clearance 0 10 0 25 mm Tightening torques Bolts for camshaft gear 63 Nm Bolts for intermediate gears 50 Nm 60 Bolts for compressor gear 105 Nm Connecting rod...

Page 145: ...ing at 1000 rpm 2 5 bar With warm engine running at 2 000 rpm 4 5 6 0 bar Free spring length 61 4 mm Oil filter Only use original MOXY filters Tightening torques Oil pump Bolts for oil pump cover 26 N...

Page 146: ...ery pipe at a time and listen for changes in the engine sound WARNING Be careful when disconnecting the delivery pipes as the pressure is extremely high and could cause injury Too much fuel in rela ti...

Page 147: ...spring uncontrolled injection Leaky injector drip ping Nozzle tip jams More than 1 washer under injector Fault in turbo Clogged air filter High exhaust counter pressure Worn intake valves Clogged int...

Page 148: ...in turbo charger Damaged piston cool ing nozzles Petrol in diesel oil Change damaged nozzles Effect Cause Troubleshooting Action Dilution of oil in sump Unburnt fuel passes the piston Defective injec...

Page 149: ...urized 10 bar oil on the oil side 0 5 bar air on the water side im mersed in water 25 27 C Defective cylinder head gasket Crack in cylinder head not cracks between valve seats If the fault is hard to...

Page 150: ...covers or at the camshaft bear ing there is probably a crack in one of the cylinder heads As a rule it is possible to see which cylinder head or heads are leaking Change the cylinder head for a exchan...

Page 151: ...the correct size Check the bearing seats be fore assembly Excessive play in big end and main bearings If the bushing slides all the way out of the bear ing seat the oil pressure warning lamp will com...

Page 152: ...oil pump Clogged oil cooler Loose screws in timing gear s intermediate gear Gauge indicates low pressure at maxi mum speed but not at idling speed The main oil duct to piston cooling nozzles plug in t...

Page 153: ...ntervals Defective injector causes oil film to be washed off High oil pressure Engine warmed up Gauge indicates high pressure Incorrectly adjusted oil relief valve 1 shim 0 2 bar Piston in oil relief...

Page 154: ...sure is extremely high and could cause injury Individual injectors not operating Fan imbalance Flywheel has come loose Crankshaft hub loos ened Abnormally worn main bearings Vibration or unusual noise...

Page 155: ...olant Clean the cooling sys tem and fill up with coolant as described in the maintenance instructions Effect Cause Troubleshooting Action Leakage in suction pipe Leaky overflow valve Air in fuel syste...

Page 156: ...r heads Heat the cyl inder heads before pressurizing them Water has entered the engine via the exhaust intake system Crack in water cooled exhaust manifold Injector open Knocking noise Exhaust valves...

Page 157: ...ecting the delivery pipes as the pressure is extremely high and could cause injury Broken delivery valve spring after injection Connecting rod bear ing seizure Faulty injector seized worn incorrect or...

Page 158: ...ture too high Unclean intake air Poor grade of oil Individual piston rings broken incorrectly fitted Several upper rings broken start spray used wrongly wrong injection timing too early Several interm...

Page 159: ...ting rod Check the compres sion Take compression readings on a hot engine with all injectors removed at starter motor speed Check cylinders 1 6 then cylinder 1 again Check that starter motor speed doe...

Page 160: ...in closed position Check density and vis cosity Check charge air pres sure Check the vacuum before the turbocharger max 500 mm wc Check the air filter Check blow by in crankcase Correct value for new...

Page 161: ...drop in the external cooling system Clogged radiator Instrument shows high temperature Reduced coolant flow Check that sensor and instrument suit each other 120 and 150 C Check with a separate instru...

Page 162: ...Turbocharging pres sure enters cooling system via leaking charge air element Test pressure air 0 5 bar liquid 4 bar Crack in cylinder head not cracks between valve seats Cracked cylinder liner If the...

Page 163: ...ause Troubleshooting Action Boiler scale on engine heater Short service life Incorrect mixture or type of glycol and or corro sion inhibitor Anti freeze with phos phate based inhibitor must not be use...

Page 164: ...max 1000 mm wc Check silencer spark arrester length and inside diameter of exhaust pipe Check change gaskets Recondition change turbocharger Check clean High exhaust temperature Effect Cause Troubles...

Page 165: ...e Troubleshooting Action Normal charging voltage 27 28 V Broken alternator drive belt Slipping alternator drive belt Batteries in poor condi tion Alternator fault Voltage regulator fault Battery charg...

Page 166: ...rate 60 100 l min Closed crankcase ventilation 50 20 mm wc Leakage in manifold joint Leaky crankshaft seal Leakage at liner seal via overflow hole in cylin der block Defective cylinder head gasket Low...

Page 167: ...y in turbocharger Loss of power Hole in piston crown Bearing seizure in turbo charger Oil seepage via pistons liner Oil seepage in air com pressor Increases when white smoke limiting device is engaged...

Page 168: ...SHOP MANUAL MT26 31 06 2005 Engine Tier 3 710655 Ch 1 page 168...

Page 169: ...Engine SHOP MANUAL MT26 31 06 2005 Tier 3 710655 Ch 1 page 169 Note...

Page 170: ...SHOP MANUAL MT26 31 06 2005 Engine Tier 3 710655 Ch 1 page 170 Note...

Reviews: